Observations
  • Home
  • Observations
  • Trendcasting
  • Odds 'n Ends
  • Science/Technology/Experiments
  • Mental Health

Images made with Turmeric: The Spice of Life...

4/30/2016

4 Comments

 
Picture
Two videos below:

This post entry is based on my attempts to develop a photo bleachout system that is easy to use, educational, and fun. However, the final results so far have been a work in progress; but, there are some very interesting details discovered along the way that can become a good idea starter. So, I will share what I have done so far and hopefully others will help to add to the process disclosed. I am very well acquainted with failure and learn from each misadventure and eventually succeed.
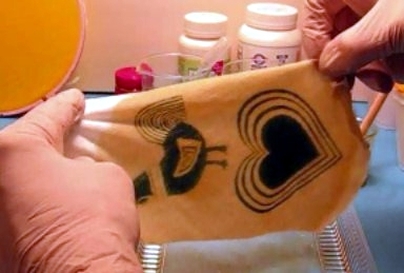
This project is based on Turmeric, an Indian spice that has been used as a dye for over 2000 years. Sometimes spelled tumeric, it contains Curcumin, (3 to 5%), a polyphenol which reacts with boron under specific conditions to form a dye called rosocyanine. This test has been in use for about 100 years and the complex formed between the yellow Curcumin and the element boron forms the red or orange-red dye rosocyanine, which is a green crystal when isolated. This process has its early roots in 1842 when John Hershel began working with plants to form bleached out images. Called anthotypes, the process never really caught on as the images were generally of poor quality, took a long time to obtain, and did not last when exposed to light. But, all of the photosensitive materials were derived from plants. There is also evidence that turmeric was used and even an obscure article in Photophysics used a boric acid spray to develop the image. But, to my knowledge there has not been any attempt to enhance the image or make a permanent image as I am attempting to do with the sodium hydroxide and alum. 
The materials used in this project are readily available locally either at the super market, hardware store, or garden center. The concentrations are low so the process is fairly safe. But, Turmeric is a strong dye and can stain whatever it comes in contact with so be prepared. The entire process and materials and processes will follow the video.  If you watched the video on YouTube just skip to the second video and the instructions below:


Procedure:
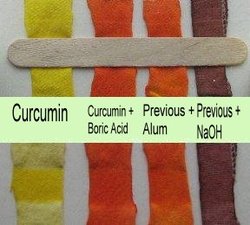
First, prepare the Curcumin tincture from the turmeric (available in the spice section of most markets) by adding about 1 gram of turmeric to 100 milliliters of 91% isopropyl alcohol.  Curcumin is not water soluble so will dissolve in the alcohol. The remainder of the turmeric will settle to the bottom and should be discarded. This can best be done by filtering through a coffee filter but can be simply decanted into a clean container and the sludge discarded. CAUTION: The Curcumin will stain any porous surface so work on a well protected surface.
Second, prepare a solution of boric acid by adding 4 grams of boric acid (ant and roach powder available at hardware and garden centers) to 196 milliliters of water. Stir until dissolved.
Third, prepare a solution of sodium hydroxide (lye or drain cleaner from the hardware store) with 4 grams sodium hydroxide to 196 milliliters of water. Stir until dissolved.
Fourth, prepare a solution of alum, potassium aluminum sulfate, (available in the spice section of the market or garden center as it is used in pickling food) with 4 grams alum to 196 milliliters of water.
Note: These are all 2% solutions, and are not critical, and close is close enough!

Picture
Notes:
This is the light stability image after 2 weeks in the sunlight. Not too bad but still not completely permanent.
The fading of the final image in video 2 was in the sodium hydroxide solution for about 10 minutes while I changed SD cards. But, the image should be removed as soon as it is developed to avoid the fading.
I hope that you get involved and can add to the information and most of all, have fun! Ken.


4 Comments

Laser Printers and the Tiny Yellow Dots...

12/26/2015

5 Comments

 
Picture
Video Below:
Is it possible for a simple home color computer printer or copier to be a tool to invade our privacy? The answer is yes and it has been occurring since the 1980’s! Here is the way in which I have determined that it happened and why the practice is not on everyone’s mind.
In the late 1980’s and early 1990’s laser color copiers were becoming not only popular, but they were providing clear and very accurate photo copies. The government, particularly the treasury department was concerned that it would become easy for counterfeiters to locate linen paper and produce good quality money. So, they either asked, or more likely told manufactures to come up with a way to identify every printer that they made with a code to track the manufacturer, date of the print, and by extension, who purchased that machine. And so the system was developed to place very tiny yellow dots in a code that could be read perhaps by an overlay or an algorithm. But the real question is that once the threat of phony money passed, why would the government continue wanting to track information on us? Because, that is what they do best! Perhaps if someone printed and distributed “dangerous” material or leaflets they could be tracked. But why invade the privacy of the rest of us when there is no law or legal basis to do so? 
So, be aware that big brother is watching and if you by a copier or laser printer with a credit card, you are easy to track if the images produced go anywhere in the public space. One experiment that I have yet to try is to find a color laser print online and see if that contains the yellow dot signature. Even with cash, the purchase is bar coded and theoretically could be tracked. One thing that we can all do is email the printer manufacturers and tell them we will stop buying their merchandise and spread the word. Or, just print everything with black printers only.
The Electronic Forum Foundation (Here) is running an experiment to get as many readers to submit samples to decode and identify which printers are coded. I inadvertently referred to them in the video as the Freedom Foundation because to me they are trying to protect our digital freedom. But the link will be clear.
Below are the photographs, video, and a link to my video covering the conversion of a webcam to a microscope (Link Here). (For the video, the webcam was defocused by about two turns to move the lens farther away from the image element). Enjoy and please comment as always.


Picture
Picture
5 Comments

A Treasure Trove of Electronic Projects and History...

9/24/2015

0 Comments

 
Picture
At one time there were a fairly large number of magazines that featured amateur and hobby electronic projects. This began long before the internet and its deadly impact on print publications. But in the long history of DIY electronics, Popular Electronics was a really big deal.
There was an interesting convergence of events that led to the extreme popularity of home electronic projects. First, there was the invention of the transistor in 1947 at Bell Laboratories. Second, Heathkit began selling kits to the general public so that they could build everything from oscilloscopes to robots! Heath actually began in 1912 selling aircraft parts but recognized the post-war economic growth and came to the table with a very successful business model. But it was apparent that there was a market for wide scale dissemination of electronic projects and technology was moving quickly. And, Popular Electronics began to fill that need.
Of course there were magazines that covered electricity and particularly, radio. After the widespread introduction of radio broadcasting, the field of radio transmission expanded to include amateur radio and related interests. The early 20th century was a great time for beginning experimentation. But, it was a time that had somewhat of a limited focus, and in time, that would change.
In 1954, Ziff-Davis Publishing introduced the world to Popular Electronics, a monthly magazine with electronic projects, access to parts, (by mail of course), and ideas to stimulate the budding hacker. It was the “World’s Largest Selling Electronics Magazine” with a circulation in 400,000 by 1963. A competitor, Rival Electronics World, merged with Popular Electronics in 1972. The magazine underwent some changes in name and then ceased publication in 1985. But, it was bought by Gernsback Publications and came back in 1989. But, once again the magazine stopped publication in 1999. And like the Phoenix Rising, it ended with the name Electronics Now, and its final issue was in 2003.
 But, the story actually has a good ending as there is now a complete archive of all of the issues over the entire time span of the publication’s life. All issues are available in PDF's complete with advertisements. But, be careful when ordering as many of the companies are out of business! The link is here. Time to warm up the soldering iron!


0 Comments

Embossing Powder Made at Home...

5/9/2015

280 Comments

 
Picture
Update 4 August 2015: There is now a composite image showing the extracted polymer ( in these examples the polymer came from a floor finish from Holloway, sold at Walmart) with pigment inks, and color experiments with the colorless Versamark ink after the second video. This photo and effort is provided by Kristina Roberts, who has shared her work with our community. Thanks, Kris! Please check the comments for Kris's work with this alternative polymer.
Two videos below: Video 1 shows the results and video 2 illustrates the process.


Thermography is frequently considered to be raised printing typically used for business cards, wedding invitations, and other decorative printed material. The process provides a third dimension of height. The procedure is essentially the use of a slow drying ink, a thermoplastic polymer, and a source of heat. The wet ink receives the powdered resin and is heated until the polymer flows and adds the dimensional effect and becomes solid again. Raised print is also useful in the production of Braille in place of punched indents. Although a fairly mature industry with its beginnings in the early 20th century with copal or varnish resins, there are new uses being discovered. For example, the rubber stamp process has been adopted by crafters and has become a billion dollar business. It has become an “at home” art form with cards, scrapbooks, and new areas of artistic expression. The companies in this business now sell several kinds of ink, embossing, (thermoplastic) powders in many colors, and other peripherals to make the hobby easier and more versatile.
I became interested in the polymers used in the thermographic process but found very little in the literature and patents. There is an abundance of information on the equipment used but most of the embossing powders are proprietary and even the MSDS literature was of little help. I was fairly sure that someone had made some of these embossing resins at home but a search turned up no process. Additionally, after reading several crafting blogs it seems as though there was a desire to find such a method that was easy to do at home and used readily available materials. After many failures and frustrations I have been able to extract a clear embossing powder from a common floor finish. Since this in an open source website I welcome comments and community additions and suggestions to improve and refine the process. Here is the recipe and the two products required for the extraction of clear embossing powder:

Pledge Floor Care Finish, 798 ml (27 fluid ounces). This was called “Future” until 2008. It is manufactured and sold by S C Johnson. Follow any cautions listed.
Distilled White Vinegar.
Procedure: Add 2 parts of cool water to one part floor finish in a disposable container and not one used for food. With stirring, add vinegar slowly until the polymer becomes thick and very easy to see. Stop adding vinegar at this point. Pour polymer into a sieve or funnel/coffee filter and drain. Return the drained polymer into the original container and add water as a rinse. Drain and transfer to paper towels, spread material and allow to air dry. Reduce particle size by placing dry polymer into a sandwich bag or Cling wrap and apply pressure to make a powder. If a finer powder is required, pass the particles through a dryer sheet as shown in the video.
How it works: The acrylic floor finish is a stable emulsion and is stable due to the fact that the emulsion is kept at a pH of greater than 9. Remember that a pH of 7 is neutral. When we add vinegar that has between 3 and 9% acetic acid, the pH of the emulsion goes down and the polymer precipitates out. The variability of the acetic acid content is the reason that there is no fixed ratio stipulated.
There are other alternatives to consider but they all have limitations. Laser toner is useful but there is no colorless toner and the colors are very limited. Powder coating for metals is an option but very expensive and not generally available in small amounts. So, this project is an alternative material to the commercial products and it is a lot of fun to make your own!


Picture
280 Comments

Dextrins and Alcohol...

3/26/2015

2 Comments

 
Picture
This is a companion post to the one on Palcohol (powdered alcohol) on the Trendcasting page. It deals with the science of powered alcohol and how the product is most likely manufactured. I use the word likely as the product is proprietary and the formula is considered secret. But, we all know that proprietary never stops anyone from trying to figure out how it is made. In August of 2014, Paul Adams authored his method of making alcohol into a powder product in Popular Science, here. Other attempts have been made with varying degrees of success. But all of the ideas that I have seen use dextrin in one form or another as the starting point.  And, that makes sense as dextrin is considered a safe material and can absorb liquids to some extent. The first patent to use dextrins to absorb alcohol for mixed drinks was issued to General Foods in 1974. (On Google Patents search 3,795,747).
Dextrin is a type of low molecular weight carbohydrate produced by modifying starches. The starches can be selected from corn, potato, or even tapioca. These starches are treated by various enzymes or acid hydrolysis and form a starch-type sugar. They are all water soluble but have some very distinct characteristics. In the Popular Science article, the author used a relatively easy to obtain maltodextrin. But, he also suggests that a cyclodextrin might be a better choice. And, he is absolutely correct with that assumption. We can think of maltodextrin as a one dimensional powder that has some fur-like extremities that absorbs fluids and is used in the food industry to soak up oils. It is a short chain starch sugar and is used as a food additive as well. It can be sweet like a sugar or have no taste at all. Cyclodextrin is a totally different and is also called a cycloamylose, made of molecules bound together in a ring. But, cyclodextrins have a neat little trick that makes them ideal for making alcohol into a powder.

Picture
You really don’t have to know anything about chemistry to understand why they work so well. So, if you want to, disregard the OH (hydroxyl) and O2 (oxygen) symbols just look at the shape of the material. It is a toroid and allows some materials to be trapped inside! The interior is favorable to somewhat hydrophobic (water incompatibility) materials like alcohol. But, the exterior is hydrophilic (water compatible) and dissolves easily in water. Of course this is a simplified description and does not allow for arguments about alcohol and its polarity. But hey, we are after all making powered booze.
Cyclodextrins are becoming more readily available so there will be more homemade alcohol powders in the future. Whether or not the packaged alcohol even makes sense will be determined by consumers.


2 Comments

Coffee with White Clumps and a Bioplastic...

2/7/2015

0 Comments

 
Picture
If you add milk to coffee or tea you may have noticed small white clumps floating around the surface and wondered what they were. And although they are not desirable, they may offer no more than a harmless appearance. On the other hand, it may indicate milk that has become spoiled. But, there is a fair amount of chemistry involved in the formation of these little clumps. So, let’s look at what happens in your nice hot cup of coffee.

Milk is a blend of several naturally occurring ingredients including fat, protein, and sugar. Milk is a colloidal suspension which simply means that the fat and protein molecules are very small and are floating around freely and not attached to each other. The light is refracted in this colloid and that is why it appears white. We can consider the protein molecules (casein) to be a monomer that can potentially be attracted to each other to become a polymer. There will be more on the polymer later in the post.

So, in milk the casein molecules are floating around individually and naturally repel each other. But, if the milk becomes more acidic (lower pH) the casein molecules attract each other and begin to clump or curdle. They separate from the liquid portion now called whey. And, as in most chemical reactions, increased temperature accelerates the clumping. But that fails to explain how the milk becomes more acidic.  All milk whether pasteurized or not contains bacteria. It is harmless and just swims around doing something that can change the milk over time. Hence, the “sell by” or “use by” date on the container. The bacterium slowly eats the natural sugar in milk called lactose. One of the byproducts of the bacterial feast breaks lactose down into lactic acid and the pH drops. And, as the pH drops the clumps increase, and the milk will spoil. Actually, it is the smell of lactic acid that indicates spoiled milk. So, if the clumps are only sporadic in number and the milk smells normal, it is fine to use the milk. But, it is an indicator that the milk is on the way over the hill! But, the good news is this is exactly how some cheese is made. The milk is heated and an acid is added like vinegar or lemon juice and the curd is separated from the whey. But, what about the above mentioned casein polymer?

 Well, as the lactic acid forms the curds, the individual casein monomers unfold and reassemble in a connected chain forming a polymer or plastic. When the curd is kneaded and the water removed, the mass can be molded and shaped and will become hard. But, it is very biodegradable and will break apart with water. However, chemists in the early 1900’s discovered that they could make a more permanent and functional product by washing the curds in a 5 % solution of formaldehyde to cross link the polymer. These products (referred to as the Galalith process) were sold as buttons, fountain pens, and other decorative items for over 70 years. So, with milk we can make butter, cheese, yogurt, and pour it in our coffee and cereal!

If you want to make your own bioplastic from milk and vinegar, just search “casein plastic”, or “milk plastic”. There are multiple sites to show you how. Got Milk?


0 Comments

AAAA Batteries from 9 Volt Battery...

12/17/2014

1 Comment

 
Picture
Video Below:

We are all familiar with the range of alkaline batteries in all of their sizes, voltages, and capacities. The most common of these portable storage devices are the D, C, AA, and AAA. But, there are less well known types used as well. Type N is fairly common but not as popular. Another one that is widely used but less frequently available is the AAAA (LR61) or usually called the quadruple A. These smaller than AAA cells, are used in computer styli, laser pointers, LED flashlights, and headphone amplifiers. I use them when I need a smaller physical battery than the AAA but with reasonable milliamp/hour capacity. But, I have never bought one! They are not generally available in local stores, so some time ago I found that the Duracell 9 Volt batteries had six quadruple A batteries inside. So, the resulting video shows how to extricate these little gems easily and save some money as well. I have not tried other alkaline 9 volt batteries but some may be identical. If you have found other sources of batteries with these cells please comment.


1 Comment

Ballistic Gel for Pellet Guns...

11/21/2014

1 Comment

 
Picture
I recently had the opportunity to have contact with a reader who had hosted a guest post, (Growing Mushrooms at Home), snoman8. But, it was about an experiment that I posted almost a year ago on Reusable Molding Material. (Here)  He wanted to try this experiment with a pellet gun as the ballistic gel. My suggestion was to use the initial formula but to reduce the glycerin by about 50 % to more closely resemble human tissue (Photo above courtesy of snoman8). To my surprise the formula worked very well and comes close to the standard from the INS National Firearms Unit. The most commonly used formula is a 10 % ballistic gelatin which is prepared by dissolving 1 part of 250 bloom gelatin into 9 parts of warm water by mass. It is then chilled to 4 C (39F) for use.
Ballistic gel has been used for many years as a substitute for human muscle tissue and the effects of projectiles causing wounds. The material used is based on gelatin and the formulation is standardized against swine muscle tissue which is close to that of humans. Here is the formula used by snoman8 and the relevant data:
14 grams gelatin, 70 ml water, and 35 ml glycerin. The mixing process is identical to the video in my post listed above and really should be replicated for the best results. The completed material was molded in a plastic container 3 inches by 2 inches (76 mm X 58 mm). The pellet used is a .177 caliber lead shot from a distance of 10 meters (32 Feet). The muzzle velocity was approximately 400 ft/s. The pellet traveled 2.75 inches (69 mm) through the 3 inch direction.
My sense is that the use of glycerin as a plasticizer is perhaps a better choice than with gelatin alone and the completed gel is reusable by heating and recovering the pellets. As always, comments and questions are welcomed and a special thanks to snoman8 for his effort in expanding information…


1 Comment

A Toy to Demonstrate Biomimicry...

10/2/2014

0 Comments

 
Picture
Video Below:

Biomimetics or biomimicry is the imitation of the models, systems, and elements of nature for the purpose of solving complex problems. More simply, it is the adaptation of the natural movement and habits of plants and animals to solve human problems. A good example of this adaptation is the loops and hooks of the popular material Velcro. It mimics the action of burrs and the way they stick to each other. Almost everywhere we look in the natural world we can see models worth copying. From the way snakes use serpentine movement and muscle contraction, jellyfish propel themselves, and the action of light on plants to provide growth, we are surrounded by fascinating motion and function.
One of the earliest attempts at replication was the flight of birds. I can imagine that the very earliest humans on the planet must have wanted to fly. Over 400 years ago, Leonardo da Vinci designed many types of flying machines using birds for his inspiration. One of the most popular was the ornithopter, which is the basis for the toy in the attached video. In the 1980’s a French patent was filed by Brevet with the design for this toy bird that also has US patent coverage. You can see the patent at Google patents under 5,163,861. (Best to copy and paste). I have been fascinated by biomimicry for a long time and thought that this toy was a good example of the process. Enjoy the video and the close up photo of the mechanism.


Picture
0 Comments

Under The Dome With Wasps...

9/5/2014

4 Comments

 
Picture
Video Below:
I have found over the years that watching insects and by following the movements of various species, that a great deal of interesting behaviors can be observed. For this post I have been following wasps, (from the order Hymenoptera) to see if I can alter the activities of the colony. Wasps, in many parts of North America are called yellow jackets, and are very different from bees, particularly the honey bees. While bees are typically docile and collect nectar that in turn pollinates plants, wasps are parasitic and live on insects. They do inadvertently pollinate plants to some degree as they also seek nectar as a supplemental food source when they become adults. They like corn as there is a great deal of available sugar. And, they are extremely aggressive and will swarm to sting any intruders or threat to the colony. I accidentally found this hive in an abandoned hole left by a gopher or other digger. It happened to be right next to my corn in a raised bed. When I went to pick some corn they attacked and I slowly retreated. I was surprised as wasps typically build hives in protected areas and not in holes in the ground. But, I began to wonder if an altered entry would prevent them from normal colony activity. So, I modified a cylindrical transparent container and called it a dome as in the TV show, which I refuse to comment on! From the video you will see as I did that this colony was quite large and very aggressive. At one point there were at least 20 wasps around me or on me but I did not run or show fear so they did not sting me. Hey anything for science! Enjoy the experiment…


4 Comments
<<Previous
Forward>>

    Author

    The author has an eclectic background in chemistry, electronics, writing, mental health, and community action...Ken

    Archives

    June 2021
    March 2020
    September 2019
    August 2018
    August 2017
    March 2017
    December 2016
    November 2016
    October 2016
    August 2016
    April 2016
    December 2015
    September 2015
    May 2015
    March 2015
    February 2015
    December 2014
    November 2014
    October 2014
    September 2014
    August 2014
    July 2014
    June 2014
    May 2014
    April 2014
    March 2014
    February 2014
    December 2013
    November 2013
    October 2013
    August 2013
    July 2013
    June 2013
    May 2013
    April 2013
    March 2013
    February 2013
    January 2013
    December 2012
    November 2012
    October 2012
    September 2012
    August 2012
    July 2012
    June 2012
    May 2012
    April 2012
    March 2012
    February 2012
    January 2012
    December 2011
    November 2011
    October 2011
    September 2011
    August 2011
    July 2011
    June 2011
    May 2011

    RSS Feed

    Categories

    All
    Acid And Bases
    Amateur Scientist
    Anodizing Aluminum
    Anthocyanin Indicator
    Ant Orientation
    Artificial Intelligence
    Bar And Cr Code
    Cable Tie
    Carbon Dioxide Fun
    Catalase And H2o2
    Chemical Art
    Cold Cathode
    Color Hot Glue Sticks
    Common Chemicals
    Copper Plating
    Cyanotype/Blueprint
    Dot Com
    Electroluminescence
    Epoxy Art
    Experiments
    Hydrogels
    Infrared Photography Basics
    Magnetic Money
    Old Textbooks
    Photograms
    Science
    Static Electricity Detector
    Technology
    Yogurt