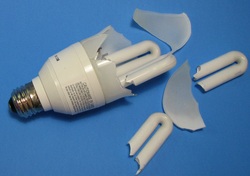
I had not planned to do this post entry, but when I accidentally dropped this compact fluorescent bulb, (CFL). I had to disassemble it to see what "makes it tick". Of course, I had a good idea about the technology, but had never taken one apart.
There have been two controversial questions about CFL use. The first was the much higher cost vs. cost of operation or efficiency, and the use of mercury in the bulbs. There are two types of CFL's, integrated, and non-integrated. The non-integrated are simply bulbs that can be replaced in an existing fixture with a ballast in the fixture. But, the type in the photo is an integrated type with the ballast enclosed in the base of the bulb. This configuration allows it to be placed in a fixture that was designed to accept the older incandescent type bulbs. The reason for replacing the incandescent bulbs is fairly simple, as incandescent bulbs take the mains voltage, 120 Volts AC in the US, and heat a filament in the bulb, and in the process, give off light. But, the bulbs give off more heat than light, and so, are very inefficient. They also have a relatively short life before having to be replaced. So, we have known for a long time that fluorescent technology is more efficient, but in the typical format that is a long tube with an external magnetic ballast, they had limited utility in the home. But, CFL's have changed that completely. So, what is a ballast, and how do they work? Lets take a look! The two photos below are from my broken bulb and show the ballast, and in the second one, the reason for probable failure. Heat!:
There have been two controversial questions about CFL use. The first was the much higher cost vs. cost of operation or efficiency, and the use of mercury in the bulbs. There are two types of CFL's, integrated, and non-integrated. The non-integrated are simply bulbs that can be replaced in an existing fixture with a ballast in the fixture. But, the type in the photo is an integrated type with the ballast enclosed in the base of the bulb. This configuration allows it to be placed in a fixture that was designed to accept the older incandescent type bulbs. The reason for replacing the incandescent bulbs is fairly simple, as incandescent bulbs take the mains voltage, 120 Volts AC in the US, and heat a filament in the bulb, and in the process, give off light. But, the bulbs give off more heat than light, and so, are very inefficient. They also have a relatively short life before having to be replaced. So, we have known for a long time that fluorescent technology is more efficient, but in the typical format that is a long tube with an external magnetic ballast, they had limited utility in the home. But, CFL's have changed that completely. So, what is a ballast, and how do they work? Lets take a look! The two photos below are from my broken bulb and show the ballast, and in the second one, the reason for probable failure. Heat!:
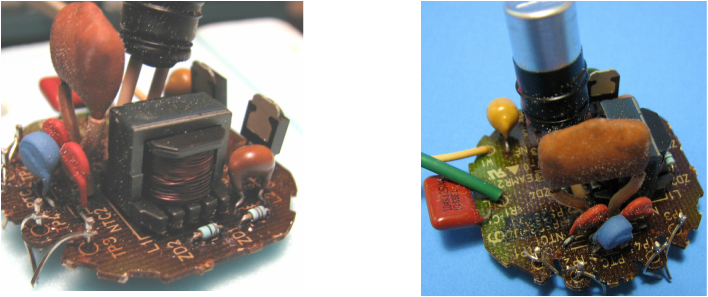
The electronic ballast found at the base of the CFL contains a small circuit board with diodes to rectify AC voltage to DC, a filter capacitor to smooth ripple, and usually two switching transistors, along with a toroid or transformer. The incoming 120 volts is first rectified to DC, then converted to high frequency AC by the transistors and the transformer to form a resonant DC to AC converter. This high frequency AC is fed to one electrode at each end of a glass tube or bulb. The bulbs contain an inert gas, argon, at low pressure. A small amount of mercury in the tube vaporizes, and causes it by ionization, to give off ultraviolet light. The inside of the tube is coated with a mixture of phosphors, which when excited by UV light, produces the white light. As a crude test of the phosphors, I illuminated the broken tubes with three types of ultraviolet light: UV A, B, and C, which is the UV found in germicidal lamps and has some dangers. With both UV A and B, I saw a pink color, and with UV C, it was white. Although not conclusive, the frequency of UV generated in the tube may be a special frequency of ultraviolet.
There are two points of interest that should be noted: The second photo above shows black areas that suggest exposure to high temperatures. This bulb was located in a recessed ceiling fixture and had very little air circulation. This will shorten the life of the CFL. They should have some open area to dissipate heat. The second is the mercury. Although the amount is small for each bulb, when several million are disposed of, the amount becomes more significant. Please recycle as the manufacturer suggests. The is a great deal of information on the web including Wikipedia, but there is a general article located here. Let there be light...
There are two points of interest that should be noted: The second photo above shows black areas that suggest exposure to high temperatures. This bulb was located in a recessed ceiling fixture and had very little air circulation. This will shorten the life of the CFL. They should have some open area to dissipate heat. The second is the mercury. Although the amount is small for each bulb, when several million are disposed of, the amount becomes more significant. Please recycle as the manufacturer suggests. The is a great deal of information on the web including Wikipedia, but there is a general article located here. Let there be light...

 RSS Feed
