Observations
  • Home
  • Observations
  • Trendcasting
  • Odds 'n Ends
  • Science/Technology/Experiments
  • Mental Health

Reusable Molding Material: Homemade...

12/7/2013

328 Comments

 
Picture
Two Videos Below:
Video 1- How to make the molding material.
Video 2- How to use the molding material.
Making and molding for duplication is a great way to replicate parts. It is a process that has a very long history and technology has made the molding and casting of many materials possible. And each process comes with some positive aspects and some negative ones. One of the most successful products has been the use of RTV Silicone, a two-part flexible elastomer that can be catalyzed by either a tin or platinum reactant. Mixed 1:1, and poured over the part to be copied, the results are typically excellent. It provides fine detail, de-molds fairly quickly, can be used to cast many times, generally requires no release agent, has high heat tolerance, and it is dimensionally stable. But, the advantages come with high cost, limited shelf life, and of course, it is not reusable. Once you are finished with the mold it is discarded. And urethanes are possibly the next most popular with casting enthusiasts. Despite the vast array of materials, none are really reusable. They are all relegated to the trash bin when they fail to perform satisfactorily or are no longer needed. But, I do have an alternative for your consideration.  It is a reusable, inexpensive, and very functional molding material based on gelatin as the elastomer, glycerin as the plasticizer, and water to form the colloidal suspension.
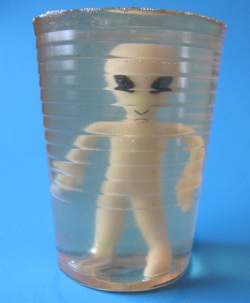
I have been using this molding material for several years and it was initially developed to secure cover slips to microscope slides. At first I used agar, but that was expensive and difficult to find locally. So, I tried gelatin and glycerin and it worked really well. I noticed that when poured on a flat surface, it formed a flexible film that acted like rubber, had a melting point well above room temperature, and could form a mold. So, I used it for small items and general castings. But recently, I decided to try and make larger and more complicated molds and cast with epoxy resin, paraffin wax, polyester resin, and Plaster of Paris. The results are promising but there is still a lot of experimenting to do. But, I think that by posting the process now, some of the readers will be able to add their information in the comments section and we can all work together to make a better process. The basic formula is shown in video 1 and it is very easy to make. Initially, the first time it is formulated, a stovetop is best as continuous stirring is required. It can be made in a metal pan as well as in Pyrex containers or glass beakers. Containers are easily cleaned with hot water. Once the elastomer is made, it can be reheated in the microwave oven using short times until you learn how much time is needed. For small batches, (40 ml), I use about 10 seconds. (In microwave acceptable containers, not metal!). The mix does not require boiling and seems completely dissolved at around 160 Fahrenheit, (71 Celsius). It sets to a rubber-like elastomer at room temperature and remains flexible. Its actual melting point seems to be about 130 F. The flexibility can be varied by using less glycerin for a firmer gel, and more for a softer material. Without using a gelometer, my best guess is that it can vary from about a 15 Shore A to a 40 Shore A, and that compares favorably with Silicone RTV.
In video 2, actual molding results are demonstrated with the advantages and some downsides as well. I recently discovered some commercial products that are reusable but I have not investigated them yet. I mentioned in video 1 that chocolate can be cast as well but that process requires a higher quality glycerin. The material sold in drug stores is not as pure as what is called food grade glycerin. That is 99.9 % pure. It may be available in markets locally, but is definitely available online.
Basic Formula:
20 milliliters room temperature water.
4 grams unflavored gelatin.
24 milliliters glycerin.
Mix as demonstrated in video 1. I have been using a 10 times batch that is about 450 milliliters. Please enjoy the videos and comment! Ken…


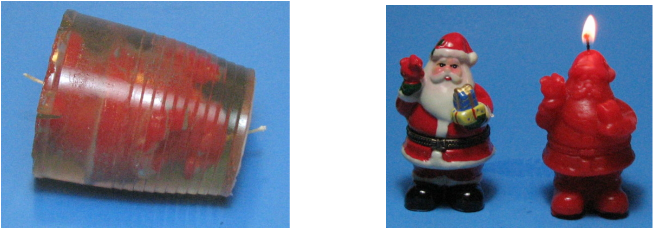
Well, it did work! I used paraffin wax and 1/2 of a red crayola crayon for the color. I did expect the dimension change as that is the nature of wax. I did also chill the mold. So, it is another use for this mold material. Try it!
Picture
328 Comments
dave smith
1/25/2014 10:10:57 pm

wow Ken that's so cool.just wot I need I haven't got a lot of money but I love moulding an experimenting an I wont to make some stuff for a market stall I was looking at that other reusable stuff but your stuff looks like it could even be the same proses its grate thanks so much for your info ken you made me a happy little vegimight that's Australian for very happy.

Reply
Ken
1/26/2014 07:40:02 am

Hey Dave,
Thanks for the comment and I hope that the process works as well for you as it has for me. If you start with small quantities it should not cost very much. Best of luck, Ken

Reply
Jasmine
12/10/2021 12:23:51 am

Hi Ken does the gelatin mould shrink with time? Many thanks!

Dominic Cangioli
7/14/2018 06:46:35 pm

Why does it have to be unflavored Gellatin ? What happens if the gelatin is flavored ?

Reply
Ken
7/15/2018 04:04:37 pm

The flavors, sugar, and color weaken the gelatin structure. Ken.

David
11/30/2018 05:59:13 pm

Hi Ken,
What is composimold bubble buster formula? Any idea? Vinegar & baking soda + water?? Composimold makes this stuff that your videos are about..remeltable, reusable gel but very bubbly.

Reply
David
12/1/2018 02:21:57 pm

Can we use vegetable Glycerin??

Reply
Jackie
3/8/2014 04:01:41 pm

Once I ave made the gel is it ok to use as a chocolate or sugar paste moulds? x

Reply
Ken
3/9/2014 12:44:21 am

Hi Jackie,
Yes, you should be all set to use in any molding procedure. You may have to chill the mold if the chocolate is really hot. But, I have successfully cast chocolate without chilling. Thanks for the comment and question. Ken.

Reply
Sindhu
3/25/2014 03:55:52 pm

Hi Ken,
That sounds great ! Can you suggest a vegan substitute for gelatin in this recipe ?

Reply
Ken
3/26/2014 01:31:30 am

Hi Sindhu,
Gelatine is an animal by-product and as such has no vegan equivalent but there are some possible substitutes. Copy and paste the link for some candidates. I have not used any of the materials listed in this application but I have used Agar as a biological growth medium. That would be my first choice for experimentation. If you are successful, let us know. Thanks for the question, Ken.
http://www.wikihow.com/Find-Gelatin-Substitutes-for-Vegetarians

Reply
Nicole
1/31/2015 04:38:37 pm

There is a product you can get here in Australia called gel-it-in, which is a gelatine product made from a corn derivative, so is vegetarian safe

Joe
3/23/2018 07:44:47 pm

Agar is a vegetable based gelatin.

Susey link
8/13/2018 03:47:37 pm

Thank you for your very detailed videos .. and am going to be doing some moulding tomorrow .. also apparently, Agar powder .. can take much higher temperatures .. I have ordered some from ebay .. as well as more gelatine .. will let you know how I get on with it all !!

Leighanne
6/3/2022 04:12:44 pm

Isn't pectin the fruit based version of gelatin?

commsnake
6/15/2014 04:57:49 pm

I've used a firmer mix than this for a year or two for casting terrain/bases for wargaming. A few drops of mouthwash or screen wash stops any problems with mold , i just keep my moulds in a box in the garage till I need to cast again. So far good after a year, with 20+ reuses

Reply
nubair
7/21/2015 03:42:51 am

i made it but it melts outside refrigerator. .. can u guide me plz

Reply
Ken
7/21/2015 08:41:28 am

Hi Nubair,
If the gelatin and glycerine are used in the ratios described, the melt temperature is about 130 F or 55 C. (20 ml water, 4 grams gelatin, and 24 ml glycerin). Unless it is incredibly hot there I would suspect that the amounts may be wrong. Hope that this helps, Ken.

Becky Hall
6/29/2016 11:48:57 am

Hi can you tell me what ratios and ingredients and process you use?

Reply
Ken
6/29/2016 03:37:47 pm

Hi Becky,
The ingredients are listed at the end of the write up and the easy process is covered completely in video one. Thanks, Ken.

Ian
10/25/2017 05:26:12 am

What is it you did to make it firmer please

Reply
Penelope
8/11/2020 08:26:23 pm

From Ken's written description: "Use less glycerin for firmer mold, or more glycerin for looser mold..." Interesting read and
I was happy to find that little tip!

marcus
6/22/2014 06:30:53 pm

hi, Ive been looking for a reusable moulding material for a while now... that is relatively cheap to make! I see you re-melt the material in the microwave... can it be re-melted in a pan on the stove!? because I want to use larger amounts.
Thanks...Marcus

Reply
Ken
6/23/2014 01:46:49 am

Hi Marcus,
Because this material has a relatively low melting point it can be re-heated on the stove using low temperature to avoid scorching. Even better would be a double boiler and let the water heat the material. Good luck and thanks for the comment. Ken.

Reply
Mike link
7/6/2014 01:04:28 pm

inert vegetable cellulose gel caps are vegan gelatin..

My question is could you use this for a face mold? I want to make a mold of my face but if the temp is to high then I need a alternative

Reply
Ken
7/7/2014 08:23:59 am

Hi Mike,
There are two problems with using this as a body part mold: The temperature is 30 to 40 degrees above body temperature and the mold would probably be too flexible without support. I would suggest an alginate life casting material that is readily available. Just Google! Thanks for the question, Ken.

Reply
tracey
7/15/2014 02:24:21 pm

hi bill
do you have a utube site with these videos
great work love it

Reply
Ken
7/17/2014 02:09:35 am

Hi Tracey,
I am working on putting some form of my videos on YouTube. It has been on my "to do" list. Thanks for the comment! Ken

Reply
marisa robson
7/28/2014 03:47:50 am

gonna try this right now! thanks so much for posting ken.

Reply
marisa robson
7/28/2014 04:54:10 am

wow it's so fast!!!! messed up my first batch completely somehow... put in way too much gelatine and the mold came out opaque... happy accident though because i REALLY like the results... smooth as glass and strong as silicone rubber.

second batch was too loose (what the hell is going on with my scale)

third batch i think i got roughly like yours was... in the freezer now.... but i think i may load it with more gelatine to try and get it like the first :) I'll let you know how the castings come out.

Reply
Ken
7/28/2014 08:37:16 am

Hi Marisa,
The good thing about this process is that it can be varied depending on the need as you have discovered. I hope that you have continued great results and projects. Ken.

marisa
7/28/2014 09:03:21 am

yip that became quite clear right away... at least in terms of the mould... i've filled a couple with clear epoxy ... gonna let them cure for about two days because it's winter here... i'm really hoping they come out glass clear... if they do, this will be my permanent moulding method :)

Reply
tracey
7/28/2014 10:08:07 am

hi ken if i make the mix and find out its not hard enoiugh ,can it be melted down and have some more gelatine mixed in with some water while its liquid form ,to firm or would this ruin it

Reply
tracey
7/28/2014 10:10:26 am

hi again ken , i have seen some people use your mix but with added honey what would the honey do

Reply
Ken
7/29/2014 02:47:40 am

Tracey,
I see no advantage to adding honey, and, as it has sugar, it will tend to become moldy without refrigeration. Makes no sense to me. Ken.

Deborah
11/2/2016 01:52:29 pm

Hi Tracey and Ken,
Loved the video, thanks Ken. Honey has antibacterial properties, but whether it would prevent mold from developing would be interesting to know. Honey also has a high viscosity so wondering if adding it might require adjusting the ingredient ratios.

Ken
7/29/2014 02:44:51 am

Hi Tracey,
I would take a small portion of the to soft mix and stir in the added gelatin without added water and let it swell. Then reheat the small portion with stirring to dissolve. Then add this to the main mix. Ken.

Reply
tracey
8/3/2014 05:11:30 pm

thanks so much ken , i i have just got hold of some Professional strength 300 Bloom gelatine , could you give me the measurements if using this stronger geltatine as i know i have to use alot less than normal
thanks again

Ken
8/4/2014 09:03:15 am

Hi Tracey,
The gelatin that I used is rated at 225 Bloom so the 300 Bloom will provide a stiffer gel than the 225. The Bloom number is simply a test to find how deep a 1/2 rod will penetrate the hard gel. They measure how the rod separates the gel and how far it enters. I would guess that you could use the same proportions and you will get a stiffer gel. If it is too stiff, try a 25 % reduction of the 300 Bloom. That should give a reduced stiffness but it may be what you desire. But, please let us know how it works for you and we can all learn. Ken.

marisa
7/29/2014 11:46:29 pm

well that was weird... demolded clear epoxy last night - usually comes out water clear but it was ... milky? waxy? it almost looks like something in the mold (gelatin or glycerin or moisture actually leeched into the epoxy)


anyhoo... heartbroken a little... i lurve this goop so i'm going to try a mix just with water and another just with glycerin... wish me luck :)

Reply
Ken
7/30/2014 02:40:26 am

Hey Marisa,
This is one experiment that I did not do as I usually color my epoxy, but I think that your observation is important for other users. Did you try buffing to see if it is a surface problem? Was there a possibility of water or condensation when you poured the epoxy? What happens if you pour a second copy? Does the same problem exist?
I have set-up some experiments using a true casting epoxy and a clear adhesive epoxy to see if I get the same problem. Let's see if we can determine what is happening to inform other users. Don't be heartbroken yet! Ken.

Reply
marisa
7/30/2014 04:33:52 am

haha thanks ken... but in my world heartbroken simply means adjust and carry on :)

I agree that the observation is important ... i'm kinda hoping we can all find a solution together, worst case scenario being... i'll just try painting a thin caulking layer onto the original before bunging in the jelly ... the white cloud happened in both my molds (i did one according to recipe and one with pretty much equal parts water / gelatin) ... it wasn't surface - it went about two mm in below the surface... i actually cut some of the resin off the piece just to see... really it almost looked as though it had been cast in a white plastic that had transparent bits swirled through it.

I didn't buff it because on clear resin that tends just to make it frosty while glazing it covers a multitude of cock ups... but no... it just became a shinier waxy white lol

it actually seems to have dyed the resin! so weird.

I wondered about water... i doubt it though... yes the mold was dry, the mold also had a mold release on it... and usually in contact with moisture (yes i've been there), epoxy will bubble and even foam... but this, i've never seen before... which is why i thought it could be because of the glycerin.

Re second copy... i'm going to do that... but i want to wait a few days say about three days ... and then i'll cast another piece... maybe the material needs to stabilise in some way.... although it looks and feels pretty stable.

I have set-up some experiments using a true casting epoxy and a clear adhesive epoxy to see if I get the same problem. Let's see if we can determine what is happening to inform other users. <---- awesome :)

here's the weirdest thing of all though... looking at the resin IN the molds it looked completely clear... the minute i lifted it OUT of the molds... the white appeared... the surface of the piece is in no way damaged... fine hairline imperfections picked up by the jelly were on the moulded piece... just in white o.O


i'd love to know what happens with yours

Reply
Ken
7/31/2014 08:40:17 am

Marisa,
Here are the results so far: The adhesive epoxy, (Devcon, 5 minute cure time) had no surface imperfections and was perfectly clear.I used no mold release on this. The true casting resin (EasyCast, 24 hour cure time was a bit different. On one sample I used mold release (Silicone as in the video) and the other no mold release. The results were that both were slightly clouded but not white or discolored. I have a very general hypothesis based on these preliminary observations. Glycerine is a polyol or sugar alcohol and may be able to penetrate the epoxy before being fully cured. In the adhesive mold there was only 5 minutes for the cure so it did not have time to penetrate the surface. There is more to do but that is what I have so far. Ken.

Reply
marisa
7/31/2014 09:48:05 am

Excellent, Ken - thanks so much for sharing! I'm a little snowed under workwise at the moment but I'll make one from pure gelatin and see if i get better results- i'll also cast in some 3 hour cure time polyurethane and see how that comes out... here's to ongoing collaboration!

M :)

marisa
8/2/2014 09:29:17 am

hi ken... just cast a couple of experiments - firstly my two molds from the other day (they've had a couple of days to get dryer) and a brand new mold made of nothing but gelatin just enough water to make the gelatin ball before melting it... my god those edges are crisp it made an absolutely awesome mold.... but the resin is turning cloudy in it... go figure... it's been in there for about two hours and i can actually see it happening this time.

maybe more glycerin is the answer.... maybe oil? olive or whatever... i'll let you know as soon as i have some answers :)

m

Reply
Ken
8/3/2014 09:12:00 am

Hey Marisa,
I also did some tests based on your comments about the gelatin only mold. I poured some epoxy on a thin film of water in one test, and onto a silicon sheet with some perforations with water underneath in the second test. In both, there was significant clouding. The one with the perforations was clouded where the holes were. And, although epoxy is hydrophobic, there appears the be serious interaction with moisture. The only remaining candidate would be the mold release if you used any. I guess what is perplexing to me is that I re-examined my earlier dyed casts and there is no evidence of surface contamination. I am truly at a loss to think of other possibilities. Ken.

Reply
Gail
11/25/2018 04:17:18 am

Hi Ken,
I just love playing and trying out different things, so thanks for your video and all the information.
Could the clouding in the epoxy not be caused by the release agent? Some epoxies will set under water but (I think) most of them would not like being in contact with other chemicals before setting.

marisa
8/3/2014 11:34:42 am

Hi Ken,

yip i've also pretty much come to the moisture conclusion... so sad. love those molds so much.

I'm going to go ahead and try with LOTS of glycerine (because it attracts moisture, the internet tells me... which means MAYBE it'll keep it away from my epoxy) plus i'm going to leave those moulds be for about three weeks this time... and then try again lol (never say die)

Reply
marisa
8/30/2014 09:14:49 pm

hiya ken,

just to report back... i've let the molds sit for a while and tried another casting in them on thursday night... yip, the 24 hr set resin still turns cloudy... eh well... it was fun but no banana.

i think i also mentioned having made moulds with almost equal parts of gelatine and water? also with very little glycerin... those turned hard... might be interesting to make stuff out of that material it's surprisingly durable :)

anyway... thanks again for your post and for sharing your info

Reply
marisa
8/30/2014 09:15:00 pm

hiya ken,

just to report back... i've let the molds sit for a while and tried another casting in them on thursday night... yip, the 24 hr set resin still turns cloudy... eh well... it was fun but no banana.

i think i also mentioned having made moulds with almost equal parts of gelatine and water? also with very little glycerin... those turned hard... might be interesting to make stuff out of that material it's surprisingly durable :)

anyway... thanks again for your post and for sharing your info

Reply
marisa
8/30/2014 09:15:11 pm

hiya ken,

just to report back... i've let the molds sit for a while and tried another casting in them on thursday night... yip, the 24 hr set resin still turns cloudy... eh well... it was fun but no banana.

i think i also mentioned having made moulds with almost equal parts of gelatine and water? also with very little glycerin... those turned hard... might be interesting to make stuff out of that material it's surprisingly durable :)

anyway... thanks again for your post and for sharing your info

Reply
marisa
8/30/2014 09:16:08 pm

urk... sorry about that... your server told me it wasn't posting lol... feel free to delete :)

Chris
8/10/2014 05:02:16 pm

Excellent videos, Ken. I watched a video on Youtube this morning and the guy didn't use any water. Just the glycerine, and gelatine. Have you done a batch without water? If so, is there any difference?
Also, I see you have the automobile repair resin in the background of video two. Was there any success with that product? Thanks!

Reply
Ken
8/11/2014 09:32:16 am

Hi Chris,
The material made without water tears very easily and is not really suitable for mold making. It is used for special effects. The water adds some hydrogen bonding to provide a stronger and more flexible colloid.
The resin is a polyester and is cured with methyl ethyl ketone peroxide that comes with the resin and is designed to work well with Fiberglas. It is a good casting polymer as well but is amber, not clear. It is also more exothermic and the mold should be chilled before pouring the resin. Thanks for the questions, Ken.

Reply
Chris
8/11/2014 02:15:22 pm

Thanks Ken! Excellent to know about the water, and being able to chill before using the urethane and resin that give off heat..
I wondered how the polyester resin worked as I've have very little success with that type unless I was doing car repairs. Even with silicone molds and pressure casting, I rarely get a decent cast (sticky).

tracey
8/12/2014 03:54:04 pm

hi bill
do you have a recipe to make food grade silicone
i would love to make my bigger molds in silicone
and leave smaller ones to the gelatine molds
anyone have any recipe for food safe silicone would be grateful regards tracey

Reply
wendy
8/17/2014 10:29:14 am

hi there everyone , i too would love to have a recipe to make my own silicone moulding material thats pourable , made with cornflour and silicone
anyone have the method ?

Reply
WENDY
8/27/2014 10:16:38 am

hi ken any chance you hAVE iddeas about my previous msg hi there everyone , i too would love to have a recipe to make my own silicone moulding material thats pourable , made with cornflour and silicone
anyone have the method ?

Reply
Ken
8/28/2014 03:31:38 am

Hi Wendy,
I am making an assumption that you are referring to oogoo, which is 100 % silicone caulk and cornstarch. The key is "pourable" and that requires a suitable solvent for the silicone. Most of the solvents used are flammable like xylene and lighter fluid "naphtha". I have had some success with this approach but it requires some experimentation. Here is a link to copy and paste to get you started. Good luck and let us know how it works for you. Ken.
jamesgregson.blogspot.com/2012/12/pourable-oogoo.html

MyGlo Designs link
8/27/2014 04:10:55 am

I have been casting with easy cast for around five years now and tried this out before. No luck. I tried using different oils, chilling, and even fillers with no luck. I have even tried out melting fishing lures in the past, and that just turned out weird. Keep up the hard work everyone, and maybe someone will stumble on a simple home made molding material for resin eventually:) appy crafting!!!

Reply
Ken
8/27/2014 08:49:12 am

Hello,
I am not sure why you are having problems with the EasyCast resin as I have used it successfully many times. With the silicone spray release I have seen no problems without chilling as the exotherm is very low as it is a slow curing epoxy. I wish that you had experienced a better result. Ken.

Reply
Jason Messer link
8/28/2014 05:09:44 am

No problems when I use the molding products that are meant for it. Time is money and so I stick with what works anymore.

marisa
8/27/2014 08:50:26 am

oh good... don't feel so stupid now lol... my next experiment though, is going to involve candle wax ... just... putting it out there. :)

Reply
edward
8/29/2014 08:00:15 am

Have you tried this mold material with urethane casting resins?
Does the moisture in the mold have negative effects on urethane resins?
Thanks for your response

Reply
Ken
8/30/2014 08:56:40 am

Hi Edward,
I have not cast any urethane as it has been some time since I have had any to try. However, the water is bound to the gelatin and not really available to interfere so it should work well. Try a small sample and let us know. Thanks, Ken.

Reply
Edward
8/29/2014 09:40:26 pm

1) Can you scale your formula up to produce a gallon of mold material without a problem?

2) How many pulls do you estimate you can get out of a mold if the casting item has no undercuts only horizontal and vertical walls?

3) Any ideas on what to use as a casting resin to produce a semi-ridgid (moderately flexible) reproduction of an architectural trim piece approximately 4 inches wide, 36 inches long and 1/4 inch thick?

Any ideas will be appreciated ,,, thanks

Reply
Ken
8/30/2014 09:02:56 am

Edward,
The formula can be scaled up easily but I would do it in a couple of batches.I have not done more than 20 but I think that it may be capable of more but I am not certain as to the number of pulls. For a semi-rigid polymer I think that I would use a polyester and maybe use a Fiberglas filler. Ken.

Reply
Edward
8/29/2014 09:50:12 pm

Couple other things:

1) Since the mold is made with gelatin will it attract insects like ants during storage?

2) And any idea of how long the shelf life might be for a mold when stored at room temperature in a dark place like a closet?

3) And do the molds need to be lubricated to prevent drying out during storage ( vegetable oil - baby oil ) ??? - Do you think shelf life might be at least couple weeks or months?

Great videos and information ... Thanks in advance for your response.

Reply
Ken
8/30/2014 09:08:01 am

Edward,
I have had a large sample out in the open at RT all summer and there has been no insects, mold, or degradation. The water does not leave the material but I would cover the container with some Handiwrap to protect it just in case. Thanks for the comments, Ken.

Reply
Edward
8/30/2014 12:49:15 pm

So, no extra lubrication is needed during storage ... that's great.

Edward
8/30/2014 12:52:02 pm

I purchase some gelatin and glycerin today and I plan to give it a try before the week is up.
I will have to let you know how it all works out.

Thanks again for the great information you posted. I really helps a lot.

Edward
9/1/2014 11:34:43 am


Hello Ken,

I tried to make up a batch of Gelatin Mold making material today.

I scaled the recipe up to make approximately 5 cups using three (3) 6oz bottles of glycerin and 18 envelopes ( 7 grams per envelope ) of Knox gelatin with just over 14 onces of water.

It was hard to tell if I had the heat up high enough to properly blend the mixture, I was trying to make sure I keep it below boiling point.
Do I need a cooking thermometer?

The mixture produced a significant amount of foam floating on top.
I thought the cooking pan was filled foam until I poured it into my clear plastic container and saw that there was about an inch of nice yellowish brown gelatin with only about 1/4 inch of foam on top.

I heated the mixture on low heat for about 10 minutes hoping the foam layer would be reduced over time, but it really didn't happen.

Is that much foam an indication that something went really wrong during the process?

I won't know just how firm the mold sets up until in the morning … letting it set over night.

Love to hear your comments on the foam and the thermometer.

Thanks a lot.

Reply
Ken
9/2/2014 09:10:17 am

Hi Edward,
The foam is actually entrapped air bubbles caused by stirring. Because the mix is so viscous, it holds onto the foam. You could try scraping off the foam and re-heating it in the microwave to see if the bubbles collapse.I have thought about a defoamer (wetting agent) but have not tried it yet. Even an alcohol might work but it needs to be tried before I recommend it. No thermometer needed if you stay below the boiling point, but, a thermometer wouldn't be a waste of time either. Your choice. Thanks for the questions, Ken.

Reply
Edward
9/2/2014 12:59:55 am

The mold came out nice and firm ... just has foam layer on top.
Is there a way to prevent the foam layering? Or should I just try scooping it off and discarding before pouring the mold?

Wonder if you could use and old crock-pot for this? Would the temperature get warm enough?

Thanks

Reply
Ken
9/2/2014 09:15:04 am

Edward,
Try pouring slowly down the inside of the mold to minimize air bubbles. This usually works. If the foam doesn't cause a problem I usually disregard it. A crock pot gets warm enough but cycles too much and is a bit slow. And, if you remove the cover, the temperature goes down to much. Thanks, Ken.

Reply
Edward
9/7/2014 07:29:46 am

Just wanted to give an update.
The mold worked great even with the layer of foam of top.
Next time I will try to skim the foam off before pouring the mold.
Thanks a lot Ken for posting this information it has been a great help.
Thanks again.

adam
11/7/2014 05:54:28 am

is glycerin necessary

Reply
Ken
11/8/2014 01:30:05 am

Hey Adam,
The glycerin is a plasticizer and provides the flexibility in the formulation. If you make the mix without glycerin it will harden to a solid. There may be some value to this for some uses but not for reusable and flexible. Thanks for the question, Ken.

Reply
Güdbytes link
1/8/2015 10:46:43 pm

Thank you so much for the amazing detail and explanation!! Going to make a few small molds for fondant/sugar work. This will be perfect!! Just for fun- I plan on tinting the mold material. I'll def update with results ♡

Reply
Edward
1/10/2015 07:47:30 am

Hello Ken,
I tried another batch of your gelatin mold formula this weekend.
I made some castings using polyurethane casting resin and it worked great!
I finally got a mold without the foaming bubbles. I think I may have had the heat up too high last time.
Again, thanks so much for sharing.

Reply
Ken
1/11/2015 01:54:59 am

Hi Edward,
That is good news as we have had questions about polyurethane in the past that I had not tried. Thanks for adding to the conversation and providing your results. Bubble free? Great! Thanks, Ken.

Reply
Nicole
1/31/2015 04:50:38 pm

I noticed in your video you said the plaster was falling apart. I was looking at using this mix to experiment with plaster molds for kids.
Do you know if it was the plaster mix you used, or if there is some reaction with the mold that made the plaster crumbly?

Reply
Mark
2/9/2015 08:47:54 pm

Thanks for the great videos, they help alot.

I'm thinking about buying the ingredients to make some molds. Is it possible to make a two-part mold with this? I was thinking it would melt the first half when adding the second half

Reply
Ken
2/10/2015 08:23:46 am

Hey Mark,
Great question and you are correct that the two halves would be easily combined. It may be possible to chill the first half and pour the second part when it was cool enough to still pour and a silicone spray used as a release agent. But, this is a stretch at best. My suggestion would be to cast the item completely and then cut the parting line. As demonstrated in the video, the material cuts easily and can be put back together and held with rubber bands. You could also cast some registration pins to make the alignment better. If you come up with a solution be sure to let us know. It would be a nice step forward. Thanks, Ken.

Reply
Mark
2/11/2015 10:52:53 am

Thanks for the speedy reply Ken.

Im pretty new to casting, i use oyumaru for molds but my alumilite 15 min demold resin heats up and puts bubbles in the mold.

Would the same thing happen with this glycerol mold? Do you know what temperature the mold is rated to?

Reply
Ken
2/14/2015 02:23:16 am

Hey Mark,
This formulation has a lower melting point than oyumaru. It is serviceable up to around 135 F. But by chilling it I have cast epoxy and polyester with no problem.

Reply
Valerie
3/9/2015 08:12:24 am

Ken, I thank you to the moon and back for your expertise. I happen to have the gelatin and glycerin products and I will try making the recipe for food safe molds.Would you happen to know the durability and life expectancy of the molds? I'm in the cake design industry and I use a lot of silicone molds that are suppose to be food safe. However, I stumbled upon a website where a toxicologist stated that all silicone including FDA approved food safe silicone is actually not safe at all. The toxicologist claims to have patients suffering from cancer, and several other life threatening ailments directly related to silicone. She also stated that the silicone has attached itself to the patients DNA. Also, I would like to know if you have any other food safe mold recipe's? Thank you again for blessing us with this information. Valerie

Reply
Ken
3/10/2015 02:44:05 am

Hi Valerie,
I have used open molds more times than I can count without problems. For closed molds like the alien or Santa Clause I have used less frequently so I really do not have a number. However, with care, this mold material can be durable. You can also experiment with using less glycerine and make a stiffer but stronger mold. Check the comments for more info on glycerine reduction. You can actually make it really stiff and almost hard if you want to. I agree with the questions about RTV but suspect that the catalyst may be the problem which can be tin or palladium based. If you get a chance please send a link to my email on the article to: [email protected]. Thanks for the comments and question, Ken.

Reply
Valerie
3/11/2015 04:41:37 am

Thank you Ken for your rapid reply. I have several objects needing to be replicated that are not heat resistant. How do I go about using your recipe without fear of distorting my objects? Also, I would like to know what is the pot life and demold time? Thank you again, and again. Valerie

Jenny
3/13/2019 05:10:56 pm

I dont really see what the answer or reply is pertaining Valerie's comments on this mold making recipie (glycerine, water, & gelatin) not being safe to use for chocolate molds ect. (food stuff) ? My main reason for wanting to make molds is for chocolate. What do you suggest I do for this?
thank you Jenn

James
5/27/2021 11:11:26 pm

Hi Valerie, so you may or may not know that alginate is a food safe, and even edible mold option. Sadly alginate can only be used for one immediate casting (work time is short, and alginate is not archival at all).

Reply
Valerie
3/11/2015 08:14:17 am

Hello Ken, I'd like to thank you again for your knowledge and expertise. My next question to you is when do I insert my object into the mixture? Do I allow the mixture to softly chill, then insert the object or do I insert the object while the mixture is in its liquid state? Also, is there a way to prevent the mold from being water soluble and how do you suggest cleaning it? Thank you so much.....Valerie

Reply
Ken
3/11/2015 09:47:57 am

Hi Valerie,
This formula as indicated in the writeup melts at about 130 F (54 C). If the items to be copied are extremely sensitive to heat they may be at risk. But, by chilling the item first and letting the mix cool, the copy can be protected. Reasonably, the viscosity increases as the mix cools and you can wait until it is still pourable. The pot time is dependent on mass but it is similar to the way water would cool. The demold time is again dependent on mass but is fairly short and can be shortened by refrigerating. The mix can be best cleaned by filtering through something like cheese cloth or fine screen. The formula will always have some sensitivity to water even at room temperature when solid but can be used in high humidity without a problem. When I make a mold I generally place the item in a plastic container and pour the mix slowly to avoid included air bubbles and it works well. As mentioned earlier, reducing the amount of glycerine you can get a stiffer mix that is a higher melt temperature. It will depend on how flexible and hard you like it and can tolerate. Less glycerine also reduces the water sensitivity. Hope that this helps. Ken.

Reply
Jennifer
6/7/2019 01:38:52 pm

I'm excited to try this! Has anyone found out more specifically what the pot life is and demold time?

willi
3/15/2015 01:05:19 am

Hello Ken,
First many thanks for your knowledge and expertise. in fact i need to make formula like This but flammable ! This product you know solid alcohol fuel or fuel tablet ! not like sterno gel packed in cans nor hexamine fuel tablet ! It's just like Japanese solid alcohol ( in rubbery tablet form ) which make by agar 1-3 % boiled in water 30 % ,then add 70 % alcohol.
I found that This amount of alcohol( 70 %vol ) doesn't gelled with the remaining water and agar ! So , if i decrease the percentage of alcohol to 40 % combined with 60 % water maybe won't ignite !
sorry for long details ! the qst is : can i make flammable rubbery form like This you explain by adding 50 % alcohol to glycerine - gelatin to becomes flammable rubbery ? Glycerine it self can't flame . so if it can, what is the melting point in this case ? you know melting point of 1.5 % agar gel about 85 C !. Can you help me ?
Great thanks Ken , So happy to send you emails if you interest !
Greetings ,, Willi

Reply
Ken
3/16/2015 03:26:24 am

Hi Wili,
While glycerine is an alcohol it is a polyol, a simple sugar alcohol with a high flash point, > 160 C and a very high autoignition point. But, it is flammable. I tried some quick experiments with methyl alcohol to see if I could lower the autoignition without any luck. I really don't see how this formula can satisfy your requirements. Perhaps a Google patent search for flammable gels wold give some insight. Sorry I was not able to assist you. Ken.

Reply
willi
3/16/2015 09:49:43 pm

Thanks Ken for your effort. Great thanks, maybe will try again with agar adding to gelatine -gylcerin formula then ethyl alcohol may combine with them.
Greetings.. Willi

Reply
Valerie
3/17/2015 10:55:09 am

Hello Ken,
thank you once again for your assistance. Within a very short time I will post the video & pictures of my mold project. Hopefully I explained myself clearly. Thanks again......Valerie

Reply
Peter link
5/16/2015 09:16:41 am

Hi Ken. I followed your formula as per the videos but the gelatin material is too soft.

How do I make it firmer?

Pete

Reply
Ken
5/16/2015 10:19:08 am

Hi Peter,
Glycerine is a plasticizer and is how firmness can be controlled. By reducing the amount of glycerine, you will get a firmer material. Good luck and thanks for the comment, Ken.

Reply
Peter link
5/24/2015 08:51:41 am

I just figured out why my gelatin mold was too soft.

Instead of adding 24 *milliliters* glycerin as per your instructions, I added 24 *grams* of glycerin.

1ml of glycerin may not weigh 1 gm of glycerin!

Easy mistake to make. I just thought I might share :)

nemanja
5/20/2015 06:00:29 am

Hi Ken.
Thanks for sharing! This looks amaizing!
I am wondering can this material be colored in some way? Maybe with food colorants?
I was thinking since I already have molds to cast with this material.
So will food colors have have any effect on final product?
I will check it out and share the result.
Also have you tried to put this material in water (after it hardens)? Do you know what is happening with it in water?
For me this could be interesting for making aquarium props. I will deffinately try and share.

Thank you very much!

Reply
Ken Quast
5/20/2015 10:00:04 am

Hi nemanja,
Yes, the material can be colored with food dye but it may be less brilliant than you may want but worth a try. As far as moisture softening the material, I have not tried yet. My best guess is that depending on the temperature of the water it will re-hydrate. It may take some time but it will be water soluble unless coated with a spray polymer. But, by all means please verify and share with us as we can all learn. Thanks, Ken.

Reply
nemanja
5/21/2015 04:54:46 am

Hi Ken,

Considering water properties of gel I have to make couple of observations.

First, it is negativ bouyent. It sinks. That can be positive or negative depending on aplication.

Second, it is totaly clear in water. From the first moment. Yellowish color is washed right away.

Finaly, after 2 hours there was no change in gel (except color). It was elastic and tough. And shape was remaind.
But after 12 hours it was different story. Shape remaind but elasticity was gone. It was maybe 50% than before put in water. Insead it tands to tear under presure.
It can be that part of the gelatin is being absorbed buy water, because my hands after contact with that water are a bit sticky.

I will try to make another round, but after it is set I will dunk it in some acrilic paint (since I have it arround), and when paint dryes put it in water to see what happens.

I think I have some paint for boats arround somewhere (it is waterprof but not elasic) and have a go with that aswell.

Anyway will share results

Joe
5/25/2015 11:53:01 pm

Ken, this is an awesome tutorial! Thank you for taking the time to do it and post it for us.

I mixed the materials and put a figuine in it. Let it overnight and when I get home tonight I will see how it did. I was unable to find unflavored gelatin and went with orange flavor.

I was thinking to use the same stuff I used for the mold as a casting material, just to see how the mold worls before buying anything else. Do you think that will work?

Thanks!

Reply
Ken
5/26/2015 02:52:11 am

Joe,
It will depend on what is actually in the gelatin package. If there are sweeteners, dyes, and flavors,it may cause problems. But, you are taking the risk and experimenting and that can only be good! Please let us know how it works and maybe include the package contents and brand so we can all learn. Thanks for the comment, Ken.

Reply
Joe
5/26/2015 04:04:12 am

Thanks for the reply Ken. I will update when I play with it. With your mixture, do you think you can use the same thing for the mold as for the casting itself? Like using the same substance for both things.

Ken
5/26/2015 08:24:42 am

Hi Joe,
I don't see any way possible to use this material as both the mold and the casting material. The warm gelatin/glycerin portion will immediately begin to melt the mold causing a mess. Sorry, Ken.

Reply
Joe
5/27/2015 01:19:05 am

Thank you for the reply Ken. I am about to go buy the Gulf Wax to try it. I read you chilled the mold. As for the wax itself, did you let it cool a little bit or did you just poured it right from the pan (or what you used to melt it)? I guess you have to wait some or it would melt the mold, right?

Reply
KEN
5/27/2015 09:52:27 am

Joe,
Wait until the paraffin wax has cooled but is still pourable and pre chill the mold, Ken.

Akshat Jariwala
6/18/2015 05:14:23 am

Hey Ken,
Great job on the mould development. It looks very promising.
I was wondering if you have tried using agar as a binder in place of gelatin or if you think that might work at all.

Thank you for sharing this! Great stuff!

Akshat

Reply
Ken
6/19/2015 02:41:44 am

Hi Akshat,
I have not used agar as it is hard to find locally and usually expensive. I do use agar for bacteria cultures as agar is not digestible by bacteria where gelatin is. So. you will have to try a small experiment and let us know what you discover. Thanks, Ken.

Reply
Akshat
8/3/2015 06:45:29 am

I did try using Agar. Though it does a good job of making the mold. The mold is not very elastic and breaks easily unless handled with care. It also loses water quickly. In a few days, it visibly starts shrinking in size.

The gelatin-glycerin does well. But, I observed that varying the glycerin changes the mechanical properties significantly. In general, a 1:1 ratio worked best for me. Thanks!

Akshat
8/3/2015 06:47:21 am

Correction in the below post:
it was 1:1 ratio of water and glycerin and 10g/L gelatin

kellyzhang
8/5/2015 10:16:25 pm

may i know more details about your products?

Reply
Ken
8/6/2015 02:31:12 am

Hi Kelly,
I have no products to sell or endorse. The information in the videos is designed to help viewers acquire and complete this project. Thanks, Ken.

Reply
Jonni link
8/24/2015 10:12:47 am

Ken, I tried the recipe, using Edward's cup measurements, since I don't have a milliliter measure in the house. I found it really difficult to mix the gelatin with the water, and the bits that didn't get wet with cold water would, naturally, refuse to melt.I was able to remove the hard bits, and the material that was left seems very strong. Is there a trick to mixing the water with the gelatin that I can use when I make my next batch?

Reply
Ken
8/25/2015 03:37:36 am

Hi Jonni,
I am not familiar with Edward's cup measurements but I am assuming that it is Imperial measure (Cups and ounces). It does sound like there is a quantity problem as the gelatin should swell after it has been added with stirring to the water at room temperature. Then, when the glycerine is added it will plasticize the mix and gentle heating with completely dissolve the gelatin. So, in Imperial measure the 20 milliliters would be about 4 teaspoons, and the glycerine would be about 5 teaspoons.The measurements are not critical but with less glycerine the mix will be slightly harder and stiffer. But in any event, the gelatin should swell before adding the glycerine. I hope that this helps but it would be worthwhile to pick up a cup measure with milliliters as well. If you have further problems you can email me at [email protected] and I can offer additional assistance. Thanks, Ken.

Reply
Jessica
9/27/2015 02:30:17 pm

would it be possible for you to upload all of your part 2 videos on you tube every time i try to view any of your part 2 videos it will only play a few minuets ( i am using chrome) no issue like this with other videos fro other sources , i have clean browser history cleared my cache etc it is only the part 2 videos and on this site I would love to be able to see the entire process of each project thanks great work!

Reply
Ken
9/27/2015 04:34:12 pm

Hi Jessica,
Actually, it is difficult for me to copy my video and add to YouTube due to my server restrictions. However, I just updated the site to "refresh" and watched it in Chrome with no problem and I have DSL. I also watched it in Firefox and Safari with no problem. Perhaps you can try again as I have not seen this problem in the past 5 years. You might also try starting the video and double clicking on the video to show the play and pause and expand bar. Please let me know how it works as I would like to know that everyone is getting the shared information. Thanks, Ken.

Reply
John
10/25/2015 11:57:18 pm

This is so simple! I have never done any kind of casting before, so this seems like a safe first step and I'll definitely be giving it a try.

I bought a bag of water-based natural clay (I couldn't tell you the type, but it's a light gray color) a month ago with little understanding of what exactly I needed, intending to use it as a re-usable, air-hardening sculpting material.

I am aware that water-based natural clays tend to shrink and want to crack as they dry...so I am wondering, have you tried adding any sort of natural clay to this mixture? If so, what was the result? If not, I'll give it a try. I'll visit the store where I bought this clay and see if I can get some details about what exactly it was.

Thanks for any help!

Reply
Ken
10/26/2015 03:20:52 pm

Hey John,
I have not added any other material to the mix as it does exactly as I wanted without modification. I am not sure what it is that you want to accomplish with the clay but by all means experiment and let us know how it goes. We all appreciate a shared effort to improve our ideas. Thanks, Ken.

Reply
Sharon
11/11/2015 04:00:20 am

Hi Ken
This is really amazing. Been doing some testing and seems to be working well. Next batch I'm going to lessen the glycerine and see what strength I get.
Just want to know if you have a indication of the shelf life of the product?
I am using ozonated water which should prevent any mould forming etc.

Reply
Ken
11/11/2015 09:40:24 am

Hello Sharon,
Typically, as the amount of glycerine is reduced, the material becomes stiffer. If you reduce it too much it will become extremely hard. It becomes very much like a cured epoxy. As far as shelf life, I have used it as many as 20 times with out any problem. If there is contamination it can be run through a sieve to filter out the contamination. I have not seen any mold over the course of a year using just distilled water so you should be fine. My best to you, Ken.

Reply
Sharon
11/11/2015 10:35:00 pm

Thanks, what amount glycerine reduction would you recommend for a good firm mold? I'm thinking to try 20%?
Regarding Shelf life how long can the material be kept without using it eg if I make material and leave it before making a mold, can it be kept for 6 months or a year if not used continuously up to 20 times?

Ken
11/12/2015 09:48:29 am

Hi Sharon,
My apologies for not understanding the shelf life question. I have two molds that are at least two years old and still fine if kept at room temperature. So, there should not be a problem if the mold is protected from extreme heat. With regard to the glycerine I would try 30% and this is the reason: If the material is too hard you can add some glycerine to make it less stiff which is easier than trying to remove glycerine. And as mentioned, you can make this material really hard. I have not tried any experiments with the ultra-hard yet but it could be interesting. Thanks, Ken.

Reply
Sharon
11/12/2015 10:14:18 pm

Thanks Ken, made a batch of 20% less glycerine and it is quite a bit firmer. I'm going to make another batch with 30% reduction and let you know which one works well. I'm intrigued now going to make a hard batch for the fun and see what happens. Thanks for the shelf life I thought maybe 1 year but it's good to know you've had for 2 years. Will let you know when all is tested. Thanks Sharon

Reply
Rick link
1/2/2016 11:12:43 am

Hi Ken,

Thanks very much for these directions and for all of the helpful comments regarding others' experiments and experiences. I'll be trying this kind of mold using a clear drying liquid acrylic medium as a casting material. Will see if I have the same situation as Marissa. I may only be able to use this process when adding a relatively opaque level of pigment to the medium, but it will still be a great tool in my studio.

BTW, I think this could also be used to create gelli plates that once damaged can simply be reheated to create a new gelli plate. Gelli plates are used for creating monotypes. If it is dense enough, it might be carvable like linoleum for linocut priontmaking as well. As I try these things I'll update you. This could be a VERY versatile material for artists!

Reply
Ken
1/3/2016 10:28:23 am

Hi Rick,
I hope that your experiments go well and that you are able to expand our community knowledge. With regard to the gelli plate application I believe that the value may be in the fact that the Shore A hardness can be changed with the reduction of the glycerine. This make the gel possible to be carved or imaged. Thanks for the comments and thoughts, Ken.
.

Reply
Rick Rogers
1/11/2016 11:23:11 pm

Hi again Ken,

For the typical gelli plate for monotypes, you will likely want to retain the completely flat surface, but still have a slightly harder surface. So I created one last night where I used less glycerine than your recipe, and it certainly looks to be an excellent gelli plate. I used the following recipe to make it somewhat harder and to make my calculations easier, since gelatin comes in 7g sachets up here in western Canada:
35 ml water
7g gelatine
30 ml glycerine (this would have been 42 ml with your recipe)
And it was a 10x batch that produced an 8"x8" gelli plate about 1/2" thick.

I'll wait a little longer before using it to try creating a simple monotype print, and then see how well it cleans up with acrylic paint. Then I'll carve into it and try making a relief print.

I hope to be a good community member and video tape these experiments, but I'm inexperienced with a video camera and lighting, so we'll see how it turns out before I post it on YouTube...

Cheers!

Reply
Ken
1/13/2016 09:44:06 am

Hey Rick,
I appreciate the fact that you are keeping us in the loop and hope for success. I have thought about flat surfaces and thought that a glass plate with sides might work well with the glass surface being the top of the mold. How do you get a flat surface? Keep us informed and good luck, Ken.

Rick Rogers
1/14/2016 10:45:59 pm

I had something already available to me, a cheap 8" square silicone cake pan that I got at a clearance store a while ago for use in the studio. But I am sure that a casserole dish or a piece of glass and a dam of modeling clay would work well too.

Reply
Rick Rogers
1/17/2016 01:22:37 pm

Hey Ken,

The test of the printmaking plate application went very well overall. The recording not so much, so I won't be posting a video as planned.

Anyway, here are the findings:

1. The firmer material was excellent for a gelli plate. It accepted marks from paint brushes, a brayer, a paint marker, and fingers readily, and released the acrylic paint to paper really well, so it makes a great monotype printmaking plate.

2. It cleans up like a dream. A little water and it comes right off the plate, leaving only miniscule dots of acrylic in micro-bubbles on the surface of the plate. These little dots don't impact the prints pulled from the plate at all.

3. The one negative result was that bending it while carrying it around - mostly to and from the sink for cleaning - caused the surface to rip/split/crack and with repeated manipulation the rips continue to deepen and widen, as you'd expect. (But it can always be remelted and recast!)

4. Since it was ripped already, I also tried carving it like a lino plate. It carves really easily with a knife, but not well at all with carving tools. The initial cut tends to rip with carving tools because the plate isn't firm enough for a v or u shaped blade to slice into it without deforming it first. Perhaps if I REALLY sharpened my tools... but I have some ideas for creating a reusable relief printmaking plate from it.

5. The print pulled from the relief carving was great. I only tried it with acrylic paint, but the paint rolled onto it very nicely and the pulled print had nice sharp edges where the cuts were made.

So a follow-up question for you: Does the tear strength of the material come primarily from the gylcerine or the gelatine? If I reduce the glycerine further, do you think it will become even more likely to rip as I expect? And if so do you have any suggestions for other plasticizers that might allow a firmer plate that doesn't rip easily? In some initial searches online, I found references to sorbitol, cirtic acid, cooking oils and vinegar being used with bioplastics as plasticizers, but no clear information on what the differences and what ratios make sense. I think this might warrant a trip to the library sometime soon to understand the chemistry behind it more.

Cheers,
Rick.

Reply
Ken
1/18/2016 11:04:48 am

Hey Rick,
It certainly sound promising so far as you have indicated. The tear strength seems to come from the gelatin and the glycerine allows mobility for the gel. So, my best guess without experimentation is that the tear strength will increase as the glycerine is reduced. Your dilution was quite moderate so a further reduction may be actually better. But a better solution may be in simply chilling the plate before cutting. The Bloom Test (gel strength) is performed at 10 C so cutting might be better and cause less tearing at cooler temperatures. And although there are other plasticizers available, at this point there does not be an advantage to using them yet. Referring to the Bloom Test, the normal unflavored gelatin has a rating of about 225. However, there are gelatins available with higher ratings that may be considered at some point. I found the following link to the "Gelatin Manufactures Handbook" that you can copy and paste to get to the PDF. It is a complete chemistry of the gelatin collagen relationship and physical characteristics. Ken.
https://www.google.com/webhp?gws_rd=ssl#q=bloom+strength+of+gelatin+pdf

Reply
Ken
1/18/2016 11:13:14 am

Rick,
That link was incorrect. Try this instead: https://www.google.com/webhp?gws_rd=ssl#q=handbook+of+gelatin

Ken
1/18/2016 11:19:08 am

Rick,
I am not sure why these links are not working so just go the Google and use Gelatin Handbook as the search term. It works! Ken.

Reply
Rick Rogers
1/18/2016 01:01:10 pm

Thanks Ken. That reference is helpful.

Two further results:

1. Cleaning is even a breeze a day later with paint that was marked on the surface of the plate. A little water and rubbing and even dry feeling acrylic paint comes off.

I'll melt this plate, add more bloomed gelatin, and recast it to see if an even firmer plate will hold up better to the monotype process And I think I have a great idea for a relief printmaking process as well, once the material is a bit firmer. Will try that with and without the cooling suggestion - thanks!

2. Unfortunately though, I think I've determined why the cleaning was so easy. When it came to the acrylic casting test, this material ran into several difficulties. An acrylic skin (poured acrylic medium mixed with liquid acrylic paint) was very slow drying, compared with it's usual drying time. Basically the acrylic stays wet underneath a very very long time.

The edges of the plate even started to turn upward away from the table it was on. Acrylic is a water-based polymer that cures through the process of evaporation, drying from the top down. I think that the acrylic skin poured over the cracked and cut area of the plate was absorbing water from the plate itself while its own water was evaporating off during the curing process. Not sure how to prove this, but I am quite certain that acrylic in liquid state, and perhaps even thickly applied gels will not cure effectively as reliefs when poured over a carved plate of this material. I suppose it is possible that the ripping and cutting of the plate may be the problem, so I might try casting again, but in an undamaged mold to see if the problem persists. But I suspect that casting with liquid acrylics may always have this problem.

I wonder whether using hydrophobic plasticizers or a hydrophobic plasticizer and water, instead of glycerine and water might help, but then I'm not sure how the liquids would mix effectively enough to plasticize the gelatin. A problem for a more dedicated scientist!

I may be stuck with silicone (not reusable) for casting acrylic, but this material should work well for casting epoxy resins. Onward!

Reply
does it smalles like rubber??
2/21/2016 11:20:03 am

Reply
Ken
2/21/2016 05:27:29 pm

No.

Reply
Ella Jameson
3/9/2016 10:35:58 pm

I'm looking to cast some ABS parts in Silicone. I'm totally new to this, so I'm bound to make mistakes. My casts will be mainly one-offs, so a reusable mold solution is promising. One that's so cheap and easy is also attractive. However, I would appreciate some advice.

I don't have a degassing chamber, so I'm likely to use Mold Star 20T with some pigments added. I am currently planning on using Ease Release 200 for the mold release, but I'm open for any suggestions.

From what I've read, it doesn't seem that silicone exotherms much at all, so my initial reaction is to say this might work will. What do think?

Reply
Ken
3/12/2016 09:53:59 am

Hi Ella,
Unfortunately I am not sure that I understand the question. If you are going to cast ABS in a silicone mold, how does the reusable molding material play a part? If the mold is silicone, it should not need a release agent for most polymers being cast. Please explain more. Ken.

Reply
Ella Jameson
3/12/2016 05:18:31 pm

No, I mean I want to create a copy of an ABS part that's made out of silicone. So the work flow would look like this:
ABS positive > reusable mold negative > silicone positive.

I know that making the mold of the ABS part out of the reusable material works, as I've tried it a few times and it's worked. What I want to know, preferably before potentially wasting material, is if casting silicone into this mold will be likely to work.

As another area of interest, I've noticed that there are a ton of bubbles that form on the surface of the part being molded. Are there any techniques to eliminate this? I know Composimold (basically a commercial version of this stuff) sells a 'Bubble Buster' solution that lowers surface tension. Do you know of anything cheaper I could use/make that would act like that?

Ken
3/13/2016 09:37:56 am

Hey Ella,
Thank you for the clarification as it is now clear. The silicone in the reusable molding material should be fine but I would probably chill the mold as the silicone is mildly exothermic as it cures but the chill is not essential. But, it will be somewhat firmer and perhaps more stable. As far as the bubbles I find that the bubbles appear in non-active areas of the mold, particularly at the top. But a small amount of isopropyl alcohol or even dish washing detergent in very small amounts may help. Pouring slowly also helps. It is viscosity as much as reducing surface tension. Please keep us informed as you experiment. Thanks, Ken.

Reply
Deborah
11/2/2016 02:11:52 pm

Hi Ken,
From my old jello making days, bubbles could be gently scooped off the surface with a spoon. Obviously unnecessary functionally for moulding, bubbles just interfere with my chi-ha!

Reply
Elizabeth
4/16/2016 10:34:47 am

Ken i have a broken yard angel. Can i make a mold like this to make a plaster wing from the good wing using plaster paris

Reply
Ken
4/17/2016 10:53:07 am

Hi Elizabeth,
Depending on the size (amount of material) it should wok just fine, I have used it to repair other plaster objects. Ken.

Reply
Johnny
5/15/2016 11:46:18 pm

Hi Ken, have you tested using this Mold-material for casting resin Parts?
Maybe we can discuss some further tests as I did some already myself, I'm looking for a good release Agent. I'd also like to know about your experiences an faybe freezing the Material.
BR

Reply
Ken
5/16/2016 09:13:36 am

Johnny,
As shown in the videos I have cast epoxy and polyester successfully and in most situations I use silicone spray as the release agent. I have not had an occasion to freeze the material so I cannot comment. Thanks, Ken.

Reply
Sharon
6/29/2016 11:18:07 pm

Reply
Ken
6/30/2016 09:03:08 am

Sharon,
Please resubmit your comment. Ken.

Reply
Sharon
7/12/2016 11:27:58 pm

I only resubscribed as I accidently unsubscribed thanks

John
7/11/2016 07:50:27 pm

Hi Ken. 2 questions. I am moulding polyurethanes with exotherm temps higher than 130 F. Any suggestions for an additive to increase the mold-material's melt temp? Also...is it possible to de-gas the mold-material in a vacuum chamber prior to casting the mold?
Thanks!

Reply
Ken
7/12/2016 03:18:40 pm

Hi John,
I have successfully cast polyurethane as well as epoxy and polyesters by simply chilling the mold. I can not think of any useful additive but you could reduce the amount of glycerine which reduces the flexibility but raises the melt point. But, I would not reduce it more than 15 or 20%. And yes, you can degas the melt prior to casting. I have even had good luck with one of those hand vacuums. Thanks for the questions, Ken.

Reply
Becky Hall
7/19/2016 11:55:41 am

Alright guys!
I have never had a problem with this material I have cast with amazing resin and I also pour easy cast and castin crafts in it I make miniature toy replicas so for the hard to find ones I actually sculpt them in clay myself and then cast them in the gelatin I then pour them in the resin fine-tune them afterwards by sanding and then repour them for my final cast. This is a very long and drawn-out process that's what I like this material because this material is reusable. I did this and I poured molds and about a month later I ended up going back to using my mold and it has shrunk 50% now I was sitting on here looking up how to reproduce result as it captured all the detail of my larger sculptures but reduced it 50% and I remembered that I put rubbing alcohol into my mixture to help for some of the bubbles cuz I had overheated it and cause a lot of foam on top so I'm guessing what happened was when I added the alcohol to the mixture it filled it and acted as a filler and then over time the alcohol dissipated or evaporated which shrank my molds happy accidents

Reply
Ken
7/19/2016 04:38:12 pm

Hi Becky,
Interesting post as it raised some good questions. First, the over heating probably caused some water to be driven off. Second, the alcohol forms an azeotrope which makes the water easier to evaporate. All water based colloids will release water over time so it may be useful to cover and refrigerate. Additionally, it may be worth weighing the material to see if waster has been removed and replace it. A final thought is that a hand vacuum pump might be helpful in removing bubbles as they are cheap and easy to use. Simply make a mason jar or other suitable container as the vacuum vessel and then pump for a partial vacuum. Walmart has one but others are easy to find. Thanks, Ken.
http://www.walmart.com/ip/American-Educational-Products-7-206-2-Vacuum-Pump/48013328?wmlspartner=wlpa&sele

Reply
Ken
7/19/2016 04:43:37 pm

Becky,
The link failed to work so just Google "hand vacuum pumps". Ken.

Adrian
9/6/2016 04:32:47 am

Hi,
I was wondering how this recipe worked as a casting agent?
I have found a few posts sharing this, or a similar recipe for making moulds but I am looking for a safe home made recipe for casting..

If I already have moulds of the figurines I want to duplicate, how effective and durable will this Gelatine/Glycerine mixture be if I wanted to use it to make the actual casts out of?
I need it to be relatively firm but still flexible and not something that will break, tear or disintegrate over time (like silicone except that silicone is expensive and hard to come by where I am - Food grade, non toxic silicone that is).

I want to make some soft figurines/toys that are safe for kids.

Any advice?

Regards

Reply
Ken
9/6/2016 09:46:10 am

Hi Adrian,
My best advise is that this material is not really suitable as a casting material. I think that for the purposes that you describe a polyurethane might be a good choice. Copy and paste the link to Tap plastics for some good alternatives. Thanks, Ken.
http://www.tapplastics.com/product/mold_making_materials/casting_products/tap_quik_cast/74

Reply
Adrian
9/6/2016 12:36:16 pm

Thank you for your reply Ken,

I have had a look at the link provided, unfortunately this will not work for my intentions, I am looking for something that will be "rubbery" when set, like silicone. It will also need to be non-toxic or food grade as I intend on making casts of children's toys...
Considering the fact that small children tend to put just about everything into their mouths it will have to be safe and non-toxic.

There are certain types of silicones available that are suitable but they are not available where I live and will cost a penny to order. I was just wondering if there was a homemade solution for this.

It does not need to last a lifetime, as long as it does not break or fall apart easily and maintains the shape that it is cast to.

If I were to try this solution out, just for interest sake, what would you recommend as a good ratio to be sure the end result gives a soft yet firm rubbery finish?

I will look into something more suitable when I have more to spend and more experience with what I am planning to make, this will be a temporary solution to see what can be done.
Do you think it might be possible to get a good result using your recipe, considering all the above mentioned criteria? Once again it does not need to last a lifetime, just not be broken too easily.
Also what could I use to make the final results different colours? Will food colouring work for this? will it set with the solution or will it stain?

Regards

Ken
9/7/2016 03:11:34 pm

Adrian,
They do make urethane that is flexible but the safety issue would be a problem. At the moment I can't think of an alternative but I will give it some more thought. To try my process I would suggest a small experiment where you reduce the glycerine by 25 %. This would give you an idea how flexible vs. hardness it can be. Adjust from there. As far as color, since it is starting out as amber, adding color might be less desirable than you want but it is worth a try. Let us know how it works. Good luck, Ken.

Reply
Ken
9/7/2016 03:59:18 pm

Adrian,
After I posted the above response I was thinking about using bio plastics in your application. It is food safe and can be make flexible with glycerin, and can be colored with food color. I have made several types using corn starch and it may be worth looking at for your project. I did a little research and found an Instructable to check out. They used potatoes but also includes the use of corn starch which is easy to find. Check out the following link and copy/paste. Ken.
http://www.instructables.com/id/Make-Potato-Plastic!/?ALLSTEPS

Reply
Jack Wood
9/9/2016 07:13:02 am

One thing I noticed is that the mould will sag after a couple of days at room temperature. For example the candle moulds I left here by the computer out of direct sunlight after a few days have turned into bent candle moulds even though they are an inch thick either side of the candle! I think with some extra gelatine it might hold it's shape better!

Reply
Ken
9/9/2016 09:57:21 am

Hello Jack,
The problem you report is of course due to the relatively low melting point of the material and the effective wall thickness. Additionally, the high RH in summer can increase the tendency to sag or deform. And, you are correct that the ratio of gelatin/glycerin is the important issue. As in previous posts, I recommend a reduction in glycerin to increase stiffness. I have added gelatin to a prepared mix but it is really a PIA. The gelatin has to be in a water solution and is tricky to get right. In your situation I would probably recast the candles with an increased wall thickness and make any subsequent batches with maybe a 10 % reduction in glycerin. Just a thought. Thanks for the comment, Ken.

Reply
Jack Wood
9/9/2016 10:23:46 am

Thanks for the thoughts! If I try it I'll report back

Michael
10/9/2016 03:40:36 am

Hi Ken,

Thanks for all your hard work in posting on this project! I tried my first batch today and it was very straight forward following your instructions. The only problem I have is that the tear strength is quite low. I wasn't able to remove the master without wrecking the mould...

The recipe I used was:
100 mL each of water and glycerine
20 g of gelatine

Any suggestions? Given that I am already using less glycerine than your base recipe I am wondering whether I need to increase the amount of gelatine?

Cheers,

Michael

Reply
Ken
10/9/2016 04:42:52 pm

Hi Michael,
I would agree that a closer approximation of glycerin to my original formula would be helpful as more plasticizer eases the tearing. But, since the gel is a colloid the structure will have a tendency to tear. However, if you noticed in video two when I took the Santa Clause figure out, I really beat the mold up and it still didn't tear and that figure had a lot of undercuts. The molding is clearly not a replacement for RTV silicone but it does have utility as well as some frustration. Hope that this helps, Ken.

Reply
Michael
10/10/2016 03:55:50 pm

Hi Ken,

Thanks for your quick reply. While I was never expecting RTV performance, I was impressed with what you were achieving in your videos and wanted to try and replicate it. My first "base" recipe (as posted above) appeared to be both less stiff and less tear-resistant than yours, so I wanted to experiment a bit further.

Here's how I went about it: I remelted what I had and divided it into 4 portions:
A) the unaltered base recipe.
B) the base recipe + 10 mL glycerine.
C) base + 2 g gelatine (hydrated with 15 mL water).
D) base + 10 mL glycerine + 2 g gelatine (15 mL H2O).
I mixed/heated each recipe, poured each into a small round dish and allowed to set overnight. I then demoulded the samples and did a rough elongation test to see how far they would stretch before breaking.

Observations:
As you would expect, the addition of gelatine produced a firmer consistency and the glycerine increased elasticity.

"Results" (really rough, so take with a grain of salt):
B elongated 10-15% more than A before tearing.
C elongated to a similar length as B but did not tear.
D elongated 5-10% more than A before tearing.

Conclusion:
I need to increase the amount of gelatine in my recipe to improve the tear strength. I wonder whether it has a lower bloom strength than the gelatine you are using? (There is nothing marked on the packet, so I can't compare numbers). Adding glycerine as well may or may not be necessary. I expect there is a trade-off between elasticity and tear strength - the "sweet spot" will vary depending on the shape being moulded (e.g. one would probably want more glycerine if there are large undercuts).

I have now mixed all the samples back together (it's great how reusable this is!) and will try moulding the same pattern I tried last time. Will let you know how it goes.

Cheers,

Michael

karri
11/28/2016 01:28:52 am

I don't see the videos or any links, possibly because I'm on my mobile? I'm not sure, but I wanted to watch then before doing this. Also, what are your thoughts on using this for fine detail wax casting? I've been fiddling with plaster molds without much luck. It holds the detail wonderfully, but always breaks when coming out. Lastly. .. Could you make a mold a using s |6l kipsculpted from clay, such as plastcine?

Reply
Ken
11/28/2016 10:18:04 am

Hi Karri,
I am not sure why you are not seeing the videos as my site supports mobile devices. Could be in your video application as I have not had this report before and they work on my mobile devices. I will post a YouTube link below to copy and paste for an overview and video 1. In video 2 I show the use of paraffin wax and it works very well. I really can't respond to clay or Plasticine as I have not tried them at all. Please let me know if I can be of further help, Thanks, Ken.
https://www.youtube.com/watch?v=u3lLyDnWUxE

Reply
karri
11/28/2016 04:01:03 pm

I am having trouble loading the 2nd video, for some reason. So if you discuss clay.. But can you please tell me if I would be able to make a mold using plastcine clay as the model?
Do you think i should make a plaster cast of the clay item to use as a model with this reusable material. .. I'm new to this and so i appreciate any advice you might have thanks karri

Reply
Ken
11/28/2016 05:25:40 pm

Karri,
The problem with Plasticine is that it will soften with the molding material so a plaster casting would be best. As far as the video, I have tried to fix the problem but find that there is a difference between cell and WiFi so I'm not sure how to fix your problem. I could copy the video and send it to you via Google drive but it will take a little time. Send me your email and I will do what I can. Ken.
[email protected].

Reply
Devin
12/21/2016 04:06:40 am

Nice but does it work with plastic or any hard materials?

Reply
Ken
12/22/2016 05:39:04 pm

Hi Devin,
I am not sure what your question is and can you explain further? Thanks, Ken.

Reply
John link
1/29/2017 11:36:35 am

Thankyou Ken for your expertise. I find that this recipe is just as good as the commercially available Composimold but much cheaper. I have probably cast 6 or 7 times with minimal air bubble sign then remelted and cast something else. Durability of mold also depends on medium that is used to cast and how well mold is cleaned after casting. I have yet to experience any mold forming in over 1 year just shrinkage over time. The mold release spray I use with great success is Pam cooking spray but this time I want to try a new batch with alcohol sprayed on the item to be cast ad my Bubble buster. I have cloned many miniatures using this method and look forward to cloning many more.
Thanks again and well done sir.

Reply
Ken
1/30/2017 03:39:16 pm

Hey John,
The use of Pam sounds interesting and the alcohol is a great idea for a bubble disrupter. Thanks for the added knowledge and comments, Ken.

Reply
sebastian
1/30/2017 09:47:55 am


Hi Ken, I've tested your recipes and it worked great! I have a nice very clear mould (my gelatine is not colored).
Thank you for the clear and simple recipe.

I also struggle with the stiffness.
Do you think some other products could help to make a more resistant mold?

I've seen alternative recipes that included corn syrup/honey (glucose), or denatured alcool (don't know what that is), I also read that a bit of acidity could make gelatin stiffer, maybe a bit of dissolved lemon juice could do something?

I have some composimold and its very stiff while still transparent. Its has a weird smell, some kind of fruit juice maybe (that's why I was thinking to honey or lemon...)?

Reply
Ken
1/30/2017 03:45:47 pm

Hi Sebastian,
The easiest way to decrease the flexibility is to decrease the glycerin. Try a 20 % reduction on a small sample and you can go from there. I would be cautious about adding any of the materials that you mentioned as they will present a mold problem. Thanks for the input and comments, Ken.

Reply
Ayry
3/27/2017 12:38:20 pm

I have seen that to get rid of the bubbles you can just spray it with rubber alcohol

Reply
Ken
3/29/2017 04:05:59 pm

Ayry,
That is true just use enough isopropyl alcohol to break the bubbles. Ken

Reply
Mike link
5/6/2017 03:29:43 am

Hello, great blog and feedback

I'm trying to shrink my gelatine casts. How do I mix ispropanol into the mix as I understand this may be the key to the shrink. If this is possible will it shrink proportionally.Any help would be fantastic. Mike

Reply
Mike Burrett
5/6/2017 04:14:36 am

Ps. That should read isopropyl.

Reply
Ken
5/6/2017 10:12:24 am

Hey Mike,
Both isopropanol and isopropyl alcohol are acceptable so either way you are correct. As far as shrinking the gelatin, I am a little skeptical that it it a good way to do so. IPA works to dehydrate or remove water and it is compatible with both glycerine and water but will volatilize at higher temperatures. A better way to do it would be to just let it air-dry or put it in a reduced vacuum. I believe that IPA will only give you about 1 to 2 % shrinkage if used at 5 % of the total liquid needed. If you have better sources of information please share them with us as I can always learn something new! Thanks, Ken.

Reply
Mike Burrett link
5/7/2017 12:43:17 am

Thanks Ken, I will notify you of any finds. A few years ago I was working on a bio- degradable ball. The ball cast well and withstood impact when hit. The only problem was when used in the damp the glycerine became soapy. Is there anyway to waterproof the cast.
I mixed calcium into the mix to add a nice solid colour. I did also read somewhere the zinc improves tear strength, I may have used this, I cannot remember. The ball was stored in a plastic bag and is still in fine condition (at least 2 years later). I would love to find a Vegan option, but agar did not perform so well.

Stephen Young link
5/7/2017 06:18:29 pm

Hello,

I am the owner of the website Candle Needs (http://candleneeds.com/). My website provides information for people who are looking to either make or buy candles for great deals. I was browsing through and your website caught my eye. I really like your website and the great information you provide for your visitors.

With that being said, I was wondering if you would be interested in exchanging links. I would be delighted to do this, so please let me know if this is something you would be interested in.

To reach me, please contact me through the contact page on my website.

Thank you & have a great day.
Talk to you soon.

With Sincerity,

Steve

Reply
LM
5/24/2017 04:11:18 pm

Sending appreciation for the thoroughness with which you provide fascinating information, especially regarding SAFETY instructions, cautionary notes, and helpful suggestions. You demonstrate great patience with all the commentary across the few videos and experiments I've read through, thus far, showing commitment to the spirit of open source sharing. :D

Reply
Ken
5/25/2017 04:08:32 pm

Hi LM,
Thank you for your kind and generous words. Six years ago when I started this site I was hoping for readers/viewers that would appreciate simple and open source material and I have not been disappointed. I will continue as long as I can. I value your opinion and thanks, Ken.

Reply
Bran
6/13/2017 10:53:19 am

Hey Ken:
I've mixed a few small batches of the material using your recipe but mine aren't quite turning out like your's is (or other's I have seen). In the mix, there are what looks like very tiny bubbles suspended. The first batch I did definitely had bubbles (which I think came from heating it in the microwave too long and also stirring it too rough). In the second batch it almost looks like it's particles of the gelatin floating around in it rather than tiny bubbles. I let it cure and almost 2/3 of it was foam-like and floating on the top. Also, I don't know if it helps, but my mix is a light tan (almost khaki) rather than a orange/brown I've seen with other's. I am using Knox gelatin, too.

Do you have any advice you can provide on this? If it is just suspended particles of gelatin, is adding more water to dissolve it okay or will that affect the material?

Reply
Ken
6/13/2017 05:19:04 pm

Bran,
It certainly appears to be undissolved gelatin that is causing the problem. That is why I would suggest making the first batch on the stove as in the video. Dissolution is complete and quick. Subsequent melting is fine in the microwave. Thanks, Ken.

Reply
Laurie
7/30/2017 12:52:34 pm

Would these molds work with melt and pour soap?

Reply
Ken
7/30/2017 03:36:26 pm

Hi Laurie,
This is a difficult question to answer but it may be worth trying a small amount. As the video shows, I have poured paraffin wax and that has a higher melt point than the soap. But, the mold has to be cooled in the refrigerator before the pour. However, most melt and pour soaps have glycerine and that would be possibly destructive to the mold. If you do try it, let the soap get hard before removal. Pulling it out soft may cause damage to the mold. Sorry that I can't be more definitive. Good luck, Ken.

Reply
Carlos
8/25/2017 08:38:05 am

Hello Ken, I write you from Caracas, Venezuela. I have tied the formula and it works really great, I had a lot of fun making it, it was very simple. I have been working for several years with RTV silicone and was looking for an inexpensive way of making molds, and the idea of reusable material really for a small number of casts was something I was looking for. I had looked at commercial products but overseas shipping costs are almost or higher than the cost of the product, so your formula seems like the best option.
I will use it to make simple molds for casting POP war gaming terrain/scenery and will attempt to mold some figures for resin casting I will let you know how it goes.
Thanks again for shearing your know- how.

Reply
Flávio
9/14/2017 05:40:57 pm

Hi Ken,
Congratulations on the videos and sharing your knowledge about this recipe.
Please, could you answer me 2 doubts?
First Doubt: How to increase your formula by 5 times? Would you just multiply each ingredient by 5?
Its basic formula is:
20 milliliters room temperature water -> 100 milliliters room temperature water
4 grams unflavored gelatin -> 20 grams unflavored gelatin
24 milliliters glycerin -> 120 milliliters glycerin

Second Doubt:
I do not know if you have ever seen or read about it, there seem to be recipes like yours in which they add the component Liquid Sorbitol 70% to be able to fight moisture and thus preventing the mold shrinks.
What do you think?
If it is a good thing, how would the proportion of Sorbitol 70% in your recipe?
Thank you,
Flávio

Reply
Ken
9/15/2017 03:31:15 pm

Flávio,
Your first 5X numbers are correct and will work. As far as adding sorbitol I would be careful as t is a sugar and will cause mold to form, Ken.

Reply
Jo.
9/23/2017 04:00:51 am

plaster reaches 60C when curing, so wouldn't the gel mixture just melt and not be able to be used as a mold again for that cast?

Reply
Ken
10/25/2017 09:26:53 am

Hi Jo,
Sorry for the late response but I just saw the question. POP rarely reaches that high a temperature and if you chill the mold it will withstand the warmth, Ken.

Reply
Paula
11/13/2017 04:47:26 am

Hi ya thank you so much for this video. I tried this out in a small cupcake case to see if it would work and it did famously. This was sometime last year and ive kept it in the fridge and its still as good today as it was then. I plan on making it now on a large scale for my project and just need to find the right material for it. I want to make a statue that i can use for a lamp. Any ideas on the material I should use for this? Thank you so much again for the video.

Reply
Ken
11/14/2017 03:21:39 pm

Hey Paula,
I am not sure if you want to make a negative or positive. If you make a negative and want to make a mold I would suggest Plaster of Paris and coating inside with a clear lacquer. But, I may not have enough information to be correct. More information is needed please, Ken.

Reply
Paula
11/15/2017 02:21:59 am

Hi Ken. Thank you for your reply. I would like to create a figurine that can be adhered to the side of a table lamp.

Bryan
1/2/2018 11:45:35 am

Hi, great information! Was wondering if Pectin could be used in place of Gelatin?

Reply
Ken
1/2/2018 04:46:05 pm

Bryan,
Pectin would not work well as it requires a sugar and an acidic material to gel and would probably tear more easily. Sorry, Ken.

Reply
Ayry
1/2/2018 05:58:08 pm

great info, I like your blog

Reply
Maggie
3/16/2018 08:10:36 pm

Hi Ken, I think that your mold recipe has a lot of potential. I am learning to make 1:6 Playscale objects. One can’t find them readily available on Amazon or eBay. There are some sites that sell the things I’m looking for but are either too small(1:12 scale) or too expensive “just to have”. I’m sorry for rambling, but, I’m wondering if making the recipe a little thicker might be beneficial. Maybe just another gm or so of gelatin? Idk, just a thought. Thank you for the great ideas! 💕👍🏼

Reply
Ken
3/17/2018 04:26:46 pm

Hello Maggie,
This is a very versatile process and the firmness can be changed. But, not by adding gelatin but reducing the glycerine. A 10% reduction will slightly decrease the hardness. The more you reduce the glycerine the harder it gets. If fact you can make it almost rock hard but it may tear but may be good for a two-part mold. You may have to play around with the proportions to get the stiffness you want but it will work.

Reply
Ken
3/17/2018 05:26:31 pm

Maggie,
I should have said A 10% reduction will slightly increase hardness. My Bad! Ken.

Joyce
4/1/2018 01:44:22 pm

Hi, I have an old bread machine that has a silicone (high heat) gasket needs replacing but the gasket is not made anymore. I want to make a mold of the gasket which I could fill with high heat silicone, do you think this might work for that? I have found that I can purchase one on line, but the price to my door will be 1.5 times what I paid for the machine. https://i.ebayimg.com/images/g/rJAAAOSwXshWqkPE/s-l1600.jpg

Reply
Michael
4/1/2018 03:41:33 pm

Hi Joyce,
You may be better off trying a silicone mould. There are various recipes using off-the-shelf silicone and corn starch e.g. Oogoo (http://www.instructables.com/id/How-To-Make-Your-Own-Sugru-Substitute/) or Proto-Putty (https://www.youtube.com/watch?v=7fwytA5r2Mw). You may need some mould release, thought, to stop the silicone sticking to your gasket.
Hope this helps,
Michael

Reply
sanne
4/26/2018 07:52:18 am

Hi Ken,

I was wondering if your mold recipe is suitable to use for molding things such as chocolate, would it still be safe to eat afterwards?

thanks a lot!

Reply
Ken
4/27/2018 03:12:35 pm

Sanne,
This is covered in the comments but essentially you can use vegetable glycerine, (vegan). Ken

Reply
Richard Stanley
6/20/2018 03:23:08 pm

Ken I don't belong to face book Hence the comment here: Great stuff I have used air pressure to releast handgrips off my handlebars.. Was wonderignif that would work to aid removal . Air hose had 1/8" dia. tub outlet/..

Reply
Ken
7/2/2018 09:03:03 am

Yes with low pressure only, Ken.

Reply
Lois link
7/1/2018 06:42:43 am

What a delight to watch your videos. Your tutorials are excellent, and easy to understand. It is so much fun to see you go through the process and you often appear apprehenive thinking what you made may not work and then to see the delight that you express when ITI DOES work!! Love your site.

Reply
Ken
7/2/2018 09:05:06 am

Lois,
Thanks for the kind words and comment as it is appreciated, Ken.

Reply
Dwayne
7/9/2018 04:22:17 pm

Ken,
Would the geletin mold take the heat of melted wax being poured inside a cavity? I see the mold as being used to make a wax model for a lost wax casting? Thoughts?

Reply
Ken
7/10/2018 09:51:57 am

Hi Dwayne,
Yes it does work and you can see my sample at the end of the write up. Just chill the mold completely and remember that wax contracts as it cools so an added pour might be needed. Ken.

Reply
Dwayne
7/10/2018 12:55:21 pm

Appreciate it.

Dwayne
7/10/2018 02:24:24 pm

Maybe I missed it in the video but what was your wax recipe for the Santa candle? Also, do you think the wax formula you use will be able to be carved if necessary?

Reply
Ken
7/10/2018 03:32:02 pm

Dwayne,
I used readily available paraffin wax, begins to melt (mp 37C/99F) and is easily carved, Ken.

Reply
Dwayne
7/10/2018 04:30:13 pm

Thanks again.

Ole, Norway
7/16/2018 01:16:18 pm

THANKS for the perfect introduction to •this• universe 😊.
Love your style! Now I'm gonna try myself 😊
All the best from Norway!

Reply
Sanka
7/19/2018 05:06:46 am

I tried a recipe last night that was 4oz gelatin 11/4 cup glycerin 1/2 cup room temp water 11/2 cup hot water. It came out alright but I'd like to have it be more firm so I could use it for a push mold... any advice?

Reply
Ken
7/20/2018 09:49:35 am

Sanka,
Try a small batch with a 20% reduction of glycerin and it will be more firm but the trade off is that it slightly less flexible. But it should work with control of the glycerin amount. Ken.

Reply
Sanka
8/1/2018 10:41:08 am

I think it's working... Thanks! A couple more questions if that's ok... After using epoxy in the mold, is it still safe to remelt? And how many times can it be remelted, will it eventually become unusable?

Ken
8/2/2018 10:32:56 am

Sanka,
It is safe to melt again as there is no interaction between the two materials. As far as re-use. it depends on loss of water over time. Seal in plastic and refrigerate between uses an it will last a long time. I have used at least 20 times, Ken.

Reply
yassin
8/5/2018 09:12:00 am

thank for the information i wonder what is the shelf life for thouse kind of gelatin mold
do i can to work with in long time or not
thank for you answer

Reply
Ken
8/8/2018 04:08:42 pm

Yassin,
It will lose water over time so keep sealed in the refrigerator between uses and it will last a long time, Ken

Reply
hunter stanek
8/15/2018 01:15:36 pm

i so i just saw this and was wondering could i be able to mold my halo mega blok weapons. but i want to know what type of casting could i use to make the figure pieces slightly bendable

Reply
Sanka
8/20/2018 09:13:59 pm

It just occurred to me to ask... did that epoxy cast which had the dimensional change was that dimensional change proportional?

Reply
Ken
8/22/2018 03:12:42 pm

Sanka,
Generally speaking the change is proportional but I should use a calibrated square or small bar to quantify. Another project to put on the list. Thanks for the question, Ken.

Reply
Yendis
8/28/2018 06:25:41 am

Thank you for your meticulous attention to detail and understanding.
Have you any comments about the chemistry of using neat portland cement with an acrylic latex fortifier in place of water as the casting material (no aggregate). My first test cast was a bust. The surface detail was great, but the cement itself was crumbly. I let it set in the mould for nearly 48 hours, which is usually long enough when using plaster as the mould material and fortifier in place of water. I wonder if the gelatin pulled the water from the cement, though there is nothing about the appearance of the mould to make me think this, just that the cement did not cure properly

Reply
Ken
9/11/2018 10:38:45 am

Yendis,
Portland cement needs enough water to form a solid cement. It sounds like you need to make some test small batches to determine how much water to add. Good luck! Ken.

Reply
Sanka
9/8/2018 09:26:09 am

I read somewhere that people are substituting Glycerin for Sorbitol to increase the tear strength... any thoughts?

Reply
Ken
9/11/2018 10:42:09 am

Sanka,
Sorbitol can be used but the tear strength is better with glycerine and can be increased by using slightly less than what I recommended, Ken.

Reply
Yendis
9/21/2018 06:18:18 am

I unsubscribed by accident....I couldn't find any other way to resubscribe except to post a comment.

Reply
Sanka
10/1/2018 05:10:01 pm

I've been checking online to find a recipe that can be used as a brush on silicone like material... haven't found anything. Do you have any ideas?

Reply
Ken
10/3/2018 10:15:00 am

Sanka,
You could try thinning out 100% silicone caulk with naphtha (Lighter Fluid) but I am not sure if it is what you want. I would use a two part RTV and be sure of the result which would be brushable, Ken.

Reply
Jawed Avedia
10/8/2018 03:35:20 pm

Hi,
This mold use for resin casting ?

Reply
Ken
10/10/2018 03:43:40 pm

Jawed,
Yes, and other non-water based materials like wax. Just chill thee mold before pouring, Ken.

Reply
Janie Riordan
11/3/2018 05:13:38 pm

Such a great video (both). Would you please bread down the 10x formula you use. I have experimented but don't trust my calculations doing this amount of increasing. Appreciate your input. Loved the videos!

Reply
Ken
11/4/2018 08:56:55 am

Hi Janie,
20 X 10 = 200 ml water
4 X 10 = 40 grams gelatin
24 X 10 = 240 ml glycerine
Thanks for the question, Ken.

Reply
Janie
11/4/2018 09:01:15 am

Thanks Ken, I thought maybe there might be a change in in the formula for large quantities. Appreciate quick response.

Reply
esther wallace
11/5/2018 04:32:23 pm

how long does it take for it to cure? i want make a face or hand mold...

Reply
Ken
11/6/2018 04:41:18 pm

Hi Esther,
I have done this before so I do have some thoughts. First, let the mix cool enough so it is still pourable but not too warm. Second, place the container being used in enough cold water to cure faster after you have put your hand in. You will begin to feel the material become harder in about 15 minutes so be patient. Third, don't pull you hand out quickly but move your fingers a little to break the suction. You should then be able to pull out without harming the mold. Ken

Reply
Janie
11/8/2018 04:52:11 am

Came out nicely but very sticky. Any idea why?

Reply
Ken
11/8/2018 03:35:01 pm

Janie,
I assume that you mean the mold was sticky and not your hand and that suggests that the mold was not cool enough. Try refrigerating and see if it gets harder. The other possibility is that it would be a good idea to reduce the amount of glycerine and that will make the mold stiffer. But, you can still get your hand out by breaking the suction, Ken.

Reply
Scott link
11/25/2018 09:45:59 pm

Hi Ken, I'm looking forward to trying this, and if it works I'm hoping to scale it up somewhat to use in sculpture. It could be a real money saver for me. My question: do you think I can cast Hydrocal (basically, plaster of Paris with some Portland cement added) in this? In a previous comment on YouTube you mentioned it's not very good for plaster casting because of the water in the plaster. But I notice in the write-up above you do mention plaster. Any tips there? And thank you!

Reply
Scott link
11/25/2018 10:12:36 pm

By the way, I just saw that one of the commercially available reusable mold-making products similar to this offers a quick-cure plaster for use in their molds (and also sells the powder additive separately), and says that by creating a faster cure, the water in the mold doesn't have time to react. So, maybe quick-curing is the key?

Reply
Ken
11/28/2018 10:34:30 am

Fast set has the same heat output so no advantage.

Ken
11/28/2018 10:32:35 am

Scott,
The water is less accessible because it is tied up in the gelatin matrix. But the problem is in the exothermic plaster so chill the mold well. Also, use a plaster mix with a little less water. I have used it but it is not the best material but may work for you. Hydrocal has the same exothermic characteristics. Ken.

Reply
Ken
12/2/2018 10:58:13 am

David,
Vegetable glycerin works as well. And the "bubble buster" is a simple wetting agent like a small amount of detergent. Also, minimize stirring to reduce bubbles. Ken.

Reply
Sanka
12/13/2018 06:45:22 am

I tried using the Devcon 30 min epoxy and I didn't really notice any shrinkage, does the shrinking happen inside the mold or after demolding? How long do you normally leave it in before demolding, I demolded the piece after 8 hrs.

Reply
Ken
12/13/2018 10:18:38 am

Sanka,
Good information and I de-molded mine too soon. Would work better even with a proper casting resin. Thanks for the comment and insight. Wait to de-mold!. Ken.

Reply
Sanka
12/13/2018 11:24:56 am

Thanks, I actually WANT it to shrink though... I just wanted to see how long you waited to demold, with the hope that I could achieve the same shrinkage. Jr

Joan
12/24/2018 11:45:43 am

Do you think this would work to mold your colored hot glue by sticking cut hot glue sticks to a flat surface - sealing container - then pouring in the hot glue mix? Silicone molding works so I wonder if this might work or just melt.

Reply
Ken
12/25/2018 10:32:24 am

Joan,
The temperature of the hot glue exceeds the molding material so it will melt. Sorry, Ken.

Reply
DAVID
1/9/2019 11:49:10 am

Hi , I did score some ingredients. I 10 x'd your formula. I used Knox unflavored gelatin & glycerin USP..I ordered from a pharmacy..1 L for $21 CAD.
So, do you add more gelatin to increase the rigidness? The gylerin acts as the binder that melts & solidifies? So increasing gelatin will increase tear strength? Can you use the microwave instead of stove top?

Reply
Ken
1/10/2019 09:38:46 am

The glycerin acts as a plasticizer so to increase rigidity reduce the glycerin by 10% in small experiments until you reach the hardness you want. There are limits but 25% will still be OK. Don't increase the gelatin. The stove is used the first time because it is necessary to stir and that is difficult in the microwave.

Reply
David
1/11/2019 09:12:12 am

So I took your advice & did another batch x 10 to your formula but this time using 10% less glycerin. Now it is perfect.
So the new formula for a 10x batch is-
200ml bottled water
40 grams of gelatin (knox unflavored)
216 ml of glycerin , USP (Medisca.com)S/N-Y18-11470324, Code-0613-09
It is perfect.

David
1/11/2019 09:15:29 am

This is the glycerin I used
https://www.medisca.com/Pages/ProductSearch.aspx?Search=glycerin++usp#

David
1/12/2019 10:49:39 am

So Gelatin increases tear strength?

karen link
1/10/2019 06:47:20 pm

Thanks for the videos, I was looking at buying some reusable composi mold , that stuff is expensive for the beginner, (like me) as as you were showing the video how to make it, I realized ,,, I already made some for my scrap book called I believe a jelly plate!! so Now I can remelt that and use that!! Thank you again so much for the great video, casting is my newest hobby, :)

Reply
KAREN KRUSCHKE
1/11/2019 07:53:57 am

Hi Ken, Karen again, I tried the stuff I had already made, and it is not thick enough the item i used for a mold came out with the solution attached to it, can I make it thicker by melting it down and adding more knox to it?
Thank you
Karen

Reply
Ken
1/12/2019 10:27:33 am

It is possible but the question is how much to add. I would suggest small samples and the gelatin may be hard to dissolve but probably worth a try. Best of luck, Ken.

Ken
1/13/2019 08:35:00 am

David,
The tear strength is actually determined by the glycerin to gelatin ratio. Less glycerin = increased tear strength, Ken.

Reply
Ann Blachly
1/29/2019 06:24:17 pm

How does this molding compare to 3-D printing.
Example, I have a Sunbeam Stand Mixer which must have a broken plastic gear...because the beaters just stopped/clashed into each other and are out of alignment.
If it take it apart to discover this, what material would I use to create a new one?....using the gelatin as the mold from the original.
Or better to take the broken one and get it 3-D printed? There are no aftermarket parts.

Reply
DAVID link
1/29/2019 07:56:09 pm

Use a polyurethane liquid plastic for the part, its very tough. You have a couple options.
Specialty Resins in USA
https://specialtyresin.com/product-category/rigid-casting-resins/
Or Alumulite on ebay
https://www.ebay.com/itm/Alumilite-Amazing-Casting-Resin-16-Ounce/113550824494?hash=item1a7028142e:g:tgoAAOSwyYRcOlYE:rk:10:pf:0

Reply
Ann Blachly
1/29/2019 08:12:41 pm

Thank you such a quick reply....and for these options. I'll check them out.
I'm sure there are plenty of other things for which we could make new parts to get things repaired.
Thanks!

Scott link
2/7/2019 10:41:46 pm

Hi Ken,

The material is working beautifully, however, I ran into a problem tonight. I had cast some tinted/ colored plaster in a flat, wide mold, and afterward I needed to clean the colored residue off the mold so that I could use it for a different color plaster. I put the mold in cold tap water (I'm guessing 55 degrees or so, quite cold) and cleaned it up just with my hands. When I lifted it out of the water it just sort of fell apart immediately, tearing along the bends that were in it. So, did the cold water just make it too brittle to bend? Would water at say 70 degrees work better? Or if it's not able to be cleaned in water at all, what method would you recommend?

Next question. I have some spray-fixative here, which is just a clear acrylic spray coating that is used to keep drawings from smudging. Do you think that it would work as a mold release? I'm actually casting something I made from cardboard, and it releases ok but not great. And I don't have any silicone spray. From some comments above it seems like acrylic may not interact so well with this mold material? Alternatively I have some spray polyurethane here. Any thoughts on that as a mold release?

Thanks again!

Reply
Scott link
2/7/2019 10:49:30 pm

Last thing, Ken. I'm interested in making the mold stiffer, increase the tear strength. I was planning to mix 2 oz gelatin with 9.4 oz water, let it 'bloom' and then add it to the rest of the heated, liquid mold material, basically to just decrease the ratio of glycerin in the overall. Any issue with changing the mix like that?

Reply
Ken
2/8/2019 10:16:38 am

Scott,
Water at any temperature will cause the same problem as the material is water soluble. If the color is a pigment it can be filtered out but if it is a dye I would suggest re-heating and stirring to move the dye throughout the material. Not the best solution but it may work. Silicone would be best but acrylic should work. Ken.

Reply
Scott
2/9/2019 12:00:48 pm

Ha - don't know how I missed that fact! OK, again very helpful, thank you.

Scott

Steve link
3/6/2019 03:25:53 pm

Hi Ken
just wondering if anyone has tried adding agar/agar to formula of (gelatin,water and glycerin ) this may help to raise the melt temperature, mainly to help with problems with larger molds and plaster cast,were you have the gel breaking down slightly with the curing temp of plaster.
are currently trying different formulas to try and achieve.
will keep posted

Reply
Ken
3/13/2019 05:35:51 pm

Jenny,
Standard glycerin is not food safe so you have to use a food safe vegetable grade. You can Google the differences, Ken.

Reply
Don Santo
4/11/2019 01:05:32 am

Hi Ken,
You might find this interesting.
Take a battery, 1.5v is fine, and a magnetic compass (I used a suunto, but an inexpensive one will work).
Place the terminals of the battery close to the needle ends of the compass, switch around as required.
Answer the following questions:
1. Is the NORTH POLE of the compass + or - ?
2. Is the SOUTH POLE of the compass + or - ?
3. Is the + pole of the battery North or South?
4. Is the - pole of the battery North or South?
Please let me know what you find out and see if we get the same results.
Regards
Don S.

Reply
Ken
4/20/2019 10:15:57 am

Don,
I couldn't find a compass as I use a phone app but the results will always be the same. An alkaline battery is zinc and manganese dioxide with a metal case. So even disconnected there is electron flow which is a weak magnet according to the right hand rule. So the anode and cathode will produce the same result. Even a 9 volt battery will do the sane thing. Ken.

Reply
Also Ken
4/14/2019 11:37:26 am

This will be my first gel/glycerin mold attempt. I've been useng latex and silicone molds for about a year now.
Con you substute pectin powder for the gelatin? At this time I don't have the funds for a lot of experimentation.

Reply
Ken
4/15/2019 10:22:07 am

Unfortunately no as the pectin is a polysacharide (sugar) and will be a problem. Ken.

Reply
Jennifer S
6/7/2019 06:52:00 pm

I love this and about to start my first mold. I have spent hours reading so many comments so I apologize if my question has already been answered. My question is about cutting or trimming the solidified material. I need to cast something similar to scrabble tiles, but twice as thick. thick. say i glue 2 scrabble tles together to get the thickness I want. You know how the edges and corners are rounded, so I think the material will form an unwanted protrusion (line) between the two tiles. Can i shave the material easily to get rid of that? my other thought was wrap with tape, but there are like 50 of them to do.

Reply
Ken
6/10/2019 10:51:18 am

Jennifer,
Yes it is trim- able particularly if you refrigerate for a few minutes but you might also consider using a cheap clear finger nail polish to fill in the lines. Ken.

Reply
Lin
6/24/2019 06:07:32 pm

Thanks so much for all of the great information. Question regarding what can be safely used as the item to be cast. I would like to cast a VERY soft rubber frog (like stretchy rubber) and am not sure if it would ruin the item to be casted? Any recommendations for what to form the new item with (bakeable clay? POP?) It can be a firmer rubber texture or paper clay or other harder texture that can be painted.

Reply
Ken
6/25/2019 10:57:53 am

Lin,
I have similar frogs and have had no problem. Just don't pour the mold when it is scalding hot. I would probably use POP. Ken.

Reply
Lin
6/25/2019 03:13:22 pm

Awesome! Did you use anything other than silicone to be sure it didn't stick? Thanks for your help AND for being so quick to respond.

Celina Porter link
7/14/2019 07:05:07 pm

Hey Ken! Thank you so much for your fun! I really enjoyed this one, which was a side track from embossing powder! Do you have that one on your site? I am an artist that is branching out of my comfort zone, and don't want to spend a fortune on mistakes! :) Thanks again!

Reply
Ken
7/15/2019 09:06:48 am

http://www.observationsblog.com/sciencetechnologyexperiments/embossing-powder-made-at-home. Ken

Reply
sue causey
7/15/2019 01:37:10 am

I want to make rocks out of quickcrete.........do you think this would work for that?

Reply
Sue
7/15/2019 09:09:16 am

Sue,
No, both materials are water soluble and the bricks will be deformed. Ken.

Reply
Skyler Williams link
8/2/2019 12:32:42 pm

I had no idea that RTV silicone produced such great results. I am in need of a silicone mold but I wasn't sure what to get. I will make sure to keep this information in mind as I search for the right silicone mold to fit my needs.

Reply
Flávio
10/17/2019 06:09:22 pm

Hi Ken,
According to your gelatin mold recipe, if I want to increase the amount, please see if I made the correct formula.
If I buy 1kg (1000 grams) of gelatin, I will have to buy 6000 milliliters (6 liters) of glycerin and use 2500 milliliters (2.5 liters) of water. Is correct?
The second question would be:
For that big amount I told you above, would I make the recipe exactly the same as you demonstrated in the video or would I have to do something different?
Thank you very much

Reply
sam
10/22/2019 07:45:22 am

Do you think this recipe would be safe to us for making plates or cups or any item which is used to store or keep food ?

Reply
Ken
10/22/2019 09:14:15 am

Sam,
In order to be safe you need vegan glycerine to be completely safe. It is available in many places including online, Ken.

Reply
Heather
1/25/2020 07:21:02 am

This stuff is amazing . Wish i would of found it before i wasted money trying so many different things.
I do have a question though, i wondering is I could use this as a mold for my gummy bear candies? I worry because the are made out of jello an gelatin an this mold has gelatin to.

I have been working on ways to get rid of bubbles an i found that, if you let the mold material set up after you first make it in the frig then remove it in one piece all the bubbles have set at the top an you can cut them away then remelt the main mixture an bubbles are gone. I do this with my gummy bear jello mix , i found it when i was looking to make candies.
Figured it would work for the mold to an wallah it does.
Now if i can just use this mold for my gummy bears ?

Reply
Ken
1/25/2020 08:32:20 am

Heather,
The biggest problem in using the process you describe is the water available to blend with the mold. I suspect that a commercial mold might be a better choice. Just a thought, Ken.

Reply
Heather
1/26/2020 03:29:36 pm

Ken,
Thank you so much.
I did take a page out of your book ...lol... an decided to experiment a little.
The candy mix i use is unflavored gelatin, jello, an a small amount of water . So i made up my mold using your amazing mold material an set it in the freezer for many hrs while i made up q small batch of the gummy candy mix. I let the candy mix cool a little an then filled up my turkey baster, completly cleaned an sterilized. An then pulled mold out of freezer an started filling them . I put them straight back into the freezer for awhile then moved to set the rest of the time in the frig .. They came out beautifully.
Thank you so so much.

Reply
Ken
1/27/2020 08:45:40 am

Heather,
Congratulations on your success! Thanks for sharing your results as that is the value of a shared community. We all learn from failure and success. Thanks for the experiment, Ken.

Reply
liz
5/12/2020 02:56:41 am

Can you pour hot wax into a gelatine mould? Can't believe this would work but your second video seems to suggest one can use wax.
BTW I'd find it really helpful to have short written instructions. The videos are great but they take time to watch and rewatching to check detail takes forever.

Reply
Ken
5/12/2020 04:28:53 pm

Liz,
The operative word here is "hot". The mp of the molding material is about 130 F. So, the Santa Clause candle I made after the videos was with paraffin which has a low mp. I chilled the mold in the refrigerator for two hours and let the paraffin cool so that it still poured but was not hot. Worked like a charm!

Reply
Natan
6/1/2020 01:21:31 pm

This is so cool! But I have a question. Because the mold is made with water is there a chance that the mold will shrink because the moisture has evaporated? If yes, how much does the mold shrink (like by half or by a quarter)? -thaks in advance!

Reply
Ken
6/1/2020 04:40:49 pm

Natan,
No but over time if not stored in sealed container it will eventually lose water. Ken.

Reply
Natan
6/2/2020 03:00:43 am

Thank you so much!!

Michael
9/24/2020 10:17:58 pm

Thank you, Ken, for your really helpful instructions to try something other and easy (and way more affordable) than Silicone for flexible mold making.

What do you think about sealing/conserving such gelatine/glycerine molds of yours by water-proof wood/white glue?

And could flattened-out/poured gelatine/glycerine medium be glued to textiles by such white glue to form a flexible rollable mat?

Any chemical problems with using water-resistant PVA-type glue?

Reply
Ken
9/29/2020 03:37:18 pm

Michael,
The main problem with encapsulating the material is the relatively low MP of the process which is about 135 F. Also, PVC (Polyvinyl acetate is semi-permeable and will degrade over time. They are good ideas but I feel will disappoint over time. Ken.

Reply
Michael
9/29/2020 05:23:09 pm

Ken,

thank you for your kind help.

Ah, I see. My thinking was along the line of coating the finished, cool molds or forms with a water-resistant and quite flexible medium like certain types of Wood Glue - to keep those molds/forms and not remelting them (which is against the core idea of reusability of course - but very interesting as silicone proxy nonetheless).

I would use those forms as durable molds for not-too-hot casting media or modelling medium - more or less hardened by reducing the glycerine.

I understand that there is a general problem with bio-degradable plastics over time for (art) projects that should last (a while). Sometimes Thymol is used to repel at least critters.

So, PVA is no optimal solution for water-proof sealing or conservation, I see.

I tried to search for information about common types of industrial Wood Glue which is different for diverse usages and grades of water-resistance (Type I-IV). The chemical recipes seem to be different also, like 'PVA', 'aliphatic resin' and 'polyurethane'. Those ingredients could be (cheap) casting mediums by themselves!

I suppose, only long-time experimentation could tell ... .

Ken
9/30/2020 04:06:55 pm

Michael,
If you do come up with a solution please post and pass it on to us. We all like to learn from others. Ken.

Reply
Michael
9/30/2020 04:30:25 pm

I will, Ken.

Btw. I have the impression people are searching for alternative mediums not only because of money and ecology but health also. Gelatine-glycerine seems to be safe for my skin and lungs - silicone, epoxy-resin and polyurethane not so much! :P

Take care and happy crafting!

Reply
Russell
10/15/2020 08:57:50 am

hi Ken will it cast plaster of paris thanks

Reply
Ken
10/15/2020 09:30:57 am

Russell,
I have cast with POP but some things to consider: POP is exothermic when setting so chill the mold before pouring. Make the POP a little thick with less water. It can be a little tricky but does work. Thanks, Ken.

Reply
Ken
10/16/2020 03:22:52 am

sorry is that with lemonade ken and how do I thicken the mixuture thanks

Diego walker
1/14/2021 11:08:53 pm

Rotomolding Of Plastics can also be utilized for the production of storing tanks for hazardous liquids. Plus, they are designed to be easy to use in any project. Interested to know more about rotomolding of plastics? <a href="https://www.24article.com/rotational-molding-economy-and-versatility-in-a-single-technique-3.html"><b>Learn more</b></a> here.

Reply
Gari Oke
2/24/2021 02:09:40 pm

Hi Ken. Great tutorial. I made a mixture of 200 ml water, 150 Glycerine and 28gm of Gelatin. Made a mold of the head of one of my rubber action figures. I used a slow curing Epoxy Resin and it turned out great. I might try a firmer mixture on my next batch, but so far am pleased with the results.

Reply
Moses
4/4/2021 11:45:59 am

GREAT IDEAS KEN!

You re a trained ChemEngineer?
which materials will make gelatin more rigid?
Which materials can we use to replace $$$ Resin urethane on tiny model parts?

On sm. critical parts Im brushing on layer of $$$ RTV Silicone + Chunkies + THEN Im trying your gelatin as the THE 80% mold matreial

Ive found terrific supply sources to save $$ and to share with all;Buy Online Walmart Harbor freight Ebay ;
---No name,1lb Gelatins + xxl Glyercerin
--Sm Poly Mold boxes = $ .50= 8" x3 x 2"H Chinese takeout pans w/lids
--XL Poly tote supply boxes = $1.19= 13" x8 x 6"H "8 Quart strelite totes w/lids -chop up lids for more mold frames
-- FREE Poly campaign Signs; make great bases & sides
--expensive hot glue vs No name silicone caulk gun !

Can you do a Video on complex, small ship or tank parts? eg Which direction makes better wheels, anchors, 1" soldier figures?
Thanks
Binsman Boston


Reply
Sabrina
6/2/2021 10:43:36 am

I saw a few comments about two-part molds and would like to report that I've successfully made cap/squish molds with this compound by letting it cool until it's comfortably warm on skin before pouring. I haven't tried chilling the existing half of the mold but that could help as well.

Vaseline works great as a mold release and I've gotten super clean keys. I recommend at least a 3/4" cap, as anything thinner seems to want to curl.

Reply
Kristofer Van Wagner link
7/8/2021 08:56:19 pm

I do agree that it is important for us to choose the right service as it will impact the outcome and the quality. It makes sense as in doing so, we can consider the proper removal. I will definitely keep this information in mind for future references.

Reply
Erica
8/8/2021 07:40:05 pm

Just want to say how sorry I am to read that this post is "in memorium." I just came across it today, and Ken sounds like a really interesting guy. My condolences.

Reply
Derek
8/11/2021 01:29:19 pm

I also just found this page and have been reading through the comments for much of the afternoon. I hadn't seen "in memoriam" - thank you, Erica, for your comment.

I am sad to read about this. Finding someone that builds a community by sharing and encouraging others to do the same is a beautiful thing.

Thank you, Ken Jr., for keeping this going for all to contribute and benefit.

Reply
Toystorations link
9/3/2021 12:29:54 am

Adding my condolences to this comment chain, I've come across this recipe many times over the years and I finally tracked it down to Ken here, who I assume is the originator of this legendary concoction? If not the originator, he surely understood it and I've just read through almost a decade of helpful comments and friendly advice, and I am now saddened to learn that I cannot personally thank Ken for his generosity in providing the world with his knowledge.

To Ken Jr and anyone who knew Ken, I just want you all to realize how unbelievably amazing Ken's work was, and how rare it is to find someone so clearly genuine and wholesome. Thank you for preserving his notes here, and his memory. His legacy deserves to live on forever in the vastness of the internet and I am truly saddened to hear of his passing.

Adam Golightly link
8/24/2021 02:51:07 pm

My cousin has been thinking about getting some cast resin in order to be safer. She would really like to get some help from a professional in order to be safe. It was interesting to learn about how gelatin can work really well, and it can form a flexible wall.

Reply
Matt
11/1/2021 08:28:37 pm

I followed him on youtube:) he was very informative. Thanks for all the help and God speed. Sorry for the loss:)

Reply
Marijo
5/20/2022 04:46:20 am

I am very sorry for your loss. This blog post in particular was very useful. I appreciate his experimentation and appreciate you maintaining this space.

Reply
Alice link
6/14/2022 11:36:13 pm

Hi

The article is very informative.Thanks for sharing the
Reusable Molding Material: Homemade. Wonderful article. Please read about us on our website.

Kind Regards

Alice:https://zetarmold.com

Reply
Jane link
12/13/2022 08:29:48 am

Thank you very much for your analysis. Our company is also engaged in related industries and your article is very helpful to us. Our company's website is https://zetarindustry.com
We are looking forward to the publication of your article soon and it will inspire us more.

Reply
Eddie Wild
5/2/2023 08:05:19 am

Just tried this but found that the gelatine didn’t all dissolve when heating. I was conscious of your warning of over heating so maybe I was too cautious and failed to heat it enough. I would appreciate your comments. And thanks for the video.

Reply
Richard
6/19/2023 05:35:20 pm

Hi Ken, thanks for sharing this. You are an answer to prayer! I thought I had to pay hundreds of dollars to get a simple reusable mould material. You are a legend!
Thanks again.

Best Regards Rich

Reply
Gaby link
9/10/2023 07:15:27 am

Hi Ken Jr I just wanted to add my condolences. I got directed to this site about 3hrs ago. Believe me I enjoyed reading the posts. He sounded like a real enthusiastic gentleman. Who loved helping people.
I’m sure he’s going to be so missed. I’ll never get to ask him the question but won’t forget him either. Gaby

Reply
Cassim
9/30/2023 08:54:40 pm

Can I use glycerine to make the gel more liquid

Reply
Joe
3/26/2024 08:39:15 am

Ken Jr., my sincere condolences. I just found this website, and it has answered so many questions for me. Your father was a great man to share such a wealth of knowledge. My deepest thanks and appreciation.

Reply
Bob
8/5/2024 10:07:58 am

Does anyone here know of anything I could try to make the molding material itself more clear and less brown/amber in color? Is it the gelatine that gives it that color?

Reply
Gabe
4/12/2025 01:06:12 pm

Clear gelatin will be somewhat lite tea hue and foggy in clarity . It will be more cloudy and tinted if it is thicker or has a lot of micro bubbles. Not heating quite enough or long enough can cause a darker hue or increased fogginess. Also waiting to long to pour it will cause it to be foggier. Pouring immediately after you're done heating it while it's still very hot should improve clarity.
The brown color could be related to the brand/quality of the gelatin.
If it's really dark in color depending on how you're heating it perhaps you're scorching it.

Reply
Pee town
9/20/2024 03:34:08 am

Hi Ken
I’m trying this out for a project where I will touch the mold repeatedly. My first try feels quite oily and leaves a residue on my hands. Do you think this material could be created to not leave a residue on hands? Keen to experiment further but don’t want to waste my time! Thank you

Reply
radhika
3/23/2025 08:00:42 pm

Thank you so much to Ken's family for being so thoughtful as to leave this site up.

What a generous man Ken must have been to share all this knowledge.

With much gratitude,
Radhika :)

Reply


Leave a Reply.

    Author

    The author has an eclectic background in chemistry, electronics, writing, mental health, and community action...Ken

    Archives

    June 2021
    March 2020
    September 2019
    August 2018
    August 2017
    March 2017
    December 2016
    November 2016
    October 2016
    August 2016
    April 2016
    December 2015
    September 2015
    May 2015
    March 2015
    February 2015
    December 2014
    November 2014
    October 2014
    September 2014
    August 2014
    July 2014
    June 2014
    May 2014
    April 2014
    March 2014
    February 2014
    December 2013
    November 2013
    October 2013
    August 2013
    July 2013
    June 2013
    May 2013
    April 2013
    March 2013
    February 2013
    January 2013
    December 2012
    November 2012
    October 2012
    September 2012
    August 2012
    July 2012
    June 2012
    May 2012
    April 2012
    March 2012
    February 2012
    January 2012
    December 2011
    November 2011
    October 2011
    September 2011
    August 2011
    July 2011
    June 2011
    May 2011

    RSS Feed

    Categories

    All
    Acid And Bases
    Amateur Scientist
    Anodizing Aluminum
    Anthocyanin Indicator
    Ant Orientation
    Artificial Intelligence
    Bar And Cr Code
    Cable Tie
    Carbon Dioxide Fun
    Catalase And H2o2
    Chemical Art
    Cold Cathode
    Color Hot Glue Sticks
    Common Chemicals
    Copper Plating
    Cyanotype/Blueprint
    Dot Com
    Electroluminescence
    Epoxy Art
    Experiments
    Hydrogels
    Infrared Photography Basics
    Magnetic Money
    Old Textbooks
    Photograms
    Science
    Static Electricity Detector
    Technology
    Yogurt

Powered by Create your own unique website with customizable templates.