Observations
  • Home
  • Observations
  • Trendcasting
  • Odds 'n Ends
  • Science/Technology/Experiments
  • Mental Health

Melting Point Apparatus...Inexpensive and Easy to Build.

2/1/2013

26 Comments

 
Picture
Testing the melting point of an organic compound is frequently used to qualify and quantify the purity of a chemical. Unfortunately, the cost of suitable equipment is quite high and out of reach of the home chemist. And, although I continue to make or isolate chemicals sourced through garden centers, hardware stores, and craft stores, I have never had a melting point apparatus for home use until now.
I had some thoughts about using the heating element from a hot glue gun when I posted the project on “Making Color Hot Glue Sticks” and the results are documented in the two videos below. And, although the precision of a homemade device is not as good as a $500 piece of equipment, the results have been very acceptable.
I determined the accuracy of the project by testing the melting point of three known standards that I had on hand that had a range of from 50C to 200C. These were reagent grade materials and I used a ramp speed of 10 degrees C per minute until melt occurred. In all three samples, the error was +2 C higher than the literature value. So, I can reduce the reading on the meter by 2 degrees and be fairly certain of the correct melting point.
Another tip for dealing with the variation in chemicals found in local retail locations can be to use recrystallization to purify these chemicals. I posted the recrystallization of potassium bitartrate (cream of tartar) found in the spice aisle of the supermarket to make better piezo crystals. The post is in the archive for December 2012, or scroll down to the post. Comments are always welcome and appreciated.
Electricity and heat = CAUTION...


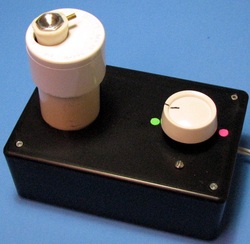
List of parts for this project:
Surebonder Hot Glue Gun 40 watt model H-270 High Temperature or equivalent.
Leviton Trimatron Single pole (1 Location) Rotary Dimmer 600 watts Number 705 or equivalent. Wired in as any other standard single pole switch.
Master Plumber soldering heat shield Fiberglas matting # 638 239 (9" X 12") or equivalent.
PVC pipe 4" long by 1 1/4" ID. (Schedule 40).
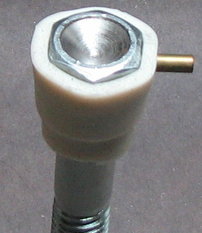
Machine bolt 2.5'' long by 7/16" diameter, 5/8" head Grade 5.


Picture
26 Comments
Scott
2/8/2013 10:44:56 am

Cool tool! What is the set of books on the desk?

Reply
Ken
2/9/2013 01:06:02 am

Hey Scott,
The books are: The Family Creative Workshop (24-volume set) [Hardcover]. These are really great craft books and as I am interested in almost everything, they have been a good resource. Although they were published in 1976, the information is still relevant. I bought them about ten years ago at a yard sale for $5. They are still available from what I could see in the web.

Reply
Claire link
2/18/2013 03:08:20 am

Hi! I work with engineering website EEWeb.com and would love to do an exchange of website links and feature the science/tech category of your blog as a site of the day on EEWeb. Would this be of interest to you?

Reply
Ken
2/18/2013 03:47:10 am

Hi Claire,
I have no problem with your proposal but please notice that I have no advertising, nothing to sell, and try not to promote other interests. But sharing? Absolutely! That is the reason that I maintain this site and I have placed everything in the public domain for others to use as long as they attribute it to the site. I am not sure that my site meets your criteria though as it is more "hacker" geared. I do some strange projects with many failures but am willing to share it all. I have a "right brain left brain" sensibility and often mix art and science. But, let me know and for off-line communication you can contact me at ken.quast@gmail.com. Thanks for the nice thoughts! Ken.

Reply
Andrew
3/4/2013 05:43:45 am

The 2nd video cuts short during the explanation of the fiberglass insulation -- is there more, or a problem with the website, or ...? I'm fascinated, and dying to see the rest...

Reply
Ken
3/4/2013 08:01:26 am

Hey Andrew,
I just checked the video and it is fine and I have had no other problems with my web host. My best guess is that it may be in your connection. The video is running at 30 frames per second and with some DSL the connection runs slower. Try starting the video and hitting the pause and watch the grey gas gauge as it gets ahead of the blue play gauge. When it is ahead of the blue, it will run fine. Let me know if you have any further problems or questions. Good luck, Ken.

Reply
Phill
10/5/2014 04:53:17 am

Awesome thank you very much sir! Very informative, you truly played a huge role in not only saving us hundreds of dollars, but you've enabled us to ensure the validity of our compounds/experiments! Very kind of you! +2!

Reply
toko alat seks link
1/4/2017 06:31:03 am

I am happy to hear even if only as a reader, his Arikel very interesting.

Reply
Kelly Bell
3/12/2017 01:08:35 am

Do you use capillary tubes for your samples? Or if you don't, how might you modify this to use them?
Thank you so much for such a great share - I have need of one and I can't wait to attempt this build!

Reply
Ken
3/12/2017 04:48:09 pm

Hi Kelly,
No, I do not use capillary tubes as an ocular is really necessary and makes construction much more difficult. I can learn more and do it quickly with this device which is analogous to a Fischer-Johns MP. I can easily see the sweat point and see melting ranges effectively so I would have to re-design for tubes. Thanks, Ken.

Reply
Kelly Bell
3/15/2017 07:03:24 am

Awesome! Thanks Ken! Aside from my project box size question, I was wondering if you could give us a couple closeup pics or videos ("uppy-closey", as we say in vapeland) of the cup/bolt/thermo assembly part, and also for the alternate method? For the former, I'm trying to see exactly how the bolt has to be drilled out and the angle of drilling for the thermo probe. (You'd probably be shocked, btw, at how hard it's been for me to find that bolt in the size specified!)
For the alternate version, you don't use a bolt at all, correct?
Thank you!
Kelly

Kelly
3/13/2017 05:48:02 pm

Hi Ken,
I asked above but maybe you didn't see: how might I adapt this to use capillary tubes to carry samples?
Also, do I still need the hollow bolt if I use your alternate method (hacksaw through handle/barrel)?
Where would I drill for my thermo probe in this (alternate) method?
Thanks!
K

Reply
Ken
3/14/2017 04:18:01 pm

Kelly,
My design is really for the Fisher-Johns type of MP and there would have to be a lot of re-design and perhaps a different heating mechanism. Viewing would also have to be addressed. In the alternate method I would drill in the bolt head and insert the probe there. But, insulate well as there will be heat loss. Ken.

Reply
Kelly Bell
3/13/2017 05:50:49 pm

One more question: what size is your project box? I don't have one lying around so I have to order one...
Thx!

Reply
Ken
3/14/2017 04:21:45 pm

Kelly,
The project box is 6 inches X 5 inches, and 2 inches deep. I think it was a Radio Shack box but I am not sure if they still carry them. Thanks, Ken.

Reply
Kelly Bell
3/15/2017 07:07:51 am

Thanks Ken! That's really helpful bc at least in the PNW, Radio Shack doesn't sellnthem anymore. Sadly, theres basically NO nationwide local resource for electronics hobbyists now. RS only carries cell phones and cheap consumer electronics now. There's no way to browse or size things visually. It breaks my heart. Thanks again!

Reply
Kelly Bell
3/15/2017 07:25:57 am

The only project box I've been able to find on Amazon that fits your specs is made of ABS, with a safe temp rating of -20 - 70 degrees (C). Is that going to be adequate, with the heat shielding / PVC assembly in place?
Thanks!
-K
Ref: BUD Industries CU-3283 Plastic Style A Utility Box, 6-3/32" Length x 4-19/32" Width x 2-23/64" Height, Black Texture Finish https://www.amazon.com/dp/B005T5A0W4/ref=cm_sw_r_cp_api_uWuYybEWW3MN9

Ken
3/15/2017 04:18:56 pm

Kelly,
The project box that you described is fine for this application. The closeup photo has been attached to the space under the list of materials since photos can't be added to the comments section. To make the concave hole I used a 3/8 (9mm) drill after center punching. The curvature follows the natural taper of the drill tip. You can make your hole deeper but don't exceed the thickness of the nut. The brass tube is not at an angle and really is not needed. I drilled the hole too big for the thermocouple and it was too loose so I had to add the brass tube for support. The thermocouple should be tight and the hole should not go into the concave section. If you use a dial thermometer, drill it just deep enough to insert the probe and try to keep it tight in the hole. The same bolt is used in the alternative method. Good luck, Ken.

Reply
Kelly Bell
3/20/2017 03:01:09 pm

Hi Ken! One more question. I would like to wire in an on/off indicator LED. Do you have any suggestions as to how best to do that? I'm thinking for placement just to the upper left of the switch.

Also, I'm using a digital probe thermometer, not an analog gauge type. Just FYI.

Thanks!!!
K

Reply
Ken
3/21/2017 09:41:05 am

Kelly,
The indicator light is probably a good idea. The easiest way is to just pick up an indicator LED assembly that has the bezel and is ready to install. I would use a neon (ne2) and a 100k resistor as they are cheap and reliable. Using an LED with 120VAC can be a little tricky. Some say that all you need is a resistor to limit current, but others believe that a diode is also needed. Best you do a Google search for some circuit ideas. No photos needed but let us know how it worked for you. Thanks, Ken.

Kelly Bell
3/17/2017 07:45:08 pm

Thank you SO MUCH for all that detail, Ken. Incredibly helpful! I know we can't post pics in the comments but if you want pics of the finished device I'll be happy to send. Almost done! Just waiting for the box to arrive to complete assembly. My friend Eric took the bolt to a friend's house who has a drill press and drilled it out for me, and sawed the base as well (this is hard to do without a drill press!) - he watched the videos too and remarked on how fun/easy a project it is.
THANK YOU!
- Kelly

Reply
Kelly Bell
3/21/2017 12:37:00 pm

Hi Ken. I'm excited by this find - a tiny, AC LED pilot light that seems perfect for this project. It's not neon AFAIK, but it's an AC (as opposed to DC) LED, which makes up for it in spades. Inclusion in the project is as simple as wiring the anode to the hot lead on the dimmer, and the ground/ground. No need for resistors etc. It's tiny too, so a very professional fit and finish.

Blue Sea Systems 120V AC LED, Green https://www.amazon.com/dp/B000K2IKPK/ref=cm_sw_r_cp_api_h9x0ybCTNPH8J

Reply
Kelly Bell
3/21/2017 01:03:09 pm

Please forgive me for indulging in a little speculative modification here… I've been dreaming of finding a way to add some intelligence to the mp measurement process. The goal being some way of identifying the beginning and ending melting points of whatever solid is in the cup.

The only constant I can think of that's common to any material in the cup is weight (the sample's low mp range reading would be returned digitally when the weight first starts to decrease, then the high mp reading when it returns to 0). But I wonder if there even exists an inexpensive digital sensor that's up to the job. It would have to be super-sensitive and heat-tolerant, and for what I really want it needs to be IC-based (though a circuit for it would be trivial to design, if need be).

But I keep thinking there's GOT to be some other variable we can measure that's common to the melting process for all substances… just not sure what that would be. It doesn't have to be an intrinsic feature - perhaps there's significant enough air disturbance that if we closed the sample cup, air turbulence or some other property might be measured?

In any case, if you (or other readers) have any ideas for a suitable common parameter I'd sure love to hear them! I think it could be really cool. And of course I'd share any eventual results/designs here.

Thanks!!
Kelly

Reply
Kev
1/15/2018 08:51:37 pm

@Kelly Bell. I would use density rather than weight maybe a tiny weight on the product that triggers a field or something when it hits the bottom of the testing bowl

Reply
Obat Pembesar penis Pria link
12/15/2017 05:40:23 am

Cool tool! What is the set of books on the desk?

Reply
Alat Bantu Sex Bandung link
6/13/2018 07:23:16 pm

nice artikelnya

Reply


Leave a Reply.

    Author

    The author has an eclectic background in chemistry, electronics, writing, mental health, and community action...Ken

    Archives

    June 2021
    March 2020
    September 2019
    August 2018
    August 2017
    March 2017
    December 2016
    November 2016
    October 2016
    August 2016
    April 2016
    December 2015
    September 2015
    May 2015
    March 2015
    February 2015
    December 2014
    November 2014
    October 2014
    September 2014
    August 2014
    July 2014
    June 2014
    May 2014
    April 2014
    March 2014
    February 2014
    December 2013
    November 2013
    October 2013
    August 2013
    July 2013
    June 2013
    May 2013
    April 2013
    March 2013
    February 2013
    January 2013
    December 2012
    November 2012
    October 2012
    September 2012
    August 2012
    July 2012
    June 2012
    May 2012
    April 2012
    March 2012
    February 2012
    January 2012
    December 2011
    November 2011
    October 2011
    September 2011
    August 2011
    July 2011
    June 2011
    May 2011

    RSS Feed

    Categories

    All
    Acid And Bases
    Amateur Scientist
    Anodizing Aluminum
    Anthocyanin Indicator
    Ant Orientation
    Artificial Intelligence
    Bar And Cr Code
    Cable Tie
    Carbon Dioxide Fun
    Catalase And H2o2
    Chemical Art
    Cold Cathode
    Color Hot Glue Sticks
    Common Chemicals
    Copper Plating
    Cyanotype/Blueprint
    Dot Com
    Electroluminescence
    Epoxy Art
    Experiments
    Hydrogels
    Infrared Photography Basics
    Magnetic Money
    Old Textbooks
    Photograms
    Science
    Static Electricity Detector
    Technology
    Yogurt