Observations
  • Home
  • Observations
  • Trendcasting
  • Odds 'n Ends
  • Science/Technology/Experiments
  • Mental Health

Make your own color hot glue sticks!

8/10/2011

78 Comments

 
Picture
There is now a video overview on YouTube Here.


Hot glue guns and hot melt adhesives are a part of most homeowners, hackers, and craft folk’s arsenal.  Generally speaking, they are an effective way to bond a variety of surfaces. But what happens when you want some color other than clear or amber? Well, you can buy color glue sticks with a limited range of color at a high price, or follow this project and make virtually any color as needed. The slideshow is intended as a guideline for making a limited number of hot glue sticks at one time. It is not intended as a method for mass production.

  Domestic hot glue adhesives are all over the map in composition, open time, tack, viscosity, and bond strength. Many are based on ethylene-vinyl acetate with added modifiers. The two sizes most easily acquired are 11 mm, (7/16"), (.43”), and 7mm, (9/32"), (.28”) diameters. The standard length is 4”. For this demonstration I am using standard “Surebonder All Purpose Glue Sticks”, 11mm, the most commonly available size. But, there is the opportunity for experimentation with all of these hot glue adhesives. The key to this process is the Reynold's  parchment  paper which is coated on both sides with silicone. It is food safe and performs up to 420 Fahrenheit. It is a great release agent for hot glue.
CAUTION: Hot glues guns operate at close to 400 Fahrenheit and can cause burns. This project is not for children, but for responsible, safety conscious adults. There is more surface area when heating in an open container and more fumes as well. Due to the unknown composition of hot glue adhesives it would be advisable to do this project in a well ventilated area.
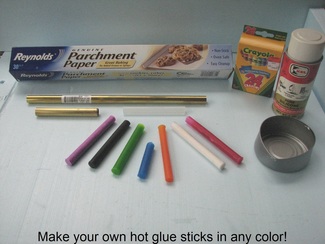
Parts and pieces:
  • Brass tube 12 inches long, 17/32" diameter,  .014 wall thickness. K&S Engineering Stock# 140 . Available at Ace and True Value hardware as well as others. K&S home here:
  • Reynold's Parchment Baking Paper. Others may work but this is the one that I used.
  • Silicone spray (Optional but helpful to protect tube exterior and other surfaces from unwanted hot glue adhesion.
  • Standard hot glue sticks for melting.
  • Color crayons. I used Crayola.
  • Disposable metal container for melting and mixing hot glue. I used a tuna can fashioned with a pouring spout.


Tips and tricks:
If there is difficulty with pouring, make a silicone funnel as shown. You can also make a cardboard funnel with a parchment paper insert if no silicone funnels are available. Silicone seems to be the best material for release properties. You can also add up to 10% by weight of paraffin wax to reduce the viscosity without sacrificing bond strength. Preheating the tube while heating the glue/color can buy you a little more pour time. Let filled tube cool about 20 to 30 minutes and disassemble. Parchment paper can be reused many times.
Before cutting the tube, wrap a glue stick in the parchment paper and push it beyond where you will make the cut. This will reduce the depression made by the tubing cutter.
There may be some variability in the tubing ID so making the parchment paper longer will decrease the finished stick diameter.
As in any additive color system, white crayon can be added to lighten the color.
Good luck and let me know if I can improve the process. Thanks, Ken...
Picture
78 Comments
Zech
12/6/2012 12:47:59 am

The wax in the crayon doesn't gunk up the glue gun?

Reply
Ken
12/6/2012 01:12:43 am

No Zech, Hot glue already has wax as one of its ingredients. As indicated in the writeup, the additional wax does not change the bond strength even up to 10%. Ken

Reply
Chris P
11/23/2013 12:42:54 am

So, I've improved the technique a bit.

I take a coffee can, fill it with a plaster of paris solution. Insert about 20 glue sticks into the mold until only a about 1/2 inch sticks out of the top.

Allow to set. Remove glue sticks. Bake to drive off moisture.
Melt glue sticks adding whatever colors desired.

You can grease the mold to help release if you like.

Pour into mold. I let the excess form a cap.

Let cool. Pull sticks from mold. Cut off cap.

Hi
2/20/2016 06:20:20 pm

No siree

Reply
val link
2/4/2013 08:03:07 am

hey, can u put a pic of the final product finished and in use??!

Reply
Ken
2/5/2013 01:31:44 am

Good idea Val,
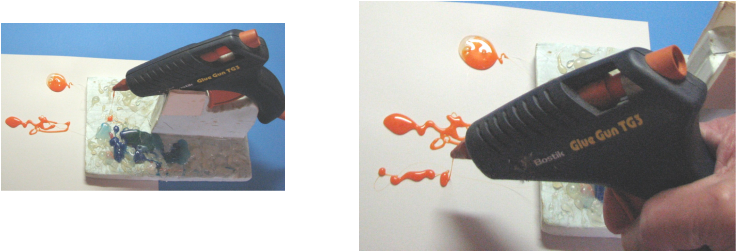
I edited the post and added the two photos made today. The first shows the glue gun loaded with the orange stick and the second in use. The round blob in the rear is the material flushed out from clear to orange. Hope that this helps and thanks for the comment. Ken.

Reply
mourmourq
3/15/2013 11:33:48 am

hi
i did it all
but cant have my all new purple stick from the tube
have you any idea to help me????????????????????
p.s: i have pictures to show if you want
thank you!

Reply
Ken
3/16/2013 01:11:17 am

If I understand you correctly, the glue stick is not releasing from the tube. If the tube is lined correctly with the parchment paper there should be no problem as the parchment paper has a silicone coating that acts as a release agent. However, the hot glue will stick to any surface not protected with the parchment paper. If I have misunderstood the problem send another comment reply and explain before sending photos. Good luck!

Reply
moourmourq
3/16/2013 11:47:15 am

yes you did understand very well !
thank you and excuse my very poor english...
i used a 22cm(instead of 10cm you gave) cupper tube (i cant find a brass)
i only curled once around the stick wirh the paper(3 cm perimeter) you said 19 cm ,maybe it's this the problem
but i had problem to enter the paper into the tube .
from next week i'll try with a 10cm tube and a 19 length paper
and i 'll let you know
thank you very very much for your post
iit is very helpfull and very easy (photos, directions,measurements)
to follow
perfect
thanks aigain.............

Ken
3/17/2013 01:39:07 am

Well done as you have identified both of the problems. The length 10 cm is important as any added length increases the friction during removal. It is possible to chill the finished assembly in the refrigerator to cause the hot glue to shrink in size. The parchment paper is less important as long as it completely lines the tube. And the copper is fine; in fact any tube material will work as long as it is heat tolerant. Again, well done! Ken.

Reply
mourmourq
3/19/2013 04:22:15 pm

hi again!
finaly i did it!
with 10cm tube
but at the end i had problem to remove the paper from the stick
it was stuck.................
i scratched with hard sponge and hot water
now its ok
thank you very much

Reply
Olivia
4/7/2013 03:11:54 pm

I gave Home Depot a shot and couldn't find the brass tube but picked up a copper tube of a similar size. Hopefully it works out okay. But I did have a question... you seem to melt a lot of glue sticks with the crayon but only come out with one when all is said and done? Am I misunderstanding?

Reply
Ken
4/8/2013 01:29:31 am

Hi Olivia,
Yes, it is an optical illusion. In fact, I may have made two pours and photographed only the second pour. But, you bring up a good point; due to the viscosity, it is difficult to get all of the hot glue out. That is why I use separate containers for each color. The copper tube will work just as well and if the diameter is too large the difference can be made up by using a little more parchment paper. Thanks for the comment, Ken

Reply
Stephen Fitton link
4/7/2013 07:16:04 pm

I was looking for the answer how to turn basic glue sticks into color as I needed to make a button die for some aluminium extrusions I had fabricated. To cover holes drilled.
Simple die will be made by drilling 2x matched aluminium plates with 4x Holes outside edge Guide pins fitted Plates drilled depth of button width of holes, Separated and a larger drill drilled into holes partly drilled into second, plate Drilled 1/8 th inch with oversized (Drill making head). When assembled. fill with colored hot glue stick. Seperate plates/test and increase hole size if shrinkage too much.
Use your normal non stick spray to prevent failures.

Reply
Christy
5/21/2013 07:23:10 am

This was great, thank you!
The glue I like is not available in the mini size - but the glue gun I like is a mini! So I used your method to transform standard sticks to mini-size. After clogging my brass tube I started using only rolled up parchment paper propped up in an old spice jar. Works a treat! Lastly, I use the standard sized glue gun to squirt the hot glue into the mold so no need for stove-top melting or funnels in my case :) Thanks again for sharing!
Thank you again!

Reply
Ken
5/21/2013 08:35:16 am

Very clever Christy! I had the same problem with the mini as the tube diameter is very small. And, as long as you are not using color, the direct fill from a standard is a good adaptation. Very good idea. Thanks for the comment. Ken.

Reply
tonya
6/17/2013 02:18:25 am

here goes :) i am going to try christies method of just using parchment paper in a jar if this doesnt work then i'll go but a copper tube

Reply
Sheryl
6/23/2013 04:24:22 am

Hi! I happen to have left oversilicon molding which I will pour around a glue gun stick and use that instead of tubing as template. Do you think there will be a problem with this?

Reply
Ken
6/23/2013 11:14:29 am

Hey Sheryl,
That is possibly a great idea! The Shore hardness is a bit too soft so it may become distorted but it should release fairly well. Lucky that you have some left over as it is expensive and has a relatively short shelf life. I think that I would support the completed mold with some outer material, but clever idea and please let us know how it worked. Ken.

Reply
Beth
7/17/2017 01:38:18 pm

I have seen lots of videos on making a shell around the silicone mold. Maybe make a lot of silicon molds around glue sticks THEN sinking the silicone shell WITH the glue stick still inside into a box of plaster like Ken did. Then later remove the glue sticks and use the silicon/plaster shell for the mold process.

Sheryl
6/23/2013 11:34:45 am

This particular silicon does have a longer shelf life and I will use plastic pipe (cut up and down to make two parts held together with clamps) that will hold the glue stic template. Once dried I will pull out the template and place mold back in pipe, secure it then pour hot glue with wax. I have found that a combination of wax and glue is used as sealing wax for stamps. Once I've completed this I'll let you know how it turns out. Thanks Ken

Reply
Milt Nation
10/29/2013 08:22:04 am

Ken (and all that made comments). This idea is outstanding, fun and saved me money. Thank you!

Reply
Sarah
11/9/2013 08:06:38 am

How many glue sticks do you melt with one crayon?

Reply
Ken
11/10/2013 12:05:44 am

Hi Sarah,
Great question and the answer depends on two variables. The first is the color density and the second is the color desired. The crayola crayons have different tinctorial strengths. The process that I used when developing the process was, in general, 1/2 of a regular size crayon to three standard size glue sticks. But, you can add more as needed until the color you want is achieved. It is somewhat of an art but works well. Good luck and thanks for the question. Ken.

Reply
Brad
1/16/2014 10:45:14 pm

Ken,
Thanks for the great post and detailed instructions. My project it to repair plastic cracked from a rearview mirror on a car and I came across website that said Hot glue was appropriate for this. I wanted to get some black glue sticks so I would not have to prime and paint etc.
After I saw your web site I searched on line again and found some colored sticks available (not custom colors, but i just need black). I ordered them since I hope this is a one time repair job and for 6$ probably not worth the effort to make my own.... until they shipped me "Hair extension Glue sticks". Now I am wondering what chemical composition i should be looking for to repair molded plastic trim on my vehicle?
Thanks in advance.

Reply
Ken
1/17/2014 01:04:07 am

Hi Brad,
You can still use the basic method to make the repair. Just melt an appropriate amount of a regular glue stick and add small amounts of a black crayola crayon to get the color close to the mirror frame. Use a small aluminum foil container and melt on the stove. Hope that this helps! Ken.

Reply
Samantha
3/12/2014 01:35:47 pm

Hey there, just found this tutorial and i must say very interesting!
I do have a question. I'm planning on using hot glue in a mold and I need a hot glue that is more liquid when it's melted (or I just need to use more glue in a smaller melting container, maybe?). Do you have a recommended brand or temp (high or low or multi-temp) and how long after you melt do you have to pour the glue into the mold (whether it be to reform the glue stick or into a mold of another shape)?

Reply
Ken
3/13/2014 03:06:29 am

Hi Samantha,
Your question revolves around two basic issues: Viscosity and open time, or the time you have to work before it sets. Viscosity, or inherent flow characteristics, is a function of temperature. Any of the available glue sticks,( hot melt adhesives), irrespective of its melt temperature can be heated beyond the glue gun temperature with improved flow characteristics. Of course, you can't overheat or burn it but an increase in temperature will improve flow viscosity. And, as I said in the write up, you can add paraffin wax up to about 20 % to decrease viscosity. The real problem is that these adhesives are designed to set fast so there is a relatively short set time. You can gain a little time by warming the mold. And a wax addition will also increase the set time.But, I have successfully made molds using Plaster of Paris. Hope that this helps, Ken.

Reply
Kim
3/31/2014 10:20:59 am

Thank you so much for helping me cut costs with these tips. Just found you guys. Thanks again for the free help. Kim

Reply
Kevin McKean
5/13/2014 08:45:29 am

Hey Ken, don't suppose you've ever tried making quarter-inch glue sticks with this method? I worry that the rolled wax paper is not likely to work well in a tube that small, and wonder if there's any other way to "grease" the tube (like with silicon or something ) in advance so that the paper would not be required. Best! Kevin

Reply
Ken
5/14/2014 02:29:30 am

Hi Kevin,
I have tried small diameter tubing but the viscosity is too high to successfully fill and retrieve the stick.Lowering the viscosity with wax just reduces tack. But, I did have an interesting idea to make small diameter sticks by extrusion. Add a short length of 1/4 inch tube to the end of a glue gun and make the tube long enough to allow the glue to form and not remain too hot to form a rod. Or, extrude it into isopropyl alcohol to cool it enough. Water won't work due to the density differential. I have not tried this approach but its the best idea that I have. Make the regular color stick and then extrude. Thanks for the question and comments, Ken.

Reply
Hi
2/20/2016 06:23:38 pm

Have you guys ever considered using a straw as the tube?

Reply
Flory
9/9/2014 02:58:36 pm

Okay... question, will clear glue sticks work (And more importantly harden clear) and can I use food coloring to make a translucent (Insert color here) glue stick.

Reply
Ken
9/10/2014 01:57:37 am

Hi Flory,
Yes, clear glue sticks will remain clear but you will not be able to use food color as it is water soluble. Crayola crayons will provide great color but they will not be translucent. For partial transparency you will need to find an oil soluble dye. Thanks, Ken.

Reply
David
9/19/2014 04:24:07 am

This is such a great recipe. Thank you for sharing. Going off of Flory's question, I was wondering what other ways you could color the glue sticks besides crayons. You mentioned dyes. Do you know if pigments would work? I'm trying to think of ways to have more nuanced control of the color (I use hot glue as a medium in itself for sculptures). Thank you!

Reply
Ken
9/20/2014 02:09:27 am

Hey David,
Yes, I have used pigments and even glitter when the project does not require the hot glue as a structural element. For more nuanced transparent color you might try liquid candle dye which is readily available. I have not used it but seems possible. Also, the standard glue stick (amber) does a good job of transmitting light from an LED. Just a thought! Ken.

Reply
Trever link
1/22/2015 04:44:09 am

can u give me simple instructions of the process to making it? (SIMPLE)

Reply
Ken
1/23/2015 07:49:38 am

Hi Trever,
I just re-read the instructions and the comments and just have no method to make it easier than what is described in the slide show and the comments. It really is a very simple process. Ken.

Reply
John
2/11/2015 06:17:56 pm

I just used a tube inside a tube. The inner tube is split lengthwise and can be pushed out with a dowel. took a while to build but works great.

Reply
C.Bailo link
3/19/2015 09:13:43 pm

Excellent post! It was just what I was looking for.
After a few failed attempts at using hot glue to make a custom mould for epoxy, I was looking for a way to recover the mounds of glue.
Thanks to you and all who added their comments.

Reply
Yazmin
4/16/2015 03:26:29 am

I wish you would make a video clip of the process...if you have one already, please share us the link....this will save a whole lot of money for us crafters...really great idea - thank you!!! :-)

Reply
Yazmin
4/16/2015 03:32:53 am

Please disregard my previous comment - didnt realize it was a slide show above....thanks a million for the idea ---- do you think though, if I increased the amount of wax perentage, i can make my own sealing wax sticks??? This would also help save me a lot of $$$. I dont want to create and explosion in my apartment, lol. thanks in advance for your advice :-)

Reply
Ken
4/16/2015 09:42:26 am

Hi Yazmin,
You can safely add wax to hot glue but I would suggest that you heat it slowly so it does not burn. I have seen no fumes or any problem with adding paraffin wax. Sealing wax sticks should be pretty easy. Thanks, Ken.

Reply
Yazmin
4/16/2015 09:45:59 am

Thanks Ken...really appreciate the advice ... Peace!

tere
5/28/2015 11:17:24 am

What is the Silicon spray for?kind of confused what to do with it. Lol

Reply
Ken
5/29/2015 02:56:03 am

Hi tere,
The silicone spray is used to prevent the hot glue from sticking to the outside of the tube. It is definitely an option and not needed to make the color glue sticks. I understand the confusion and will be making a video for YouTube and will add a link here in the next week. The slide show is perhaps not the best way to show the process. Thanks for the question, Ken.

Reply
James link
6/25/2015 04:59:50 pm

I just found you. Nice post!
I'm looking to make my own glue sticks in color ruby red for making glue eggs for fishing. Also for egg sucking leeches.
Do have any advice for me before I start?
Also what color would I use ?
You said any metal would work. Aluminum tubing. I hope will work?
Thank James

Reply
Ken
6/26/2015 04:12:10 am

Hello James,
If you use the standard Crayola crayons the red you need should be pretty easy to make. If you look at the cover photo at the top of the post you will see a red crayon that I made using the red crayon. I would suggest making a small test amount and use white to lighten the shade of red if needed. And yes, an aluminum tube will work just fine. Thanks for the question, Ken.

Reply
James link
6/26/2015 03:04:20 pm

Thank you Ken :)

Reply
LUNCH BRUNCH CRUNCH link
2/7/2016 11:44:49 am

Reply
JennO
7/26/2016 02:05:15 pm

Is the color of the glue stick translucent? If it is, do you think adding more crayon to the same amount of glue stick will make it more of a solid color? Or will that affect the glue?

Reply
Ken
7/26/2016 04:02:13 pm

Hey JennO,
The colored crayons are opaque and I actually have made many colors and have not seen any transparency. Hope my answer helps, Ken.

Reply
Wade
8/22/2016 04:04:45 pm

Thanks for the detailed write up Sir! - I use hot-melt for glue pulling hail damage on vehicles- I use your method to mix certain existing glue sticks to perform best in the conditions I'm working in at the time- (humidity, temperature)

Reply
Nymeria
10/2/2016 03:21:32 am

Hi,
Wanted to ask if I can make glittery glue stick or use acrylic paint in place of crayons or colored plastic pieces??

Reply
Ken
10/2/2016 10:02:13 am

Hi Nymeria,
Unfortunately acrylic paints are water based and would be incompatible with the hot glue. Plastic pieces may be OK if they melt at a low enough temperature. It may be worth trying a small test and let us know if it works and what you used. Thanks, Ken.

Reply
Vince
11/20/2016 08:27:37 am

Can this method be applied to a mini low temp glue gun?

Reply
Ken
11/20/2016 10:34:38 am

Hi Vince,
The answer is yes with a caveat or two. The smaller diameter low temperature is a little harder to pour due to the smaller diameter but very much the same as the high temperature. And the standard size is exactly the same. I would also reduce the wax amount to 5 % if you plan on reducing the viscosity as the bond strength may be lower but I have not confirmed that. Thanks, Ken.

Reply
myra
12/22/2016 06:34:04 pm

Hey ,I don't belong to a country where we easily get crayola so can I use oil pastels .

Reply
Ken
12/23/2016 03:14:46 pm

Hello Myra,
My best guess is that oil pastels will weaken the bond of the glue stick. As I recall, India has a brand of crayons called Camel, that I believe are like Crayola. Another alternative would be colored wax candles. Hope that this helps, Ken.

Reply
Sylvia
2/16/2017 01:25:47 am

can you add glitter?

Reply
Ken
2/16/2017 03:09:25 pm

Hi Sylvia,
Glitter is not a problem and works well as a decorative finish but if you are using it for bonding purposes try not to use too much as the adhesion may be less. Thanks, Ken.

Reply
Nina
4/19/2017 08:22:06 pm

Is there anything else that you can use to add color? I'don't like to make it of one or two colors. Thanks in advance.

Reply
Ken
4/20/2017 03:16:03 pm

Hi Nina,
It is a question of compatibility and the best so far is the humble crayon because it is wax and is fully compatible with the hot glue. But, candle colors that are readily available would also work and even an oil based mascara might be useful. Hope that this helps, Ken.

Reply
Mayank Sharma link
12/15/2017 04:50:07 am

Ken I'd like to feature this project in HackSpace magazine and would like to have a word. Could you please email me?

Reply
A person link
12/19/2017 01:09:09 pm

Hey, um how do I just tint made glue sticks because melting them and all that takes too much work. Thanks and please respond!

Reply
Ken
12/20/2017 10:27:20 am

To my knowledge there is no easy way to externally tint hot glue sticks. Ken.

Reply
A Person link
12/20/2017 03:03:23 pm

Ok just wondering. Thanks!

Reply
Lindzie Asuncion link
1/8/2018 03:04:31 pm

awsome diys

Reply
Hello
2/9/2018 04:07:59 pm

Hello. This is smart

Reply
Theresa Brown link
9/12/2019 12:25:49 pm

Here is a source to buy colored hot melt glue sticks for hot melt glue guns:

https://surebonder-online.com/products/colored-hot-melt-glue-sticks

Reply
Karaoke Kati
3/8/2021 02:50:44 am

With the smallest order amount at $50 for 5 lbs of only one color, I either do not have big enough crafting / DIY goals with the appropriate budget allocated, or maybe they cater to retailers who would resell orders of this size. Thankful that there are instructions here on how to make my own in small batches as needed. That cordless pro glue gun that will fit my Ryobi battery is way awesome, though!

Reply
Maria
12/10/2020 04:59:14 pm

Great job! Excellent instructions
Thank you for sharing :)

Reply
Ken
12/11/2020 04:49:18 pm

Maria,
Thanks for the comment and you can make colors that are not sold anywhere. Ken.

Reply
Bob
2/7/2021 02:03:18 pm

You have to be precise about it no matter what glue u use

Reply
Karaoke Kati
3/8/2021 02:19:54 am

Great stuff! I was looking for a way to color glue sticks so I could make a protective bead around the top of a vase so it won't chip with use over time (the rim is very delicate for some reason while the rest is sturdy). Now I have lots of ideas in mind, lead lines for stained glass windows, matching colors for all kinds of repairs, and with the crayons as the colors you literally can do any color. You can melt and mix two crayons or more to get more colors and you can add black or gray to deepen a shade, white to lighten. Endless possibilities. Thank you for putting this out there and saving me lots of trial and error time!

Reply
Larry
7/10/2022 09:51:02 pm

Just wondering? have any of you tried freezing the tube/gluestick after setting up to see if that would help it release?

Reply
Rottnlove
9/18/2024 04:01:33 am

I have multiple different color glue sticks but for customization and color adjustments I also have thermoplastic color pellets in red, yellow, blue, white and black. Another way to color your glue sticks is using mica powders and pigment powder for resin or even mica powders fingernail art.

Reply
Satyajay Mandal
1/12/2025 08:10:14 am

You must update your website @Admin

Reply


Leave a Reply.

    Author

    The author has an eclectic background in chemistry, electronics, writing, mental health, and community action...Ken

    Archives

    June 2021
    March 2020
    September 2019
    August 2018
    August 2017
    March 2017
    December 2016
    November 2016
    October 2016
    August 2016
    April 2016
    December 2015
    September 2015
    May 2015
    March 2015
    February 2015
    December 2014
    November 2014
    October 2014
    September 2014
    August 2014
    July 2014
    June 2014
    May 2014
    April 2014
    March 2014
    February 2014
    December 2013
    November 2013
    October 2013
    August 2013
    July 2013
    June 2013
    May 2013
    April 2013
    March 2013
    February 2013
    January 2013
    December 2012
    November 2012
    October 2012
    September 2012
    August 2012
    July 2012
    June 2012
    May 2012
    April 2012
    March 2012
    February 2012
    January 2012
    December 2011
    November 2011
    October 2011
    September 2011
    August 2011
    July 2011
    June 2011
    May 2011

    RSS Feed

    Categories

    All
    Acid And Bases
    Amateur Scientist
    Anodizing Aluminum
    Anthocyanin Indicator
    Ant Orientation
    Artificial Intelligence
    Bar And Cr Code
    Cable Tie
    Carbon Dioxide Fun
    Catalase And H2o2
    Chemical Art
    Cold Cathode
    Color Hot Glue Sticks
    Common Chemicals
    Copper Plating
    Cyanotype/Blueprint
    Dot Com
    Electroluminescence
    Epoxy Art
    Experiments
    Hydrogels
    Infrared Photography Basics
    Magnetic Money
    Old Textbooks
    Photograms
    Science
    Static Electricity Detector
    Technology
    Yogurt

Powered by Create your own unique website with customizable templates.