Observations
  • Home
  • Observations
  • Trendcasting
  • Odds 'n Ends
  • Science/Technology/Experiments
  • Mental Health

Make Leaf Photographs More Permanent...

8/30/2016

32 Comments

 
Picture
Video Below:
The science and art of making photographs on leaves has been around for quite a long time. In some cases, it is a fine art, and in other situations it is just a craft that is fun and challenging. But, in either instance there is one major problem; making an image that has some ability to last over time. The typical approach is to embed the leaf with the image in a clear epoxy or sandwich it between Plexiglas with UV protection. If some method of preservation is not used the image will continue to bleach when exposed to light. And, for me, the task was to come up with a simple process to stabilize the image and still maintain the image integrity. After many experiments, the process I came up with, while still a work in progress seems to work fairly well. And, there is a bit of chemistry involved, but the information on that aspect is not necessary for readers to use the information to produce leaves with images. But, here are the steps that I used to make and preserve the images:
First, the following materials will be needed: Baking soda, glycerin, and copper sulfate. The copper sulfate can be found at garden centers and hardware stores sold as root killer. The glycerin can be found at all drug stores.
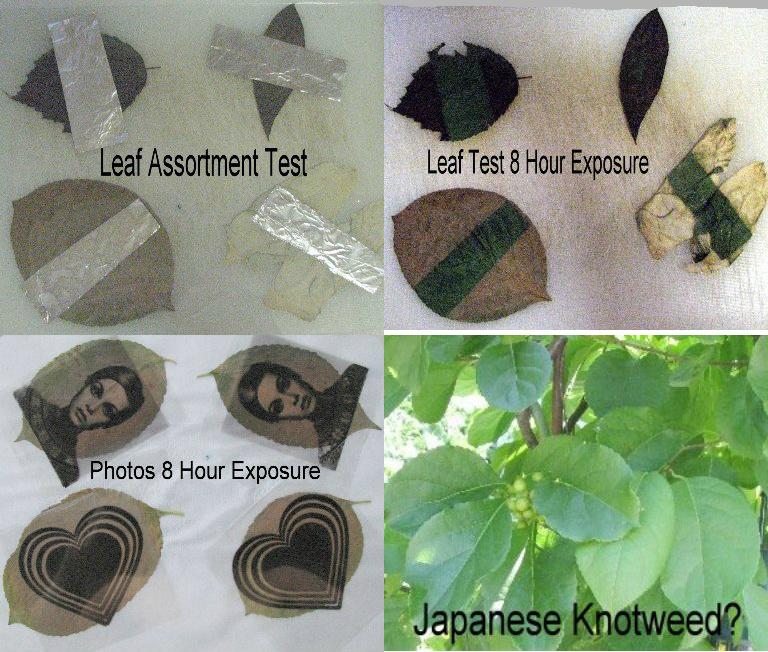
Second, gather some leaves, either from your own yard or from the super market. Place a strip of aluminum foil over each leaf and make a sandwich under glass as shown in the photos below.
Third, place the leaves in the sun and watch over time to see the bleaching of the chlorophyll. With the leaves that I selected the best were Japanese Knotweed and spinach. Some leaves will bleach in a few hours but some may bleach more slowly or not at all.
Procedure: The process is much clearer in the video but step 1 is to blanch the leaf in a slightly alkaline water solution. In a saucepan filled with enough water to cover the leaf, add just a pinch of baking soda to make the water alkaline and bring to a boil. Blanch for about two minutes. This step will maintain the color but allow the cells to be broken and air to be removed. It will also attack the magnesium in the chlorophyll so that we can replace it with a copper ion.
In the second step make a 5 % solution of water and glycerin. (For every 95 milliliters of water (3 fluid ounces), add 5 milliliters of glycerin) 0.17 fluid ounces). This is not a critical measurement but more of a guideline.  
For step 3 add a small amount of the copper sulfate so that the solution is slightly blue. This solution should be boiled for the first time to remove the air, but after that the leaf can be added to the solution when cold.
Step 4 is to add the leaf for about 2-3 minutes. Remove and if it is obviously blue it can be rinsed with water. Lay the leaf flat on a paper towel and dry. The process is complete!
Note: The process as described and illustrated in the video worked as evidenced by being able to place the treated leaf in the sun for 4 days with no further bleaching. However, I have used only a small sample of leaves and cannot predict how all chlorophyll containing materials will perform. It is also possible to use light sources other than the sun. Grow lights and fluorescent light with blue and UV light will work but take longer. The work presented is to the best of my knowledge a useful strategy for the preservation of photographic images but as mentioned, is a work in progress. Please feel free to add to this information with your own experiments and ideas.  Good luck and have some fun!
Alternative Photography leaf photography with chlorophyll Here.


Picture
32 Comments
Giovanna Lanna link
9/6/2016 01:10:18 pm

Hi. Great Post!
Can I use the quimicals more than once? If Yes, do I have to boil again?
Thank You

Reply
Ken
9/6/2016 03:27:43 pm

Giovanna,
You can reuse the chemicals but the first solution with the slightly alkaline water for blanching has to be boiling each time. The second solution with the copper sulfate just has to be boiled the first time to remove air and can be used next time cold. Just allow about 5 minutes for the copper to enter the leaf.Thanks for the question, Ken.

Reply
GIOVANNA LANNA
9/9/2016 03:21:38 pm

Thank you Ken.

I've been studying this process for a while and fixing is my worse problem. I have a few questions about why you use each chemicals.
I just got the cooper sulfate but its says on the box that it is also a fertilizer, is that correct? If you wont mind, can I ask your email so we can exchange some knowledge?
Best regards

Reply
Ken
9/10/2016 10:12:42 am

Giovanna,
The copper sulfate is also used as a fertilizer but the crystals should be blue which is the pentahydrate. Check the ingredients to confirm that there are no other chemicals in the fertilizer. As far as the process is concerned I think that the details are covered in the write up and the video. The key is to open the cell during blanching to remove air and remove the magnesium ion. In the copper sulfate step the magnesium ion is replaced with the copper which is not light sensitive in the chlorophyll. As far as sharing my email I have no problem but my preference is to have all comments posted here on the website so that all of the community can share the thoughts of our valued readers. Thanks for commenting, Ken.

Reply
GIOVANNA LANNA
9/13/2016 10:12:54 am

Hi, Ken,
sorry to ask one more thing.... I dont have a eletric oven, can I use a gas oven? if it so, there is any other alternative to the beakers?
Thank you

Ken
9/14/2016 09:34:13 am

The blanching solution which is just water and baking soda can be done in a sauce pan. The second solution can be placed in a boiling water pre-heated glass container, emptied and the copper sulfate and glycerin added. Then add boiling water slowly and the air shoud be removed, Ken.

Reply
Caroline Lacey link
9/19/2016 06:23:30 am

Hi!
Awesome stuff you are figuring. Have you left them out in the sun longer than 4 days now? Still holding up?

Reply
Ken
9/19/2016 09:13:06 am

Hi Caroline,
I now have 22 days with mostly sunny weather and some mixed cloudiness but all with substantial UV. So far there is no change and as the fall approaches I will put the samples inside in a south facing window. I feel that the experiment has been successful. Thanks, Ken.

Reply
Vargas link
10/16/2016 07:40:10 pm

thanks thanks! now im your fan!!!!
Do you try with old leafs¡ i have a lot of prints keeping on a box.
And another question, why do you think some leafs turns in black?

Reply
Ken
10/17/2016 11:14:21 am

Hi Vargas,
I have not tried the process on aged and dry leaves and I think that it may be a challenge. Because they are dry and possibly fragile they may have to be soaked in water to proceed. It would be an interesting experiment but I do not have any old prints to try. The black is most likely a mold or fungus which is typical with plant matter. Thanks for the questions, Ken.

Reply
Kay
2/18/2017 07:57:03 pm

Ken, do you think the exposing could be carried out indoors? Perhaps by using a lightbox and a flourscent bulb or one of those reptile bulbs... Maybe a sunlamp bulb?

Reply
Ken
2/19/2017 10:19:14 am

Hello Kay,
Although it is possible there are two areas of concern. The first is finding the best leaves for imaging in the winter or cold weather. The second is that the chlorophyll process requires a lot of ultraviolet light. But, if you have a good leaf candidate and a sunlamp and leave it long enough, there will be an image. However, if it is more than 12-24 hours the leaf will dry so it needs some water being fed into the stem. Thanks for the question, Ken.

Reply
Kay
2/21/2017 07:10:27 pm

Ken, I came across another leaf photography process that uses a potted plant, alcohol and iodine. I'm sure you are familiar with thks process, but for anyone who may not be, the basic procedure is in an article called 'Leaves can make photographs' by Warren B. Van Camp. I am wondering if your 'fix' would/could also 'fix' that method of leaf photography.

Ken
2/22/2017 03:27:23 pm

Hello Kay,
Sorry to say that my fix won't work with the alcohol/iodine imaging as the chlorophyll is removed leaving only the starch which will react with the iodine. My process depends on the chlorophyll nucleus magnesium being replaces by copper sulfate. And, the process you mentioned provides relatively poor images as the starch is not sufficiently reactive unless made with potassium iodide. Thanks for the question, Ken.

Reply
Kay
3/23/2017 06:57:19 pm

I'm having trouble finding the copper sulfate within a 45 mile radius in a size smaller than a large container costing nearly $20. I cannot even find a 'root killer' or a swimming pool additive with it as an ingredient. As a last resort, I did find it in a product for use in 10 gallon aquariums called Jungle No More Algae. There are 8 tablets in the box and the ingrediates as listed are... Copper sulfate pentahydrate 0.05% , diuron 0.67%, other 99.28%. The tablets are white and about the size of three 25 cent pieces stacked atop one another. Do you think the tablets would work? If so, since there will be no blue tint to watch for, how much of a tablet would you suggest I try. One tablet is supposed to treat 10 gallons of water. Thanks!

Reply
Ken
3/24/2017 09:47:47 am

Hi Kay,
Copper Sulfate Pentahydrate is the right chemical but the amount in the tablets is way too low to be effective. I am surprised that you are not able to find root killer at your local hardware store or garden center as it is so common. I did a fast search for "buy copper sulfate pentahydrate" and found 1 # on eBay for 8.94 with free shipping. I also found some on etsy for about the same price. Let me know how you proceed, and hopefully, find this material, Ken.

Reply
Vargas link
3/28/2017 07:10:01 pm

Hi!! i have a question!
At scientific level, why is the importance in attack the magnesium in the chlorophyll & replace it with a copper ion.
I supossed the step of remove air is about oxidation. But i would like to know about chemistry importance in replace ion!!
(:

Reply
Ken
3/29/2017 04:16:43 pm

Vargas,
The magnesium ion acts as an auto catalytic messenger to allow UV light (predominantly) to bleach the chlorophyll molecule. But, if replaced with a copper ion, the message is interrupted and bleaching is prevented. Thanks, Ken.

Reply
Vargas link
3/29/2017 04:26:10 pm

Thaks! i will try this week in my chemistry laboratory class. I hope to show you results coming soon

Alex
6/5/2017 11:36:36 am

Hello Ken,

First of all thanks for sharing these amazing experiments, they are remarcable as i tried myself and it works just fine.

I´m wondering if this procedure you just shown could be applied to alchoolic extracted chlorophill (green leaves) Anthotypes printed in paper? In other words, can i put my finished paper print in the 1st alkaline bath and then in the 2nd bath and expect less or non lightfastness? Thanks in advance.

Alex

Reply
Ken
6/6/2017 10:30:12 am

Hi Alex,
I have not tried to preserve paper images but my first thought is that the first bath would wash away the image unless it was extremely dense. In fact, the cells may already be broken and it will be a problem. However, if the paper stock were thick and the image deep, it may work. I would encourage you to try it and let us know how it went. We need some experiments to answer this question. Thanks a lot, Ken.

Reply
GIOVANNA LANNA
6/6/2017 05:50:26 am

Reply
Laura
10/29/2018 07:45:24 am

I'm gonna try this procedure. I think it is really nice and useful.

Reply
vandita link
3/26/2019 11:20:22 am

just a big THANK YOU first!

i have been experimenting with the chlorophyll process for last 2 years and use your process for fixing.

i find this process very individual leaf dependent. two leaves from the same plant behave so differently sometimes. there are leaves i have printed on before, but when i put the same kind of leaves out again they just turn brown, even in areas where the image is supposed to be. I wonder why that happens.

also one huge issue is moisture from the leaf settling under the plastic sheet, which makes its own imprint. any insights?

Reply
Ken
3/28/2019 11:03:00 am

Hi Vandita,
The browning indicates cell death which is normal even in the same plant. It is after all as much art as science.
The moisture is either coming from the substrate or the air through the plastic if the leaf is dry. Try a small experiment and put a dry leaf on a non-porous material and cover with glass and see what happens. You could also use a flat spry lacquer to coat the leaf. Ken.

Reply
Caroline Russell
7/30/2019 05:26:35 pm

Hi Ken!

Your video was super helpful! I followed your instructions and I think everything went well? When I checked on my leaves the next day they had a lot of blue residue on them. A wet paper towel fixed the problem, but I am wondering if I either did not rinse my leaves well enough after they were in the copper sulfate solution, or if the copper sulfate solution did not soak into the leaf. Thoughts?

Reply
Ken
8/1/2019 09:59:57 am

Caroline,
It sounds like a better rinse will solve the problem. It is unlikely that the CuSO4 was washed out. Ken.

Reply
Dani sandrini link
4/13/2020 12:46:33 pm

Hello, Ken. Thanks for your video. I would like to know if after some years, the imagens are still there.
How old is your oldest image ?

thank you

Reply
Aline link
4/19/2020 11:36:18 pm

Hello Ken ! What a beautiful work ! As I read through the comments, can you confirm that
- 1) the leave must be soaked in the -reboiled first solution (basic one) and the temperature must be high for the cells to open ? As I am working with a batch of leaves, I think the temperature drops a lot from the first leaves to be soaked in the blanching solution to the last ones !
- 2) is it okay to keep the copper sulfate bath for a long time so that I use the same container (avoiding pollution) and this solution can be at cold temperature ? thank you for your kind help !

Reply
Ken
4/20/2020 04:15:55 pm

Aline,
The temperature must be hot to open the cells and should be maintained. The copper sulfate is reusable but it works best when warm, Ken.

Reply
Hrithik Rameka
10/1/2020 05:54:15 am

Which leaves are good for chlorophyll photography ? Is there any specification to choose the leaf or all leaves work well?

Reply
Ken
10/1/2020 10:37:40 am

Hrithik Rameka,
You can use random leaves and do the test in the sun as I did in the photos to find the best in your area. Even spinach leaves worked well but they are somewhat ribbed. It takes some testing to get the best results. Ken.

Reply


Leave a Reply.

    Author

    The author has an eclectic background in chemistry, electronics, writing, mental health, and community action...Ken

    Archives

    March 2020
    September 2019
    August 2018
    August 2017
    March 2017
    December 2016
    November 2016
    October 2016
    August 2016
    April 2016
    December 2015
    September 2015
    May 2015
    March 2015
    February 2015
    December 2014
    November 2014
    October 2014
    September 2014
    August 2014
    July 2014
    June 2014
    May 2014
    April 2014
    March 2014
    February 2014
    December 2013
    November 2013
    October 2013
    August 2013
    July 2013
    June 2013
    May 2013
    April 2013
    March 2013
    February 2013
    January 2013
    December 2012
    November 2012
    October 2012
    September 2012
    August 2012
    July 2012
    June 2012
    May 2012
    April 2012
    March 2012
    February 2012
    January 2012
    December 2011
    November 2011
    October 2011
    September 2011
    August 2011
    July 2011
    June 2011
    May 2011

    RSS Feed

    Categories

    All
    Acid And Bases
    Amateur Scientist
    Anodizing Aluminum
    Anthocyanin Indicator
    Ant Orientation
    Artificial Intelligence
    Bar And Cr Code
    Cable Tie
    Carbon Dioxide Fun
    Catalase And H2o2
    Chemical Art
    Cold Cathode
    Color Hot Glue Sticks
    Common Chemicals
    Copper Plating
    Cyanotype/Blueprint
    Dot Com
    Electroluminescence
    Epoxy Art
    Experiments
    Hydrogels
    Infrared Photography Basics
    Magnetic Money
    Old Textbooks
    Photograms
    Science
    Static Electricity Detector
    Technology
    Yogurt