Observations
  • Home
  • Observations
  • Trendcasting
  • Odds 'n Ends
  • Science/Technology/Experiments
  • Mental Health

Light Box: Portable and Easy To Build!

12/10/2016

7 Comments

 
Picture
Video Below: This video is also on YouTube.

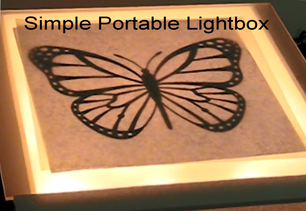
Light boxes that provide back-lighting for the purpose of tracing or drawing  have been around for many years and take as many forms as there are people who use them. However, the ones that are sold commercially are fairly expensive and not usually portable and collapsible as this one is and it can be assembled and disassembled in less than 30 seconds and stored. However, the newest ultra-thin ones are really portable but are designed for those who are commercial artists. But, the one that is presented here is for those of us who only use a light box periodically and have a need to assemble it easily and store the light box flat and out of the way.
Using simple to find and use parts such as foam board, Plexiglas, and Christmas tree lights make the build easy and still quite functional. So, as always, any questions and comments are welcomed and I will answer so feel free to comment. Enjoy!


7 Comments
Carmen
12/28/2016 07:48:21 am

I just found you! You are awesome! I work with polymerclay and I was searching for molding material and, found your channel on YouTube.
I was wondering if I can use polymerclay as a medium or, perhaps resin? Thank you so much for all you do!!

Reply
Ken
12/29/2016 03:19:53 pm

Hi Carmen,
Thanks for joining our family of people who like to share. Unfortunately, I am not sure exactly what your question is. How is it that you want to use the polymer clay and what is the desired result? I will be happy to help as I have more information to consider. Thanks, Ken.

Reply
Christina G
6/15/2018 11:59:14 pm

Hello Ken, me again! As I was watching your video, my brain exploded with ideas. What if..... you used heavy cardboard, and wire hangers support frames, to create a Plexiglas size "shoe box". I will try to explain what I am seeing in my head. Take a large piece of heavy cardboard, place the Plexiglas in the middle and trace around the edges. Cut another piece of cardboard and glue it inside the lines you just traced for extra support. Then for each side fashion hangers into rectangles, that are appropriate sizes, and hot glue onto each side against the inside support piece. Then fold over the cardboard on each side, cut to size and glue in place. You now have the bottom and 4 sides all in one piece. Now for the top. I would use steel wool and fingernail polish remover on one side, rubbing in circles until you have an opaque surface. Trace around the Plexiglas onto another piece of heavy cardboard. Draw another line about 1" inside the first one and cut out the middle then fold the sides up like a shoe box lid and hot glue together. Glue the smooth side of the Plexiglas to the cardboard lid. Cut a several pieces of cardboard about 3/4' x 6' and glue them together. then, Glue that bundle to the plexiglas inside the lid, leaving a gap for the sides to fit in. This will prevent the sides from falling inside while you are using the light box, do this for each side. cover the bottom in foil, and glue down the lights. I agree with Ken, you should use LED lights to reduce heat. Fold the sides up when in use, fold down when not. Rubber band or tie a string around the folded down sides with the lid on top, and it becomes its own storage box. ~ Cost... Cardboard (free), Hangers (free), 11"x 14' Plexiglas sheet $6.00 (at my local big chain hardware store), LED lights $3.50 (dollar store), other supplies nominal. Total= less then $10.00.

I don't know if my instructions make sense, but I can see it in my head, lol. This is just another idea how to make a light box, inspired by your video.

Thanks an awful lot Ken, for sharing your creative mind, and inspiring so many projects and ideas!

Reply
Christina G
6/16/2018 12:01:20 am

Oh Ya... I have always wanted one of these, but didn't want to pay the high prices they are charging and I never thought of making my own. Yay for saving money and thanks for the idea!

Reply
Ken
6/22/2018 04:18:54 pm

Christina,
Go for it and if you finish it send a photo to my email and I will post it.
ken.quast@gmail.com

Ken
6/22/2018 04:15:58 pm

Hi Christina,
The idea is viable and should work well but I have some thoughts. First, us Plexiglas at least 1/4 thick to avoid distortion. Second, don't use nail polish remover (acetone) as it will heal the abrasion. I have found that using number 0 steel wool at first using slow strokes and overlapping and then using triple 0 and stroking faster in the same direction works well and provides translucent surfaces. But be sure to stroke all the way across to be uniform. Circles are non-uniform.

Reply
light box link
5/16/2022 08:49:54 am

Usually I never comment on blogs but your article is so convincing that I never stop myself to say something about it. Really helpful.

Reply


Leave a Reply.

    Author

    The author has an eclectic background in chemistry, electronics, writing, mental health, and community action...Ken

    Archives

    June 2021
    March 2020
    September 2019
    August 2018
    August 2017
    March 2017
    December 2016
    November 2016
    October 2016
    August 2016
    April 2016
    December 2015
    September 2015
    May 2015
    March 2015
    February 2015
    December 2014
    November 2014
    October 2014
    September 2014
    August 2014
    July 2014
    June 2014
    May 2014
    April 2014
    March 2014
    February 2014
    December 2013
    November 2013
    October 2013
    August 2013
    July 2013
    June 2013
    May 2013
    April 2013
    March 2013
    February 2013
    January 2013
    December 2012
    November 2012
    October 2012
    September 2012
    August 2012
    July 2012
    June 2012
    May 2012
    April 2012
    March 2012
    February 2012
    January 2012
    December 2011
    November 2011
    October 2011
    September 2011
    August 2011
    July 2011
    June 2011
    May 2011

    RSS Feed

    Categories

    All
    Acid And Bases
    Amateur Scientist
    Anodizing Aluminum
    Anthocyanin Indicator
    Ant Orientation
    Artificial Intelligence
    Bar And Cr Code
    Cable Tie
    Carbon Dioxide Fun
    Catalase And H2o2
    Chemical Art
    Cold Cathode
    Color Hot Glue Sticks
    Common Chemicals
    Copper Plating
    Cyanotype/Blueprint
    Dot Com
    Electroluminescence
    Epoxy Art
    Experiments
    Hydrogels
    Infrared Photography Basics
    Magnetic Money
    Old Textbooks
    Photograms
    Science
    Static Electricity Detector
    Technology
    Yogurt