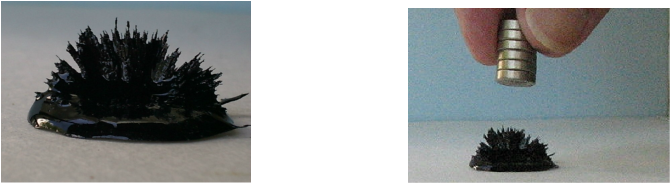
Epoxy is one of the primary adhesive technologies and is used extensibility in industry and in households around the world. It is available as one- part, two- part, paste, and with variable set times. It can help build, repair, and form castings to encase items for show. A very versatile material as an adhesive. But, like everything I see, I want to use it in a way that it was not really intended. So, the photo above shows the capture of a magnetic force in 3D.
I used a two- part 5 minute set epoxy (Devcon), but any quick set should work. I mixed a black pigment into the epoxy and then added the hardener. I had some epoxy pigments for coloring epoxy from TAP plastics, but any enamel paint, or shavings from oil pastels will work. I then added some iron filings purchased at a local toy store. But water soluble dyes fail to work so food coloring is not usable. And, in fact, no color is necessary to show the effect. I let the epoxy set for about three minutes to increase the viscosity and then placed the magnets near the epoxy and the particles were attracted to the magnet. Holding for another minute and the epoxy form was set.
I used a two- part 5 minute set epoxy (Devcon), but any quick set should work. I mixed a black pigment into the epoxy and then added the hardener. I had some epoxy pigments for coloring epoxy from TAP plastics, but any enamel paint, or shavings from oil pastels will work. I then added some iron filings purchased at a local toy store. But water soluble dyes fail to work so food coloring is not usable. And, in fact, no color is necessary to show the effect. I let the epoxy set for about three minutes to increase the viscosity and then placed the magnets near the epoxy and the particles were attracted to the magnet. Holding for another minute and the epoxy form was set.
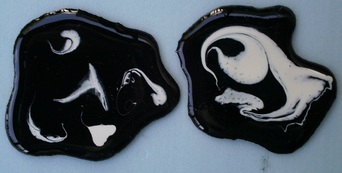
This photo shows a combination of two colors blending together. I just dropped a little white mix onto the black still unset epoxy. I then used a toothpick to make swirls. I just had to go fast and probably should have used a slow set epoxy. It sort of looks like enameling. Both of these ideas are really crude and need refinement. But I wanted to post so others can try these ideas or discover others. As they say "beauty is in the eye"...
 RSS Feed
