There is now a video overview on YouTube Here.
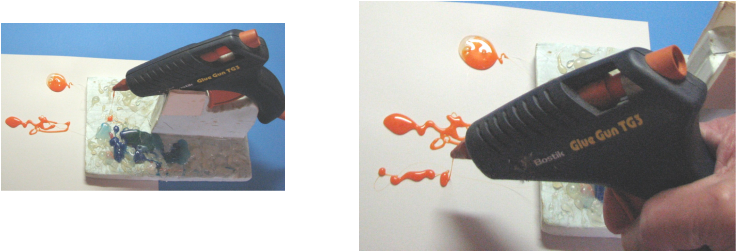
Hot glue guns and hot melt adhesives are a part of most homeowners, hackers, and craft folk’s arsenal. Generally speaking, they are an effective way to bond a variety of surfaces. But what happens when you want some color other than clear or amber? Well, you can buy color glue sticks with a limited range of color at a high price, or follow this project and make virtually any color as needed. The slideshow is intended as a guideline for making a limited number of hot glue sticks at one time. It is not intended as a method for mass production.
Domestic hot glue adhesives are all over the map in composition, open time, tack, viscosity, and bond strength. Many are based on ethylene-vinyl acetate with added modifiers. The two sizes most easily acquired are 11 mm, (7/16"), (.43”), and 7mm, (9/32"), (.28”) diameters. The standard length is 4”. For this demonstration I am using standard “Surebonder All Purpose Glue Sticks”, 11mm, the most commonly available size. But, there is the opportunity for experimentation with all of these hot glue adhesives. The key to this process is the Reynold's parchment paper which is coated on both sides with silicone. It is food safe and performs up to 420 Fahrenheit. It is a great release agent for hot glue.
CAUTION: Hot glues guns operate at close to 400 Fahrenheit and can cause burns. This project is not for children, but for responsible, safety conscious adults. There is more surface area when heating in an open container and more fumes as well. Due to the unknown composition of hot glue adhesives it would be advisable to do this project in a well ventilated area.
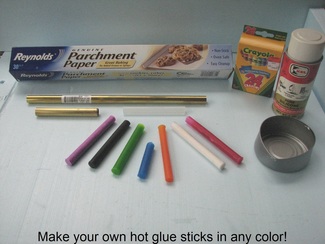
Parts and pieces:
Hot glue guns and hot melt adhesives are a part of most homeowners, hackers, and craft folk’s arsenal. Generally speaking, they are an effective way to bond a variety of surfaces. But what happens when you want some color other than clear or amber? Well, you can buy color glue sticks with a limited range of color at a high price, or follow this project and make virtually any color as needed. The slideshow is intended as a guideline for making a limited number of hot glue sticks at one time. It is not intended as a method for mass production.
Domestic hot glue adhesives are all over the map in composition, open time, tack, viscosity, and bond strength. Many are based on ethylene-vinyl acetate with added modifiers. The two sizes most easily acquired are 11 mm, (7/16"), (.43”), and 7mm, (9/32"), (.28”) diameters. The standard length is 4”. For this demonstration I am using standard “Surebonder All Purpose Glue Sticks”, 11mm, the most commonly available size. But, there is the opportunity for experimentation with all of these hot glue adhesives. The key to this process is the Reynold's parchment paper which is coated on both sides with silicone. It is food safe and performs up to 420 Fahrenheit. It is a great release agent for hot glue.
CAUTION: Hot glues guns operate at close to 400 Fahrenheit and can cause burns. This project is not for children, but for responsible, safety conscious adults. There is more surface area when heating in an open container and more fumes as well. Due to the unknown composition of hot glue adhesives it would be advisable to do this project in a well ventilated area.
Parts and pieces:
- Brass tube 12 inches long, 17/32" diameter, .014 wall thickness. K&S Engineering Stock# 140 . Available at Ace and True Value hardware as well as others. K&S home here:
- Reynold's Parchment Baking Paper. Others may work but this is the one that I used.
- Silicone spray (Optional but helpful to protect tube exterior and other surfaces from unwanted hot glue adhesion.
- Standard hot glue sticks for melting.
- Color crayons. I used Crayola.
- Disposable metal container for melting and mixing hot glue. I used a tuna can fashioned with a pouring spout.
Tips and tricks:
If there is difficulty with pouring, make a silicone funnel as shown. You can also make a cardboard funnel with a parchment paper insert if no silicone funnels are available. Silicone seems to be the best material for release properties. You can also add up to 10% by weight of paraffin wax to reduce the viscosity without sacrificing bond strength. Preheating the tube while heating the glue/color can buy you a little more pour time. Let filled tube cool about 20 to 30 minutes and disassemble. Parchment paper can be reused many times.
Before cutting the tube, wrap a glue stick in the parchment paper and push it beyond where you will make the cut. This will reduce the depression made by the tubing cutter.
There may be some variability in the tubing ID so making the parchment paper longer will decrease the finished stick diameter.
As in any additive color system, white crayon can be added to lighten the color.
Good luck and let me know if I can improve the process. Thanks, Ken...
 RSS Feed
